Share the post "Against A Wall + Agility Ladder Soccer Drills"
Soccer drills against the wall are a good way to practice soccer on your own or increase variations of ball movement.
An Agility ladder will help you build muscles and increase your flexibility, which is important when on the field.
There’s a combination of drills here to get you started!
Against A Wall + Agility Ladder Soccer Drills
4 Cone Wall Passes: Soccer Drill
Drill Outline
- Drill Name: 4 Cone Wall Passes
- Session Length: 10 minutes
- Age Group: all ages
- Number of players: 1
- Skills learned: Quick passing, first touch, ball control, weak foot
- Equipment: 4 cones, 1 ball, 1 wall
Drill Setup
- Set up this drill in front of a wall. If you don’t have a wall or hard fence, you can tip a fence on its side and use the seat as the rebounding surface.
- Place 4 cones in a line approximately 1 yard apart, 5 yards from the wall.
- P1 stands on the right side of the cone line with the ball at their feet.
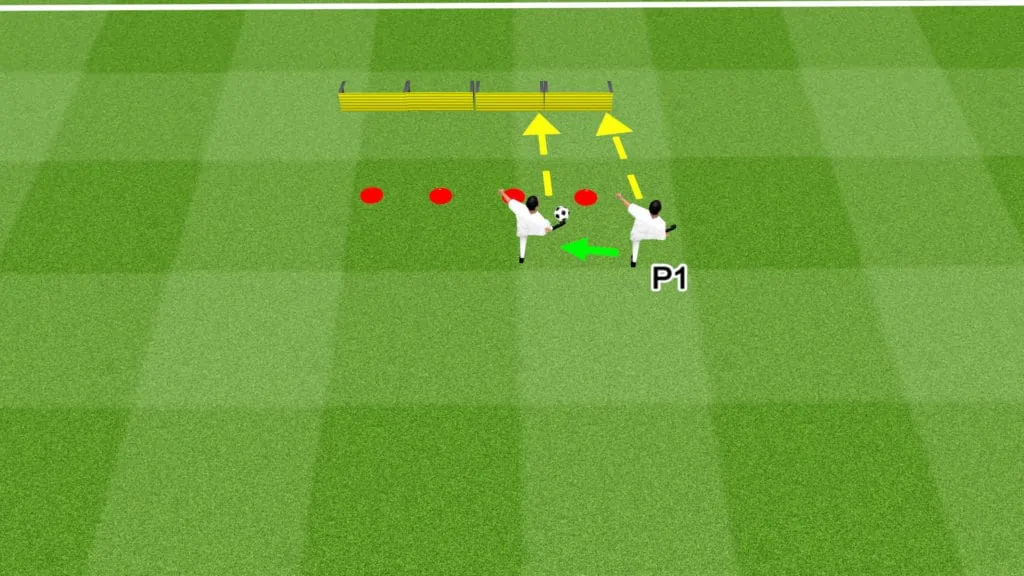
Drill Instructions
- As a warmup and to get accustomed to how the ball rebounds against the wall, P1 should play a number of short wall passes. They should focus on getting the power and placement right, ensuring the ball returns straight to them at a controllable height and pace.
- P1 starts the drill by passing the ball against the wall.
- When the ball returns, P1 takes a touch, taking the ball to the opposite side of the cone before playing the next wall pass.
- P1 repeats the steps until they reach the end of the grid. P1 then completes the drill from the opposite side.
- P1 repeats the entire process 5 times, then takes a 1-minute break before performing the drill a further 2 times (3 times in total).
Drill Variations
- Increase or decrease the distance between the cones and the wall to practice different passing ranges.
- In the beginning, P1 should focus on taking their first touch with the inside of their foot for maximum control. After a while, they can practice using different parts of the foot, like the sole or the outside of the foot.
- Reduce or increase the number of drill repetitions according to the need and skill set of the player.
Back & Forth Wall Passes: Soccer Drill
Drill Outline
- Drill Name: Back & Forth Wall Passes
- Session Length: 10 minutes
- Age Group: all ages
- Number of players: 1
- Skills learned: Range of passing, first touch, weak foot, movement
- Equipment: 4 cones, 1 ball, 1 wall
Drill Setup
- Set up this drill in front of a wall or fence.
- Place 1 cone, 2 yards from the wall.
- Place 3 more cones, 2 yards apart, in line with the first, creating a perpendicular cone grid to the wall. The final cone should be 8 yards from the wall.
- P1 stands with the ball at their feet at the furthest cone.
Drill Instructions
- P1 should warm up with wall passes to get a feel for how the ball reacts.
- P1 starts to the right of the furthest cone by playing a firm pass against the wall. P1 should try to make sure the ball rebounds to their feet on the same side, without having to alter their position too much.
- When the ball returns, P1 takes a touch, taking the ball to the opposite side of the cone before playing the next wall pass.
- After playing the pass, P1 moves forward toward the next cone before receiving the rebound.
- When the ball returns, P1 takes a touch, taking the ball to the opposite side of the cone before playing the next wall pass.
- P1 then moves forward to the next cone to receive the rebound and play the next pass.
- After reaching the cone closest to the wall, P1 then repeats the drill in reverse.
- P1 completes the entire drill 5 times, takes a 1-minute break, then repeats 2 more times (3 in total).
Drill Variations
- Increase or decrease the distance between the cones and the wall to practice different passing ranges.
- Reduce or increase the number of drill repetitions according to the need and skill set of the player.
Multiskill Drill: Soccer Drill
Drill Outline
- Drill Name: Multiskill Drill
- Session Length: 10 minutes
- Age Group: 7+
- Number of players: 1
- Skills learned: Passing, dribbling, first touch, shooting
- Equipment: 1 goal, 8 cones, 1 ball, 2 rebounding surfaces (wall, bench, fence)
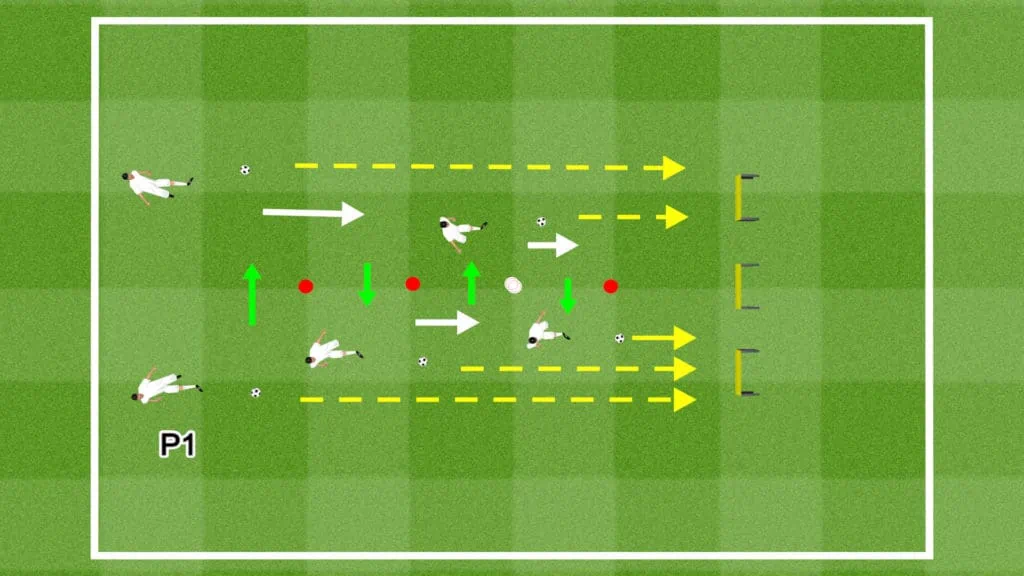
Drill Setup
- You need a grid of approximately 20 square yards for this drill.
- Set up the drill as shown in the graphic.
- A mini goal works well for this drill or a small goal made from cones.
- The distance between the cone weave drill should be 2 yards, enabling the dribbler to move through it at speed.
- If you don’t have a wall or rebounding surface, skip the passing sections of the drill.
- P1 begins the drill at the starting cone with the ball at its feet.
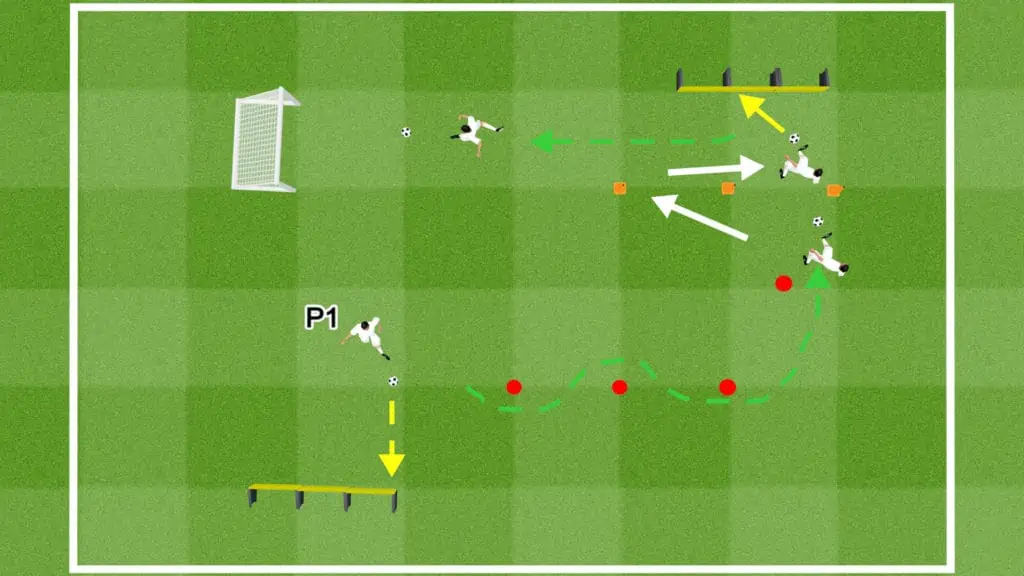
Drill Instructions
- P1 starts the drill by playing a one-two wall pass with themselves.
- P1 then dribbles at speed through the cone weave, then around the next cone.
- At the next station, P1 rolls the ball through the narrow cone gate.
- After rolling the ball, P1 sprints toward the cone to their left then check the run and recollects the ball.
- P1 plays another one-two wall pass.
- P1 takes 1 or 2 touches to get the ball under control, then takes a shot on goal.
- P1 completes the entire drill 5 times, takes a 1-minute break, then repeats the full routine 2 more times (3 times in total).
Drill Variations
- TIme each round and record the fastest ones.
- Focus on using both strong and weak feet for certain rounds.
- Increase the distance between the cones and stations to work on conditioning.
Dribble Weave – Speed Ladder: Soccer Drill
Drill Outline
- Drill Name: Dribble Weave – Speed Ladder
- Session Length: 5 minutes
- Age Group: all ages
- Number of players: 1
- Skills learned: Dribbling, quick feet
- Equipment: 4 cones, 1 ball, 1 speed ladder
Drill Setup
- Place a speed ladder on the ground.
- Set up a 4-cone dribbling weave the same length as the ladder.
- P1 begins at one end of the cone weave.
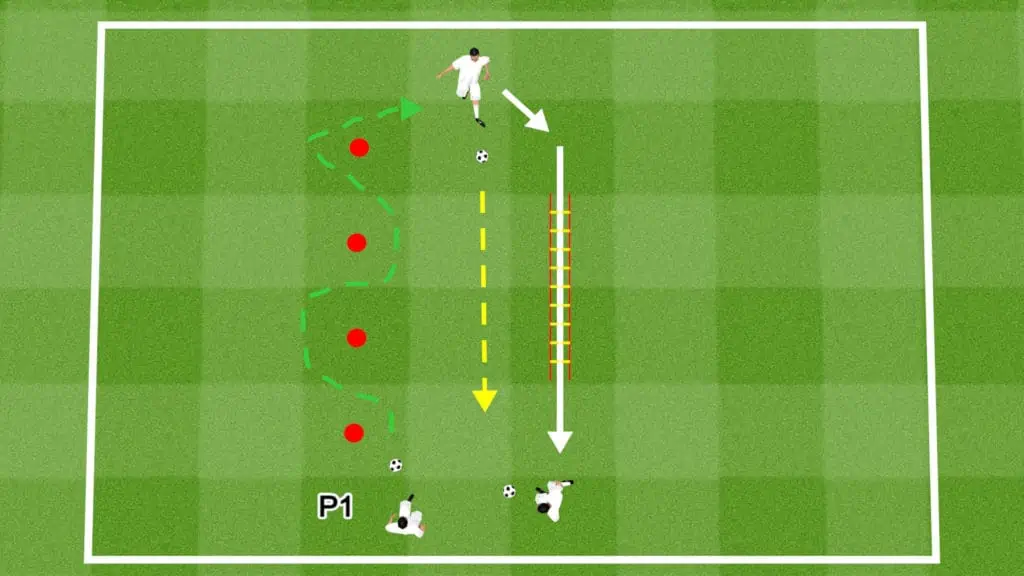
Drill Instructions
- P1 starts by dribbling through the cone weave.
- When they reach the end, P1 passes the ball lightly between the cone and the ladder from one end to the other.
- As soon as they make the pass, P1 sprints through the speed ladder.
- P1 then collects the ball and dribbles through the cone weave, repeating the drill again.
- P1 completes the drill 10 times, takes a 1-minute break, then repeats the full routine 2 more times (3 in total).
Drill Variations
- Focus on right foot dribbling only for some rotations.
- Focus on left foot dribbling only for some rotations.
- Perform different movements through the speed ladder.
Speed Dribbling: Soccer Drill
Drill Outline
- Drill Name: Speed dribbling
- Session Length: 5 minutes
- Age Group: all ages
- Number of players: 1 to 18
- Skills learned: Dribbling quickly, dribbling over long distances, turning with the ball, fitness & conditioning
- Equipment: 3 balls (minimum) per player, 3 cones
Drill Setup
- The area between the edge of the penalty box and the halfway line is the perfect space for this drill. Alternatively, create a 35-yard grid.
- Place 1 cone on the corner of the penalty box, 1 on the other corner, and 1 on the center circle
- Place multiple balls next to the cones positioned along the edge of the penalty box.
- If there are enough players, divide teams into 2 groups.
- P1 and P2 start the drill at the penalty box cones.
- The rest of the players wait and watch until the round is over.
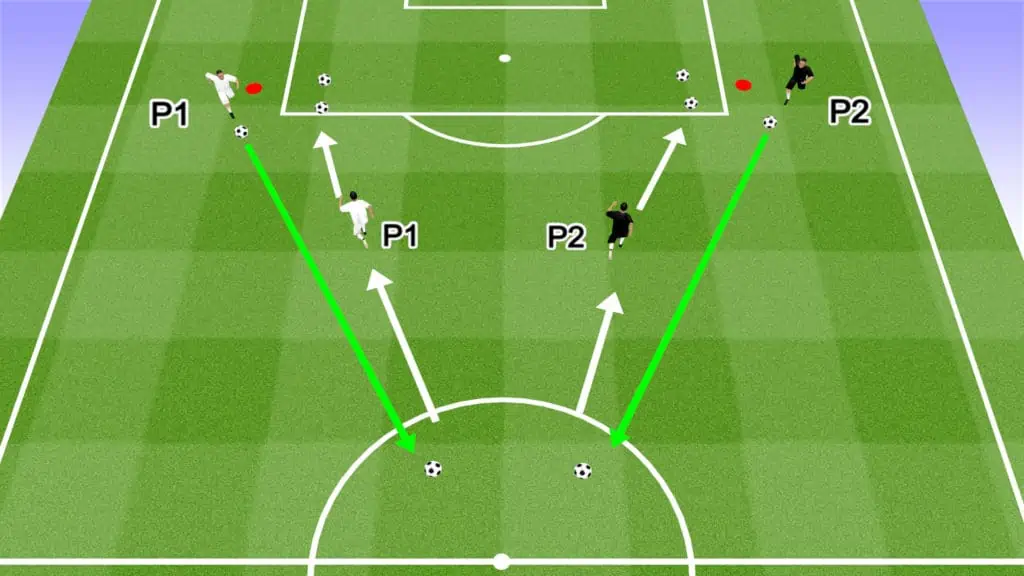
Drill Instructions
- On the coach’s signal, P1 and P2 dribble as quickly as they can toward the center circle.
- The players should focus on taking big touches, and playing the ball ahead of themselves so they can move quickly. However, they must also maintain control of the ball.
- When they reach the center circle or the cone on the halfway line, the players stop the ball dead.
- P1 and P2 then sprint back to the starting position and get a second ball.
- Repeat the drill until each player has left 3 balls in the center.
- When the round is over, return the balls to the starting point.
- The next 2 attacking players begin the second round on the coach’s signal.
Drill Variations
- Create a competition between the groups to see who can complete each round the fastest.
- Focus on the right foot dribbling only for a round.
- Focus on left foot dribbling only for a round.
- Limit the number of touches a player can take between the starting point and the center.
Fitness Course: Soccer Course
Drill Outline
- Drill Name: Fitness Course
- Session Length: 10 minutes
- Age Group: all ages
- Number of players: 1 to 18
- Skills learned: Sprinting, quick feet, lateral movement, back peddling, conditioning
- Equipment: 7 cones, 1 speed ladder, 5 agility poles
Drill Setup
- Set up the drill as shown in the graphic
- The distance between the first 2 cones should be around 10 yards.
- The distance between the end line and the ladder should be around 15 yards.
- The distance between the ladder and the next cone should be 5 yards.
- Create a staggered formation with the agility poles.
- All players line up behind P1 at the first cone.
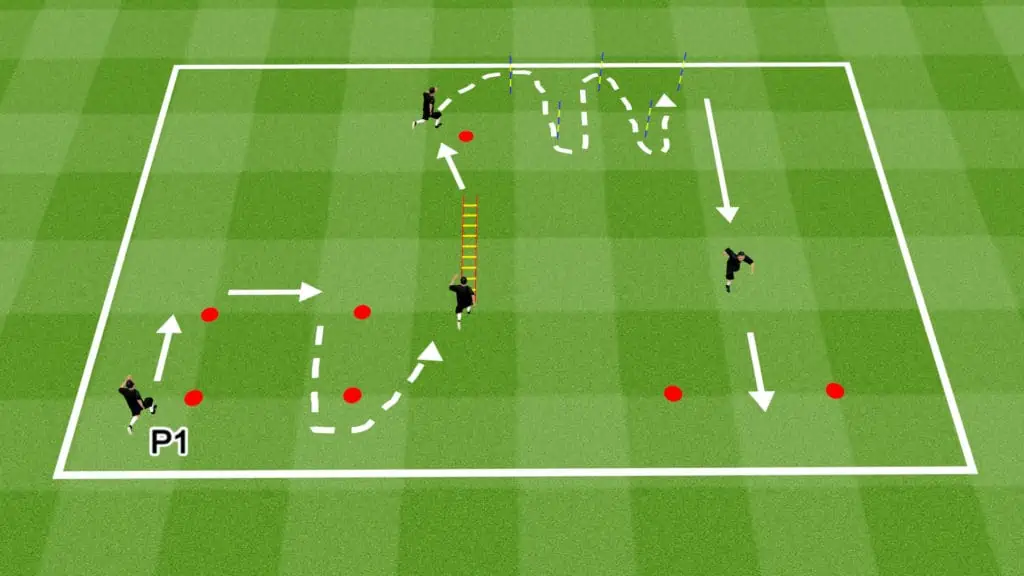
Drill Instructions
- On the coach’s signal, P1 sprints to the first cone, then side-steps quickly to the cone on their right.
- At the cone, P1 back peddles to the cone behind it.
- P1 rounds the cone and then sprints to the ladder.
- P1 sprints through the ladder, using quick feet and ensuring both feet enter each ladder square.
- P1 sprints, then around the next cone, before gliding through the agility poles.
- After rounding the final agility pole, P1 sprints to the finishing gate.
- P1 rejoins the line.
- All players must complete 5 rounds.
- The next player in line starts the drill when the person ahead hits the ladder section.
Drill Variations
- Depending on fitness levels, reduce or increase the number of rounds each player must perform.
- Create competition by timing each player’s lap. They will have to go one at a time for accurate timekeeping.
Share the post "Against A Wall + Agility Ladder Soccer Drills"
Joel is a seasoned soccer journalist and analyst with many years of experience in the field. Joel specializes in game analysis, player profiles, transfer news, and has a keen eye for the tactical nuances of the game. He played at various levels in the game and coached teams - he is happy to share his insight with you.