Share the post "Heading Soccer Drills (Attacking and Defending Techniques)"
Heading in soccer is an advanced skill, it does take years to practice, and perfect. Just a simple flick with the head is a great start.
Heading practice is more suited for players who are in high school and above. The following drills give you a variation of practice to be used in any part of the field – my favorite drill is soccer tennis, a combination of volleying and heading.
Check out the following heading drills to improve your game.
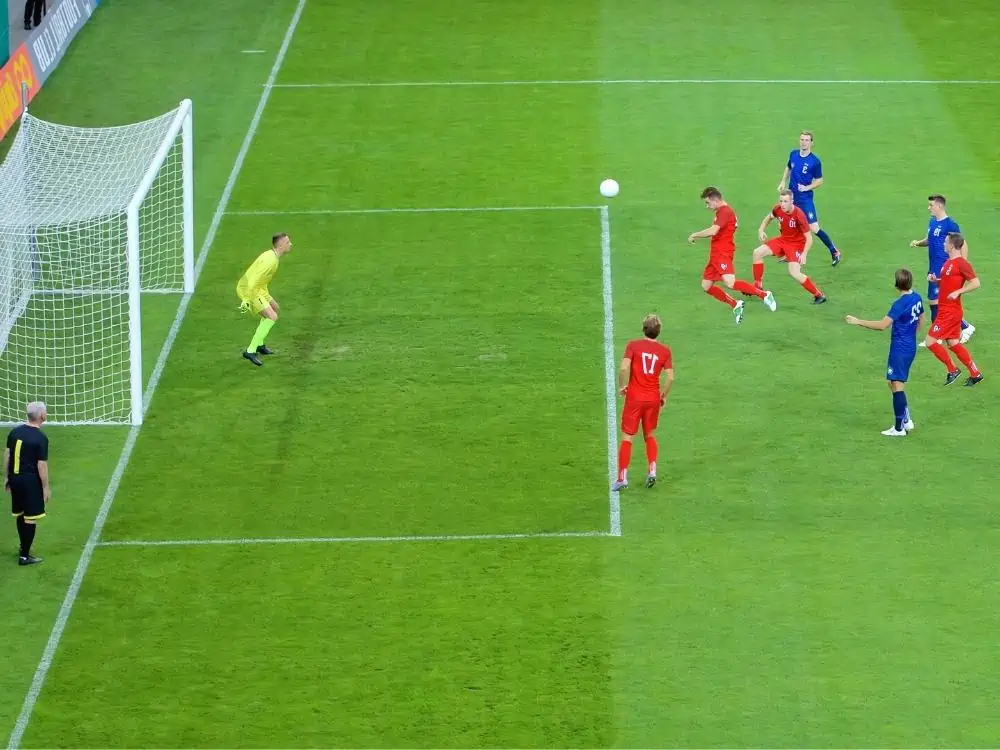
Heading Soccer Drills
Standing and Jumping Headers: Soccer Drill
Drill Outline
- Drill Name: Standing and Jumping Headers
- Session Length: 5 minutes
- Age Group: All age groups (according to health recommendations in your area)
- Number of players: 3 to 18
- Skills learned: Standing and jumping headers
- Equipment: 1 ball (minimum), 6 cones
Drill Setup
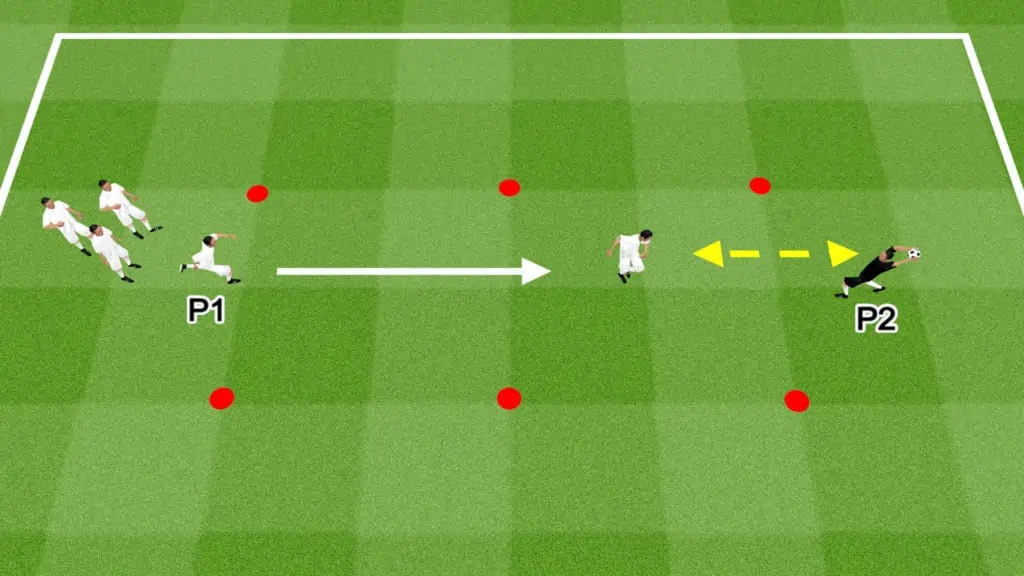
- Build 3 parallel gates, 5 yards apart using cones. This creates the heading channel.
- P1 stands on one end of the channel.
- The rest of the team lines up behind P1.
- P2 stands on the other end of the channel.
- Place multiple balls next to P2.
- P2 starts the drill with the ball in their hands.
- If you have more than 8 players, set out another heading channel.
Drill Instructions
- P1 runs down the channel toward P2.
- When P1 reaches the second gate, they stop and wait for the pass.
- P2 throws a lofted pass toward P1’s head.
- P1 completes a standing header back to P2.
- Instruct players to use the correct heading technique, keeping their eyes on the ball and making contact with their forehead.
- The focus of the drill is on accurate headers.
- After completing the header, P1 slides outside the channel and shuffles backward toward the starting point.
- The next player repeats P1’s steps.
- Rotate the thrower occasionally.
Drill Variations
- The first round practices standing headers.
- For the second round, practice jumping headers. Instruct the throwers to loft the ball high in the air.
- The heading players must learn to time their jump to make optimal contact with the ball.
6 Yard Headers On Goal: Soccer Drill
Drill Outline
- Drill Name: 6 Yard Headers On Goal
- Session Length: 5 to 10 minutes
- Age Group: All age groups (according to health recommendations in your area)
- Number of players: 3 to 18
- Skills learned: Powerful, accurate, and diving headers
- Equipment: 1 ball (minimum), 3 cones, 1 goal
Drill Setup
- If you have a goalkeeper, set up a full-size goal. If not, create a small goal using cones.
- The penalty box is a perfect space to run this drill.
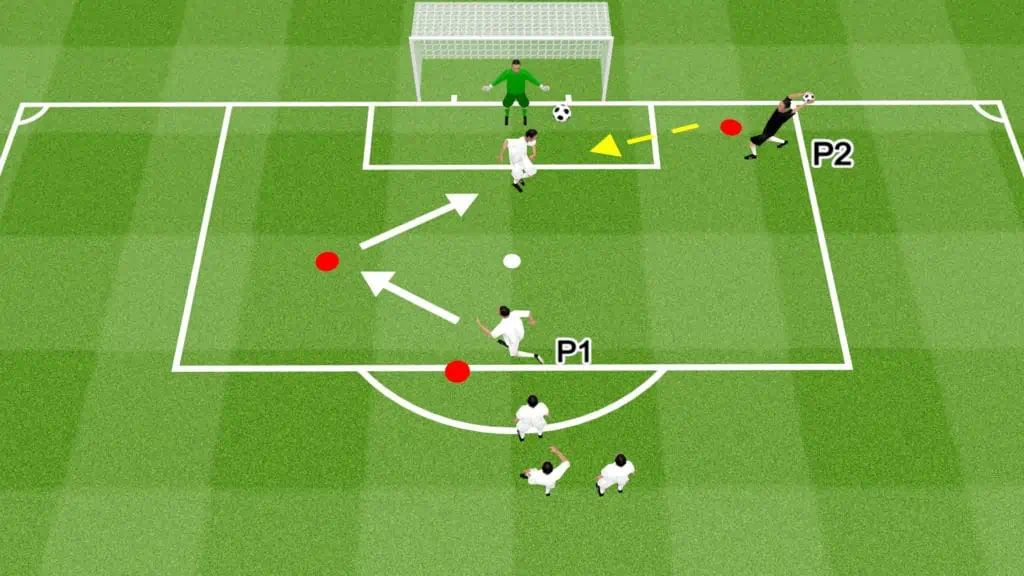
- Place 1 cone centrally at the edge of the penalty box.
- Place 1 cone 5 yards to the left of the penalty spot.
- Place 1 cone a couple of yards to the right of the six-yard box.
- P1 stands at the cone on the edge of the box. The rest of the team lines up behind them.
- P2 stands at the cone near the six-yard box.
Drill Instructions
- P1 runs toward the cone to their left, simulating a back post run.
- Once they reach the cone, P1 quickly changes direction and sprints centrally toward the six-yard box.
- P2 throws the ball in front of P1.
- P1 times the flight of the ball and heads it at the goal.
- Depending on the trajectory of the pass, P1 may have to jump or dive to make good contact.
- The focus should be on making good contact with the ball and executing powerful and accurate headers on goal.
- The goalkeeper does not try to intercept the pass but they can try to save the shots.
- Rotate the thrower occasionally.
Drill Variations
- Adjust the position of the cone inside the box, alternating dummy runs.
- Focus on headers from different positions, including the front post, back post, and centrally.
- Focus on diving headers for a round.
Fun Heading Warmup Drill: Soccer Drill
Drill Outline
- Drill Name: Fun Heading Warmup Drill
- Session Length: 5 minutes
- Age Group: All age groups (according to health recommendations in your area)
- Number of players: 6 to 18
- Skills learned: Standing and jumping headers, agility, blocking
- Equipment: 2 balls (minimum), 4 cones, 2 agility poles
Drill Setup
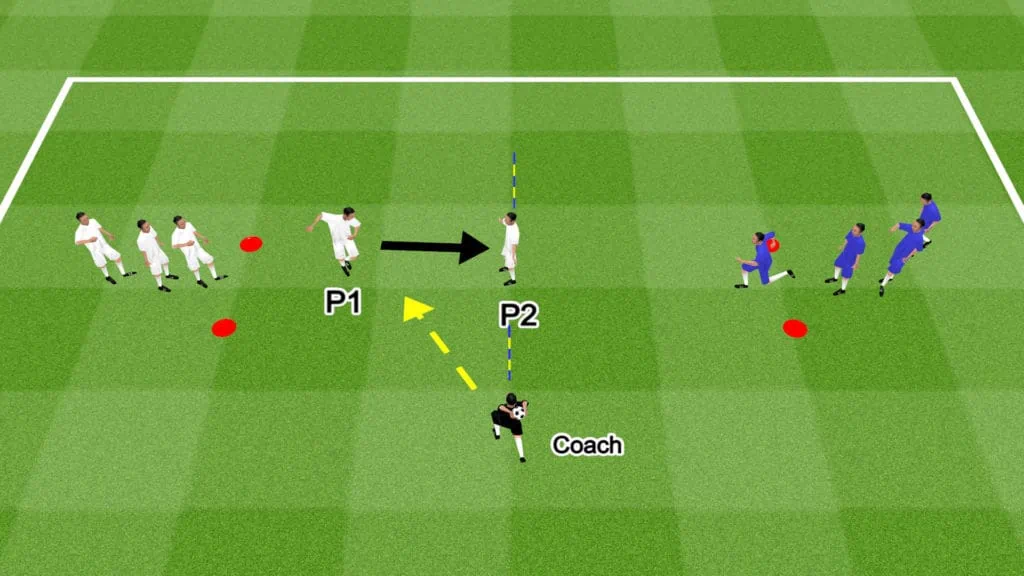
- Create a narrow gate by placing 2 cones 3 yards apart.
- Create an identical narrow gate 10 yards parallel from the first.
- Create a 5-yard gate using 2 agility poles halfway between the narrow gates.
- P1 starts between the agility poles.
- Divide the rest of the team into 2 even groups.
- 1 group lines up behind gate 1, and the other group lines up behind gate 2.
- The coach stands outside the playing grid next to the agility polls with multiple balls.
Drill Instructions
- P2 starts the drill by running toward the agility cones while calling for a pass from the coach.
- The coach throws the ball toward P2.
- P2 heads the ball, attempting to score between the agility poles.
- P1 tries to block the header without using their hands.
- P2 then takes P1’s position between the poles and the drill is repeated from the opposite side.
- This is a fun, fast-paced drill so encourage the players to enjoy themselves while working hard.
Drill Variations
- Create a last-player standing tournament. If a player doesn’t score their header, they are out of the game. The drill continues until there is only 1 player returning.
- Adjust the distance between the poles to make it easier or harder to score.
- Divide the team into pairs and repeat the drill.
Soccer Tennis: Soccer Drill
Drill Outline
- Drill Name: Soccer Tennis
- Session Length: 15 to 20 minutes
- Age Group: all ages
- Number of players: 2 to 16
- Skills learned: Heading, ball control, first touch
- Equipment: 1 ball, 1 net, 4 cones per match
Drill Setup
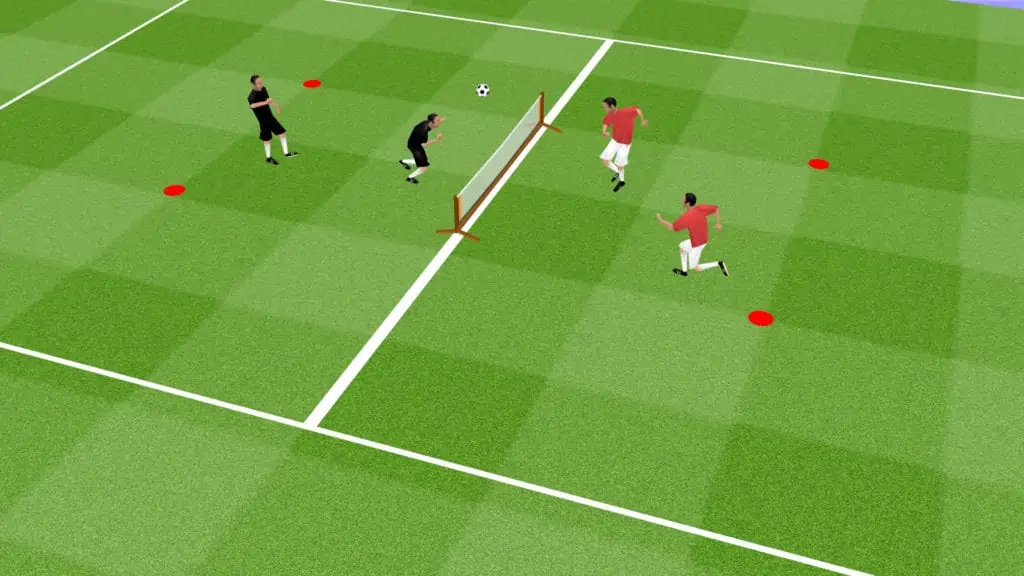
- Soccer tennis can be played 1 v 1, 2 v 2, or 3 v 3.
- Each court is 15 yards long and 10 yards wide. The net is 1 to 1.5 yards high.
- Depending on the number of players, you can set up multiple courts.
- Decide on the type of match-ups to run and divide the players into teams if necessary.
Drill Instructions
- A match starts with a serve from behind the baseline, outside of the court. Players serve by kicking, heading, or striking the ball with any body part other than the arms or hands.
- For a serve to be legal, the ball must pass over the net and touch the opponent’s half of the court or an opposition player.
- Like tennis, the objective is to score points by bouncing an unreturnable shot into your opponent’s half.
- The team that scores always takes the next serve.
- The ball may skim the net on the way over.
- If a player touches the net, a point is awarded to the other team.
- Each team has a maximum of 5 touches to return the pass. Each player can take a maximum of 2 consecutive touches.
- The ball can bounce once per play.
- A set is won when a team reaches 11 points. However, a team must win by 2 clear points.
- If a team reaches 15 points, they win the set, regardless of the points difference.
Drill Variations
- Create a tournament. Consider doing 1 v 1, 2 v 2, and 3 v 3 tournaments.
- Reduce the number of touches per team.
- Limit individual touches to 1.
- Shorten the court and play head tennis only.
- Play the best of 3 sets to determine the winner.
- Create a rule where all players on a team must touch the ball before it can be returned.
Front post flick: Soccer Drill
Drill Outline
- Drill Name: Front post flick
- Session Length: 10 to 15 minutes
- Age Group: 12+
- Number of players: 5 (minimum)
- Skills learned: Crossing technique, positioning, tactical play
- Equipment: 1 goal, multiple balls
Drill Setup
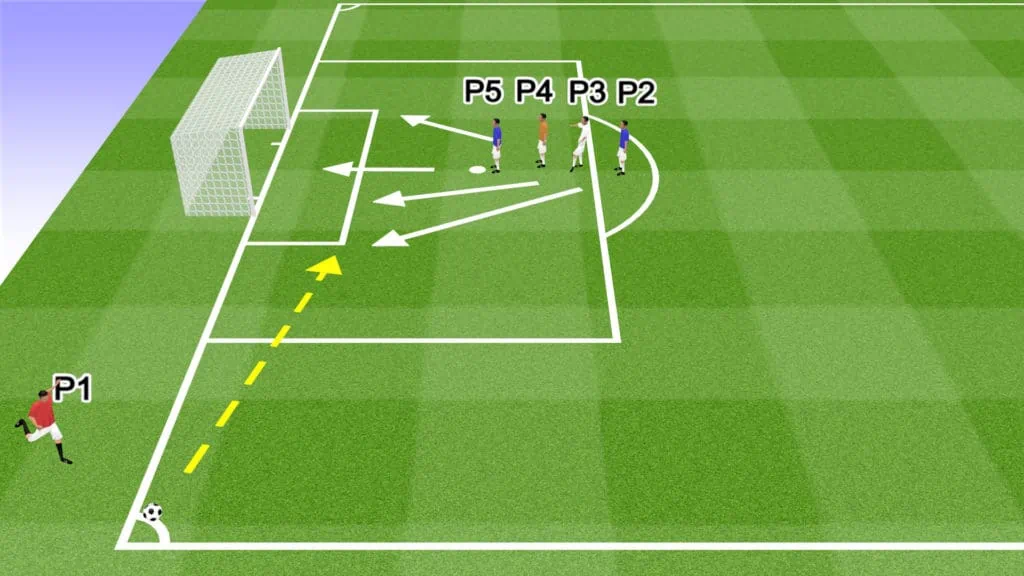
- This drill focuses on the attacking pattern of your 4 best headers or ball winners for a corner. If you have more players, instruct them to occupy other dangerous attacking positions on the edge of the box, at the back post, and around the 6-yard box.
- Use the final third of the field for this drill (entire width plus the penalty box).
- P1 should be your best set-piece taker. If you have multiple corners or set-piece takers, rotate them after 2 to 3 rounds.
- P1 places the ball in a suitable place on the corner spot.
- P2, P3, P4, and P5 stand in a stack formation close together on the edge of the penalty box. This makes it difficult for the defenders to mark them and track their movement.
Drill Instructions
- It is a good idea to use hand signals for corner setups. For this drill, the taker should raise their right hand in the air after placing the ball on the corner flag. This indicates what positions the attackers should take up during a game.
- As P1 makes their run-up to kick the ball, the outfield players make their runs into the box.
- P2 runs to the space just in front of the front post, next to the corner of the 6-yard box. P2 is the primary target of the cross.
- P3 runs around 2 yards behind P3 toward the front post, in case P2 misses the ball.
- P4 checks their run and loops around toward the back post, anticipating a flick-on from P2 or P3.
- P5 sprints directly toward the center of the 6-yard box.
- P1 crosses the ball to the front post to P2.
- P2 flicks the ball on goal or toward the back post, where P3, P4, or P5 may then try to score.
- Practice this routine multiple times, working on positioning, timing, and execution.
Drill Variations
- Practice the corner routine from the opposite side.
- For more advanced teams, consider adding extra players to the stack, making different runs.
- Set scoring targets for each training session, encouraging players to improve efficiency.
- Add defenders to simulate an in-game scenario.
Back post hang up: Soccer Drill
Drill Outline
- Drill Name: Back post hang up
- Session Length: 10 to 15 minutes
- Age Group: 12+
- Number of players: 6 (minimum)
- Skills learned: Crossing technique, positioning, tactical play, & movement
- Equipment: 1 goal, multiple balls
Drill Setup
- Use the final third of the field for this drill (entire width plus the penalty box).
- P1 and any designated set-piece takers should rotate turns taking the corners.
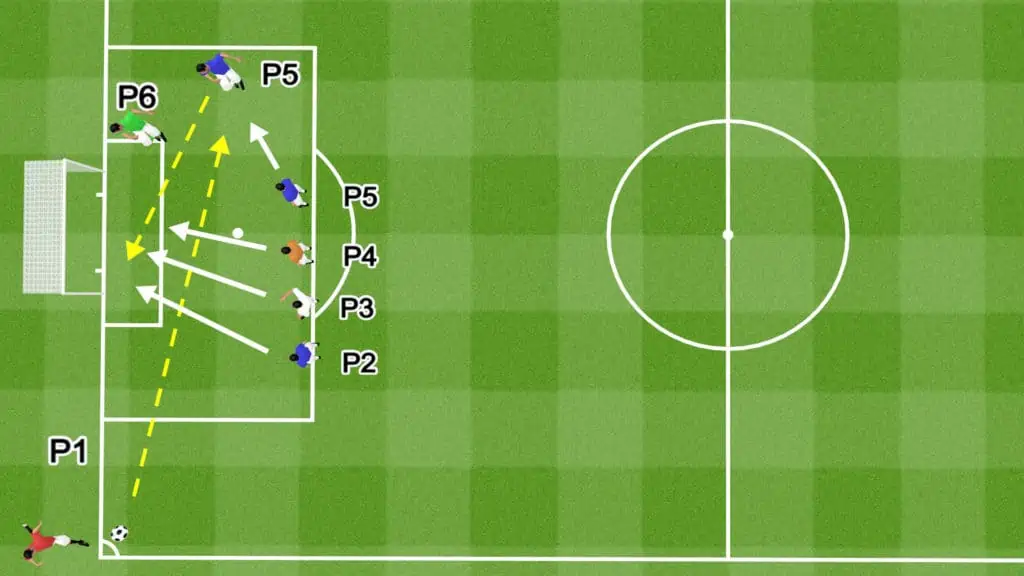
- P2, P3, P4, and P5 stand in a tight line along the edge of the penalty box. This makes it difficult for the defenders to mark them and track their movement.
- P6 stands next to the back post.
- P5 and P6 should be the tallest and best headers of the ball on your team.
Drill Instructions
- For this drill, the taker should raise their left hand in the air after placing the ball on the corner flag. This indicates what positions the attackers should take up during a game.
- As P1 makes their run-up to kick the ball, the outfield players make their runs into the box.
- P5 fakes a forward run and then drops toward the backside of the penalty box, 2 to 3 yards inside the line on the edge of the box. P4 is the main target of the corner.
- P6 waits until the corner is taken to judge the flight of the ball. P6 is the secondary target.
- P1 hangs the ball in the air toward P6 and P5.
- P2, P3, and P4 make their runs toward the front post.
- P5 or P6 head the ball back toward the front post to meet the run of the other 3 players.
- P2, P3, or P4 score.
- Practice this routine multiple times, working on positioning, timing, and execution.
Drill Variations
- Practice the corner routine from the opposite side.
- Set scoring targets for each training session.
- Add defenders to simulate an in-game scenario.
Share the post "Heading Soccer Drills (Attacking and Defending Techniques)"
Joel is a seasoned soccer journalist and analyst with many years of experience in the field. Joel specializes in game analysis, player profiles, transfer news, and has a keen eye for the tactical nuances of the game. He played at various levels in the game and coached teams - he is happy to share his insight with you.
