Share the post "Agility and Coordination Drills (Speed Movement)"
Agility and coordination allow you to weave past players like Messi. Improve these skills with soccer drills.
This collection of drills focus on agility and coordination and after doing them you will be able to move in and out of tackles, leaving the defender in the dust!

Agility and Coordination Drills
Dribble Through Gates: Soccer Drill
- Age Range: 4-8
- Length of Session: 10 mins
- Number of Players: 3-10
- Skills to Learn: Ball control, keeping the head up while dribbling
- Equipment: enough balls for each player and cones
Description; Randomly place gates that are approximately 3 meters wide. Kids will aim to dribble through each gate once or as many gates as possible in the set time.
Drill Set-up:
- Set up a large area around 30 meters by 30 meters (use a larger space for more kids)
- Randomly set up 6-10 3m wide gates using cones
- Give each kid a ball.

Drill Instructions:
- Kids 4-6 can have more gates and larger gates to minimize collisions.
- Give kids a set time and goal. For example, you can see who can get through the most gates in 60 seconds, or who can get through every gate first.
- Make the drill more challenging for older players with restrictions, like right or left foot only. You could also require older kids to complete a move before dribbling through the gate.
Pass and Move Awareness: Soccer Drill
Drill Outline
- Drill Name: Pass and move awareness drill
- Session Length: 3 to 5 mins
- Number of players: Minimum of 8 players broken into 4 groups
- Skills learned: passing, quick movement, first touch, and awareness
- Equipment: 4 cones, 2 balls
Drill Setup
- Position 4 cones to create a tilted square. The 4 corners should be 10 yards apart from each other.
- Split the training squad into 4 even groups, with each group lining up at a separate cone.
- 3 to 4 players per group is optimal. There must be a minimum of 2 in each group.
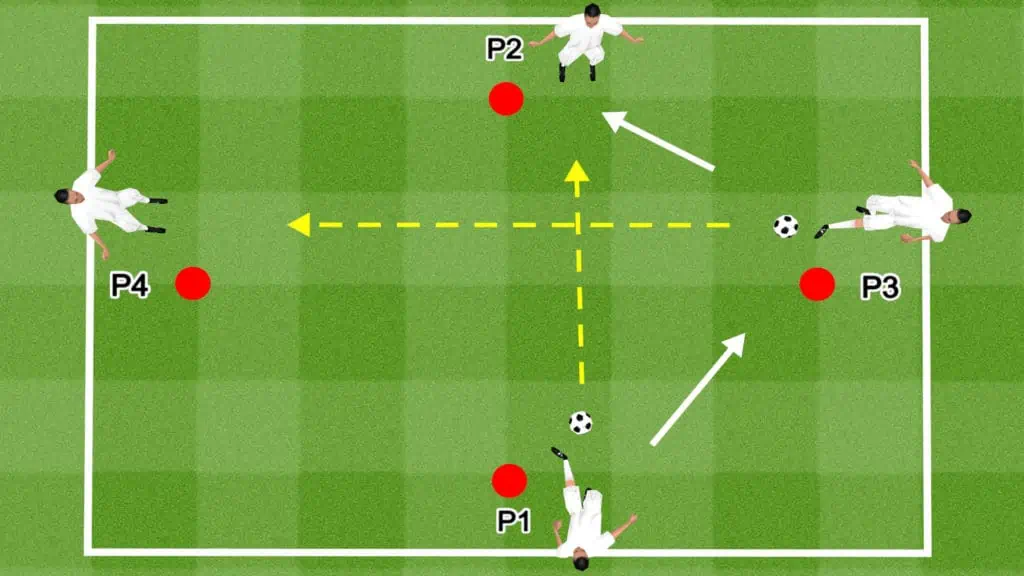
Drill Instructions
- P1 and P3 start with the balls at their feet.
- P1 plays a low, firm pass to P2. After playing the pass, the player jogs to the back of the line on their right.
- Then, P3 passes the ball to P4. When the pass is played, the player joins the end of the line to their right.
- P2 and P4 take one touch the control the ball, before playing a return pass to the next player in the group they received the ball from.
- After playing the pass, the players jog to the back of the line to their right.
- As the passing lanes intersect in the middle of the square, players must time their passes precisely to avoid the balls from accidentally colliding.
Drill Variations
- Introduce limits on the number of touches. Start out with no limits, then gradually reduce it to 2 touches.
- Instruct players to use their weaker foot for a certain number of passes.
- Set targets for successive completed passes.
Speed Ladder: Soccer Drill
Drill Outline
- Drill Name: Speed ladder drills
- Session Length: 5 to 10 minutes
- Age Group: all ages
- Number of players: 1 to 18
- Skills learned: Quick feet, balance, lateral movement,
- Equipment: 1-speed ladder (minimum)
Drill Setup
- This drill has several variations and takes place without a ball.
- Set up a speed ladder along with the group in your training field.
- Place 1 cone 5 yards from one end of the ladder to indicate the starting point.
- If there are 6 or more players, set up another speed ladder grid and split the team into 2 groups.
- All players line up behind P1 at the starting point.
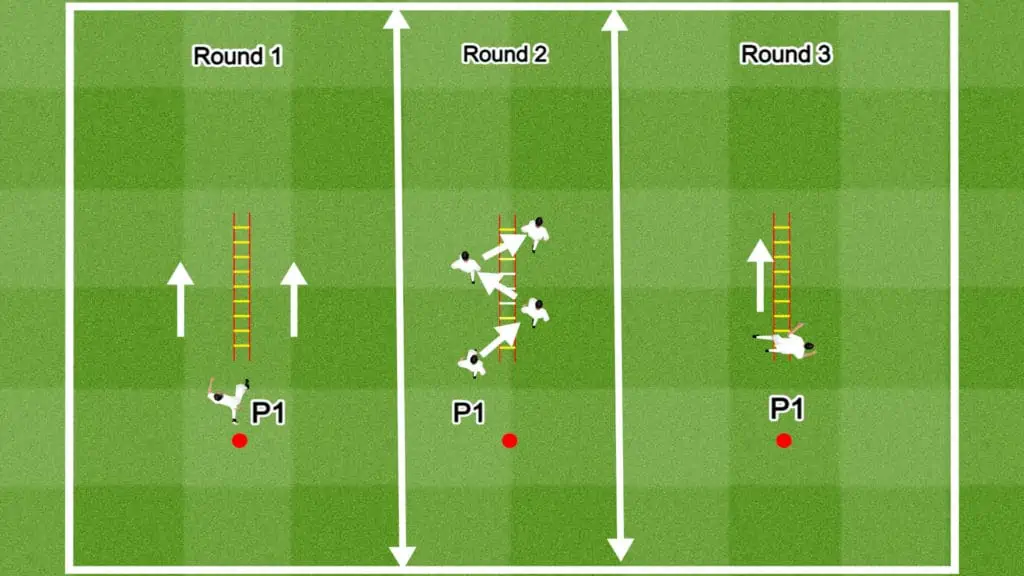
Drill Instructions
- The coach sets a timer for between 1 and 2 minutes (depending on how much time you have).
- There are 4 rounds, covering a different variation each time.
- In round 1, P1 sprints to the ladder, then run through it, putting both feet through every square, one at a time.
- When P1 reaches the end of the ladder, they turn around and repeat from the opposite side.
- In round 2, P1 sprints to the ladder, then step laterally through it, putting both feet through every square, one at a time. Repeat from the opposite side.
- In round 3, P1 sprints to the ladder and then cross shuffles through it.
- P1 starts from one side, stepping into the ladder gap and then out on the opposite side. They follow the same pattern with their trailing foot, stepping into the ladder gap, then back outside the ladder. Repeat the drill from the opposite side.
- In round 4, instruct players to repeat the movements from rounds 1 through 3 while facing backward.
Drill Variations
- If there are enough players (8 minimum), set up 4-speed ladder grids and split the team into groups. Assign a different drill to each ladder and allow players to rotate through each grid.
- There are many alternative footwork variations so feel free to get creative.
- Create competition by timing how quickly players can get through the ladder.
Dual Station Footwork: Soccer Drill
Drill Outline
- Drill Name: Dual Station Footwork
- Session Length: 10 minutes
- Age Group: all ages
- Number of players: 1 to 18
- Skills learned: Ball control, dribbling, quick feet, turning
- Equipment: 4 cones (minimum), 1 ball (Cruyff station), 1 ball per player outside Cruyff station
Drill Setup
- This drill consists of 2 stations.
- Set up the Cruyff turn station by creating an inverted square, placing cones 5 yards apart.
- The lateral movement station is simply an open space, large enough for whatever number of players you have to work with individually. Each player requires approximately 5 yards of space.
- If you have 10 or more players, consider setting up multiple Cruyff turn stations.
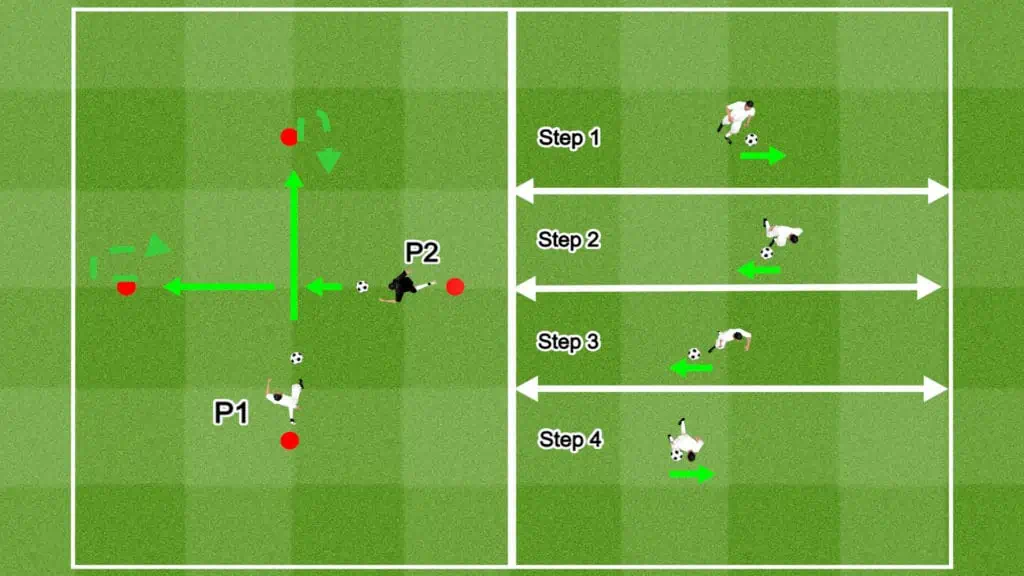
Drill Instructions
- 2 players participate in the Cruyff drill at a time (left in the image below).
- P1 starts at 1 cone with a ball, while P2 starts at another cone (can’t be the opposite cone to P1).
- P1 and P2 start at the same time by dribbling toward their opposite cones. They must use ball control and footwork to ensure they don’t collide as they cross paths.
- When they reach the opposite cone, P1 and P2 do a Cruyff turn then repeat the drill from the opposite side.
- All other players (right side) have a ball each and work individually in the lateral movement space.
- Each player takes 2 quick, short touches to then right then stop the ball.
- They then roll the ball under their foot from right to left.
- They then repeat the steps from the opposite side.
- Rotate player roles every minute.
Drill Variations
- Change the type of footwork drill in the lateral movement space to focus on other skills. Keepy-uppies, stepovers, and ball drag are good alternatives for this drill.
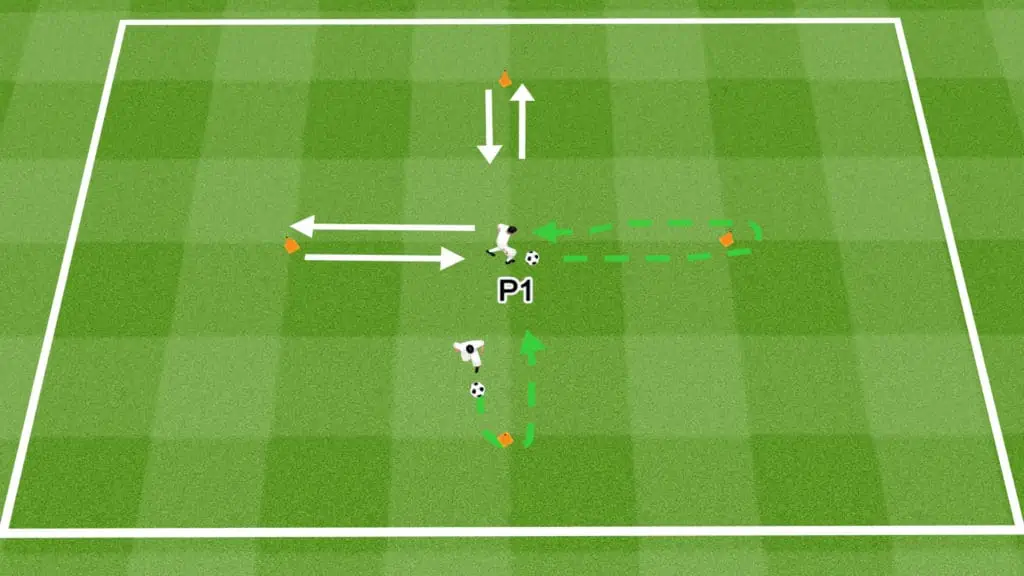
Receive Pass Drag Back: Soccer Drill
Drill Outline
- Drill Name: Receive pass drag back
- Session Length: 10 minutes
- Age Group: 10+
- Number of players: 2 to 18
- Skills learned: First touch, drag back, dribbling, ball control
- Equipment: 2 cones (minimum), 1 ball (minimum)
Drill Setup
- This drill requires players to work in pairs.
- For each pair, set up 2 cones 5 yards apart.
- Each player stands at a cone.
- P2 starts with the ball.
- P1 starts behind their cone.
- P1 is the main focus of the drill.
- P2 plays the role of a passer.
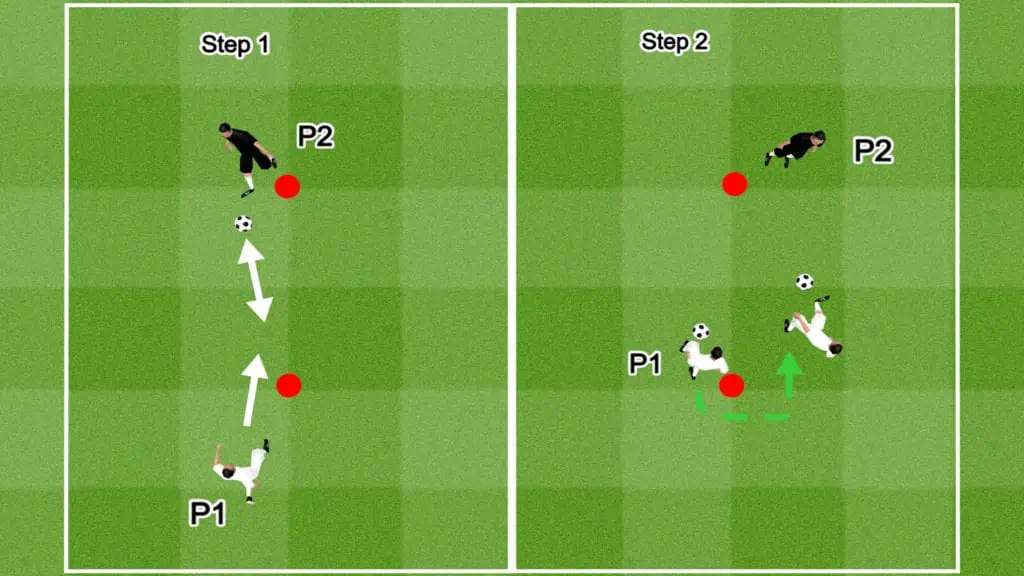
Drill Instructions
- On the coach’s signal, P1 sprints in front of the cone and calls for the pass.
- P2 passes the ball to the feet.
- P1 takes a touch to control the ball, then drags the ball behind the cone, shuffles to the opposite side, and plays a return pass.
- Repeat the drill for 1 to 2 minutes before alternating roles.
- The focus is on moving backward, then sideways while maintaining control of the ball.
- The cone represents a defender, so this drill also helps players practice receiving the ball under pressure.
Drill Variations
- Focus on using both feet for a round.
- Focus on using the right foot for a round.
- Focus on using the left foot for a round.
Footwork Combo Drill: Soccer Drill
Drill Outline
- Drill Name: Footwork Combo Drill
- Session Length: 10 minutes
- Age Group: 10+
- Number of players: 1 to 18
- Skills learned: Quick feet, lateral movement, jumping, dribbling, ball control
- Equipment: 2 cones, 1 ball, 1-speed ladder, 2 hurdles, 2 agility poles
Drill Setup
- Set up the drill as shown in the graphic.
- Place 1 cone near the end of your training field to indicate the starting position.
- Place a speed ladder 5 yards from the starting point.
- Place 1 cone 5 yards from the other side of the speed ladder.
- Place 1 hurdle 5 yards to the right of the cone, and 1 hurdle 5 yards to the left.
- Place 2 agility poles 5 yards apart, in front of the cone.
- Place 1 ball between the center cone and the agility poles.
- All players line up behind P1 at the starting cone.

Drill Instructions
- On the coach’s signal, P1 sprints to the ladder, then run through it, putting both feet through every square, one at a time.
- P1 sprints, toward the center cone before quickly decelerating.
- Once the player reaches the center cone, the coach yells “right” or “left”.
- P1 shuffles sideways in the direction that the coach instructed.
- P1 jumps over the hurdle, then back, before shuffling sideways back toward the center cone.
- P1 collects the ball and zig-zag dribbles through the agility poles.
- After rounding the final agility cone, P1 dribbles back toward the center, returning the ball to its original position.
- P1 then rejoins the end of the line.
- Once the ball is returned, P2 starts the next round.
Drill Variations
- Add more agility poles or restructure the agility pole shape to change the dribbling pattern.
- Instead of yelling a direction at the players, instruct them to shuffle to both sides before moving on to the next section.
- Create competition by timing each player’s round.
Shuttle Drills: Soccer Drills
Drill Outline
- Drill Name: Shuttle Drills
- Session Length: 5 to 10 minutes
- Age Group: all ages
- Number of players: 1 to 18
- Skills learned: Quick feet, lateral movement, sprinting, deceleration, change of direction
- Equipment: 8 cones (minimum)
Drill Setup
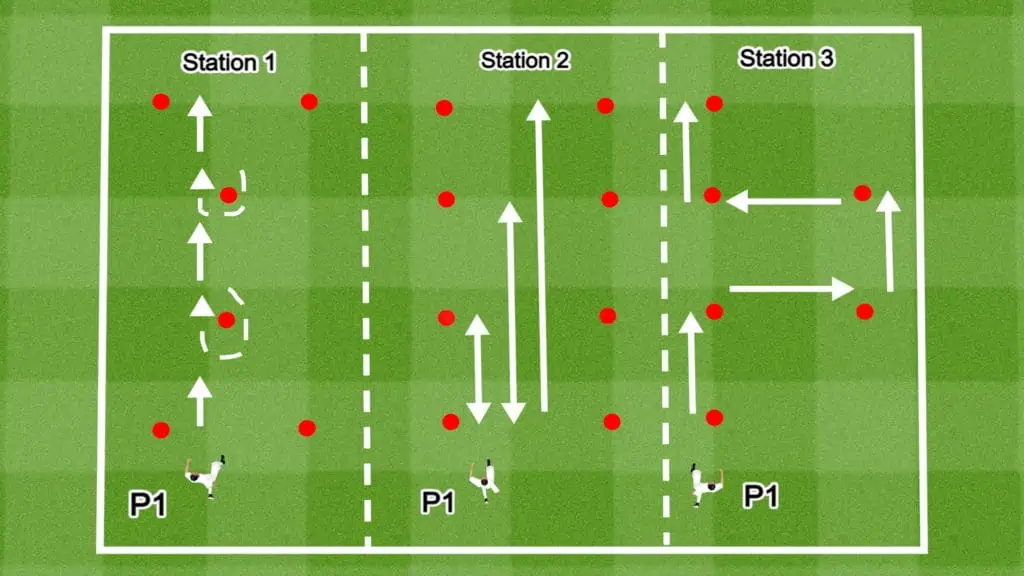
- This drill involves 3 stations.
- Set up the stations as shown in the graphic
- Station 1: Place 2 cones 3-yards apart to indicate the starting gate. Place 2 identical cones 15 yards away to indicate the other end of the station. Place 2 cones between the start and end gates, equal distances apart (5 yards).
- Station 2: Create 4, 2 cone gates, 5 yards apart to create a running strip. The full length of the station is 15 yards.
- Station 3: Use the same cone formation as station 3.
- None of the drills involve a ball.
Drill Instructions
- Each of these drills involves explosive movements. Ensure all players undergo a thorough warmup to avoid injury.
- Station 1: P1 sprints to the front of the first cone, then shuffles the full way around it while moving their feet as quickly as possible (continually facing forward). They then sprint to the next cone and repeat the same movement, before sprinting through the end gate. P1 then turns around and repeats the drill from the opposite side.
- Station 2: This is an endurance-style drill. P1 sprints to the first gate then turn and run back to the starting point. P1 then sprints to the second gate before returning to the starting position. P1 then sprints through all the gates, pushing through passed the final cones.
- Station 3: P1 stands at the left cone of the first gate. To start, P1 sprints to the cone directly in front, then side steps quickly toward the cone to their right. P1 then sprints to the cone directly in front before side-stepping toward the cone to their left. To finish, P1 sprints through the final gate.
Drill Variations
- If you have enough players and space, you can set up all 3 at the same time. If not, adjust the cones after completing each round.
- Station 2: Instead of turning and sprinting back to the starting point, instruct players to sprint backward.
- Station 3: Repeat drill starting on the opposite side.
- Create competition by timing each player’s round. Or, divide players into groups and combine their total times.
Agility Assault Course: Soccer Drill
Drill Outline
- Drill Name: Agility Assault Course
- Session Length: 10 minutes
- Age Group: all ages
- Number of players: 2 to 18
- Skills learned: Quick feet, lateral movement, sprinting, deceleration, passing
- Equipment: 6 cones, 4 agility poles, 1 hurdle, 1 ball
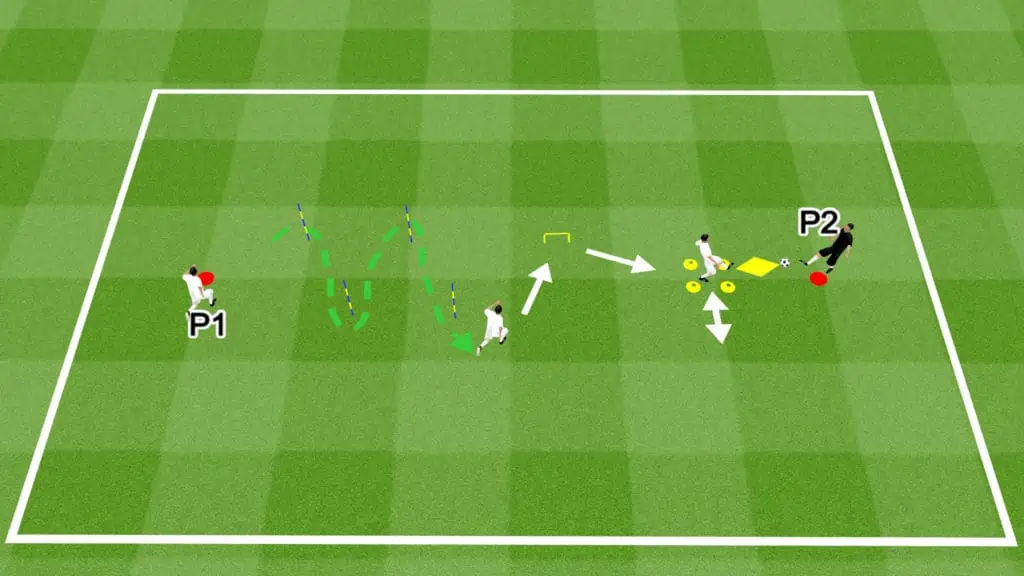
Drill Setup
- You need a training space of approximately 30 square yards.
- Place a cone at the end of the grid to indicate the starting point.
- 5 yards from the starting point, place 4 agility poles 3 yards apart in a staggered formation.
- Place a hurdle 10 yards diagonally to the left of the final agility pole.
- Create a small square grid 10 yards diagonally to the right of the hurdle.
- Place 1 cone 5 yards from the grid.
- P2 stands at the cone at the end of the grid with a ball.
Drill Instructions
- P1 and the rest of the team line up at the starting point.
- On the coach’s signal, P1 sprints to the agility poles and quickly swerves through them, keeping their center of gravity low for fast, fluid turns.
- After rounding the final pole, P1 sprints to the hurdle and hops over it then back.
- P1 then sprints to the square grid and plays a quick give-and-go pass with P2.
- P1 shuffles to the right side of the grid, then back into it for another give-and-go.
- P1 shuffles to the left side of the grid, then back into it for another give-and-go.
- The round finishes and the next player starts.
Drill Variations
- Create competition by timing each player’s round.
- Instead of a give-and-go pass, practice headers, volleys, or chest control.
- Extend the drill by increasing the distance between stages or adding extra cones, agility poles, and hurdles.
Agility Passing Weave: Soccer Drill
Drill Outline
- Drill Name: Agility Passing Weave
- Session Length: 10 minutes
- Age Group: all ages
- Number of players: 5 (minimum)
- Skills learned: Sprinting, changing direction, back peddling, 1-touch passing
- Equipment: 5 cones, 4 balls
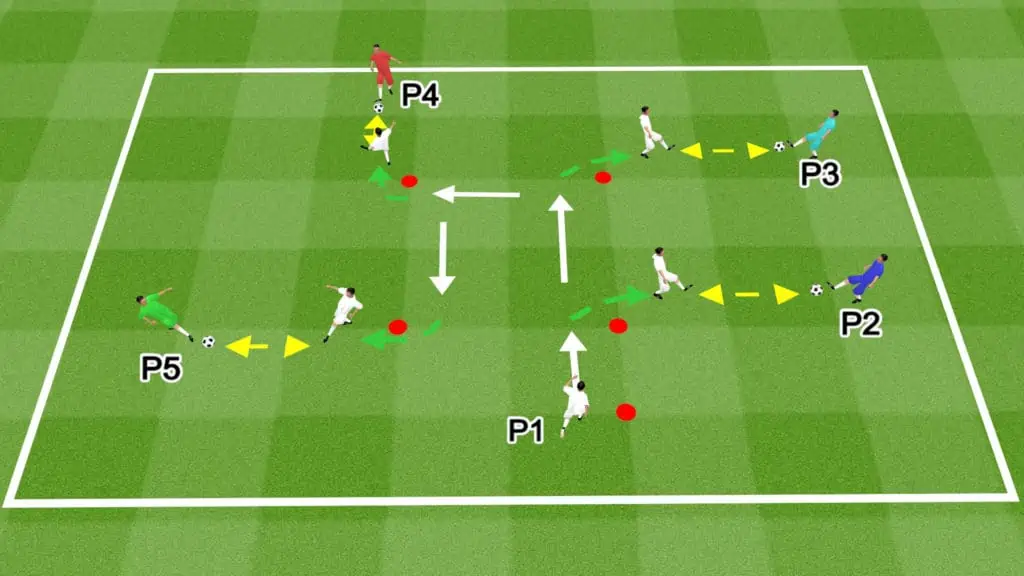
Drill Setup
- Create a square grid using cones positioned 5 to 10 yards apart.
- Place 1 cone 5 yards perpendicular to any corner of the grid to indicate the starting point.
- 4 players stand 5 yards outside each corner of the grid. Each of these players has a ball at their feet.
- P1 and any remaining players line up behind the starting cone.
Drill Instructions
- On the coach’s signal, P1 sprints to, then around the first cone and faces P2.
- P1 calls for the ball.
- P2 plays a quick give-and-go pass with P1.
- P1 sprints, then around the next cone, repeating the process until they complete the entire square grid.
- The next player may begin when P1 reaches the second cone.
- Rotate player roles occasionally, giving all players a chance to complete the drill.
- The focus of this drill is quick movements. Sharp turns to simulate getting free from a defender to receive a pass.
- Encourage players to be vocal, calling for a pass as they would in a real game scenario.
Drill Variations
- Focus on the players’ left and right feet each round, ensuring they practice with both.
- Instead of a give-and-go pass, practice headers, volleys, or chest control.
- Increase the passing distance for higher-skilled players.
- Create competition by timing each player’s round.
Dribble to Sprint Square: Soccer Drill
Drill Outline
- Drill Name: Dribble to Sprint Square
- Session Length: 3 to 5 minutes
- Age Group: all ages
- Number of players: 1 (set up multiple grids for more players)
- Skills learned: Sprinting, dribbling, conditioning
- Equipment: 4 cones, 1 ball
Drill Setup
- Create a 4-cone square grid with each cone placed 10 yards apart.
- Place 1 ball in the center of the grid.
- This drill works best with 1 player but 2 can participate at the same time as long as they work in opposite directions.
- Set up multiple grids for each player or grid.
- This drill works well in conjunction with another team-based drill, ensuring all players are active.
Drill Instructions
- Ensure all players undergo a thorough warmup before all conditioning drills to avoid injury.
- P1 starts with the ball at their feet in the center of the grid.
- P1 dribbles toward, then around a cone before leaving the ball back in the center of the grid.
- As soon as they stop the ball in the center, P1 sprints to the opposite cone around it and then sprint to the center grid.
- P1 collects the ball, turns to their right, then dribbles to the next cone, repeating the entire process.
- The focus of this drill is on speed, improving the players’ conditioning. However, they must also focus on technique, maintaining control of the ball at all times.
Drill Variations
- Focus on the players’ left and right feet each round, ensuring they practice with both.
- Count how many times each player completes a dribble and a sprint. Create a competition to see how many rounds players can complete.
1 v 1 Pass & Move: Soccer Drill
Drill Outline
- Drill Name: 1 v 1 Pass & Move
- Session Length: 5 to 10 minutes
- Age Group: All age groups
- Number of players: 2
- Skills learned: Passing, movement, dribbling, tackling, and defensive jockeying
- Equipment: 10 cones, 1 ball
Drill Setup
- Place 2 cones 15 yards apart, marking the starting points for both players.
- 5 yards to either side of these cones, create a dribbling tunnel of the same length. The tunnel should be approximately 5 yards wide.
- Place cones 5 yards apart on both sides of the tunnel to create 3 separate, evenly sized sections within it.
- P1 begins with the ball at their feet.
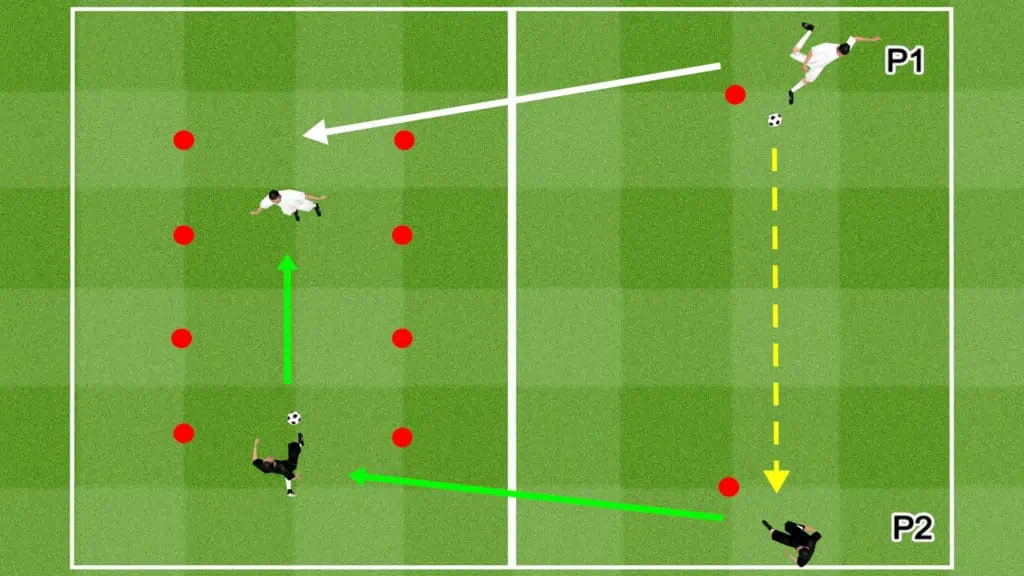
Drill Instructions
- P1 starts the drill by playing a long pass to P2.
- After the pass, P1 sprints through their end of the dribbling tunnel, making their way to the center section. They cannot enter the furthest section of the tunnel.
- P2 receives the pass, then dribbles through the end of the dribbling tunnel.
- P2 then tries to dribble past P1 and through the opposite end of the tunnel.
- P1 can tackle, block, or jockey the dribbler to try and regain possession.
- The round is over when P2 loses possession or successfully passes through the tunnel.
- If the ball crosses either sideline of the tunnel, the round is over.
- After the round, players switch roles.
Drill Variations
- Create a competition to see who can complete the most successful dribbles in the allocated time frame. Or, create a competition to see which player reaches 5 successful dribbles first.
- Set a time limit for the dribblers to get through the tunnel.
- If the defenders have the edge over the attackers, prohibit them from entering the center section.
- If the attackers have the edge, allow the defenders to enter all sections of the tunnel.
Share the post "Agility and Coordination Drills (Speed Movement)"
Joel is a seasoned soccer journalist and analyst with many years of experience in the field. Joel specializes in game analysis, player profiles, transfer news, and has a keen eye for the tactical nuances of the game. He played at various levels in the game and coached teams - he is happy to share his insight with you.