Share the post "Ball Control Soccer Drills (Pro First Touch)"
Only the very best soccer players can control the ball well – it’s an art. Perfect it and the opposition will stand in amazement!
Perfect control is when you can do it while looking at the field for your next move. But don’t try that until you’ve mastered the basics.
Every time a ball is passed to you, you need to control it and these ball control drills have a combination of ground to air.

Ball Control Soccer Drills
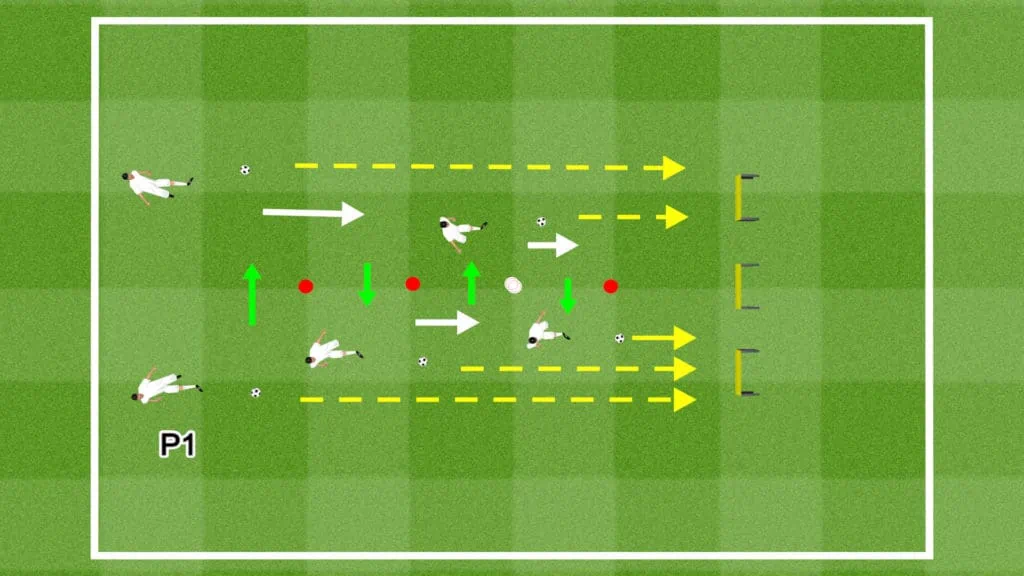
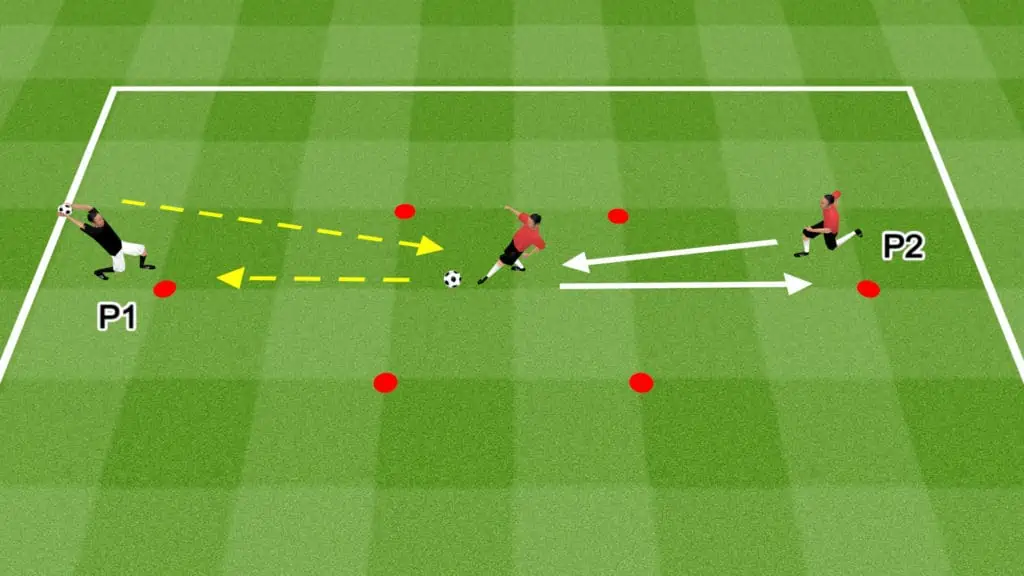
Pass, Move, and Shuffle: Soccer Drill
Drill Outline
- Drill Name: Pass, Move, and Shuffle
- Age Group: All age groups
- Session Length: 5 minutes
- Number of players: minimum of 2 as players work in pairs
- Skills learned: first touch, passing, and quick feet
- Equipment: 2 cones, 1 ball per pair
Drill Setup
- Each pair of players needs 2 cones.
- Place 2 cones approximately 5 yards apart to create the passing lane.
- Create separate passing lanes parallel to these cones for each pair of players.
- Each pair requires 1 ball.
Drill Instructions
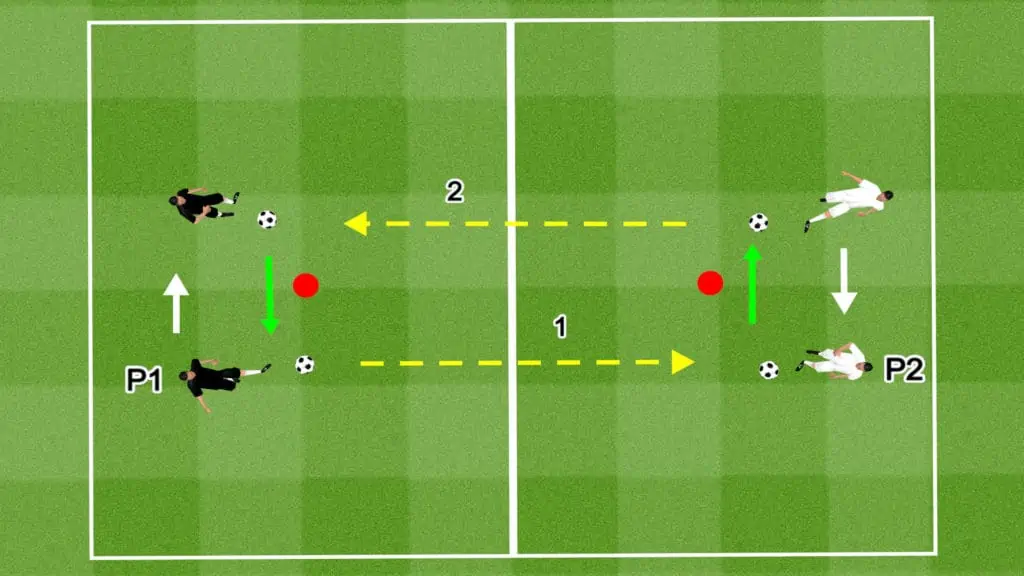
- P1 stands 1 yard to the right and behind the cone, with the ball at their feet.
- P2 stands in a mirrored position, 1 yard to the left and behind the cone, waiting to receive a pass.
- P1 plays a firm, right-footed pass along the ground to P2.
- P1 then shuffles to the left side of the cone and waits for the return pass.
- P2 takes one touch to shift the ball from the left to the right side of the cone, before playing return pass to P1.
- P2 then shuffles back to the left side of the cone.
- P1 takes one touch to shift the ball from the left to the right side of the cone, before passing it to P2
- In the first and second rounds, allow 3 touches. In the third and fourth rounds, allow only 2.
Drill Variations
- Switch starting positions to focus on opposite foot passing.
- Increase the distance between players to improve passing accuracy, control, and range. For this drill, the maximum distance between players should be 15 yards.
2 v 2 Possession Squares: Soccer Drill
Drill Outline
- Ages: 12 to 18+
- Drill Name: 2 v 2 Possession Squares
- Session Length: 5 to 8 minutes
- Number of players: minimum of 4 players, broken into groups of 2
- Skills learned: Agility, first touch, quick passing, tackling, and pressing
- Equipment: 4 cones, 1 ball per pair
Drill Setup
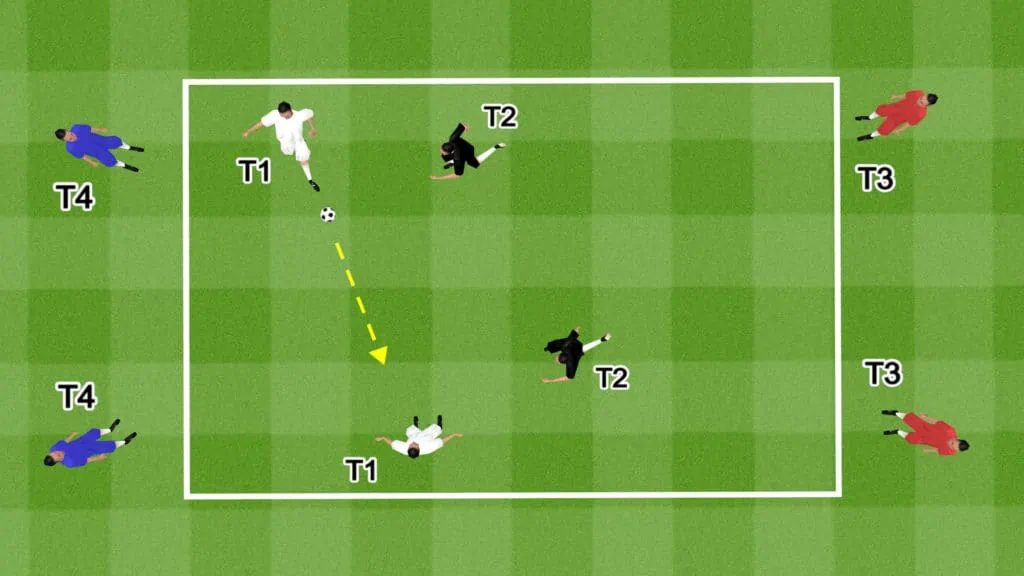
- Position 4 cones 10 to 15 yards apart to form a square.
- Divide the team into pairs.
- 2 teams take their place in the square while the other pairs wait outside.
Drill Instructions
- The coach selects one team to start with the ball and one team to defend.
- The game goes live once the first pass is played.
- The team in possession tries to keep the ball by passing and dribbling.
- The defending team attempts to win back possession through tackling or intercepting.
- If the defending team wins the ball back, they attempt to keep possession from their opponents.
- The first team to make 5 consecutive passes wins.
- The winning team begins the next round in possession. A new pair replaces the losing team, beginning the round as the defenders.
- If neither team wins after 60 seconds, the round is over and 2 fresh teams enter the square.
Drill Variations
- The number of players per team can be extended up to 11. The square should be made larger to accommodate additional players.
- If players are struggling to retain possession, consider changing the dynamic to a 3 v 2 or 4 v 2. The team of 3 starts in possession. As soon as they lose the ball, the round is over and a new 3 v 2 matchup is made.
4 Cone Wall Passes: Soccer Drill
Drill Outline
- Drill Name: 4 Cone Wall Passes
- Session Length: 10 minutes
- Age Group: all ages
- Number of players: 1
- Skills learned: Quick passing, first touch, ball control, weak foot
- Equipment: 4 cones, 1 ball, 1 wall
Drill Setup
- Set up this drill in front of a wall. If you don’t have a wall or hard fence, you can tip a fence on its side and use the seat as the rebounding surface.
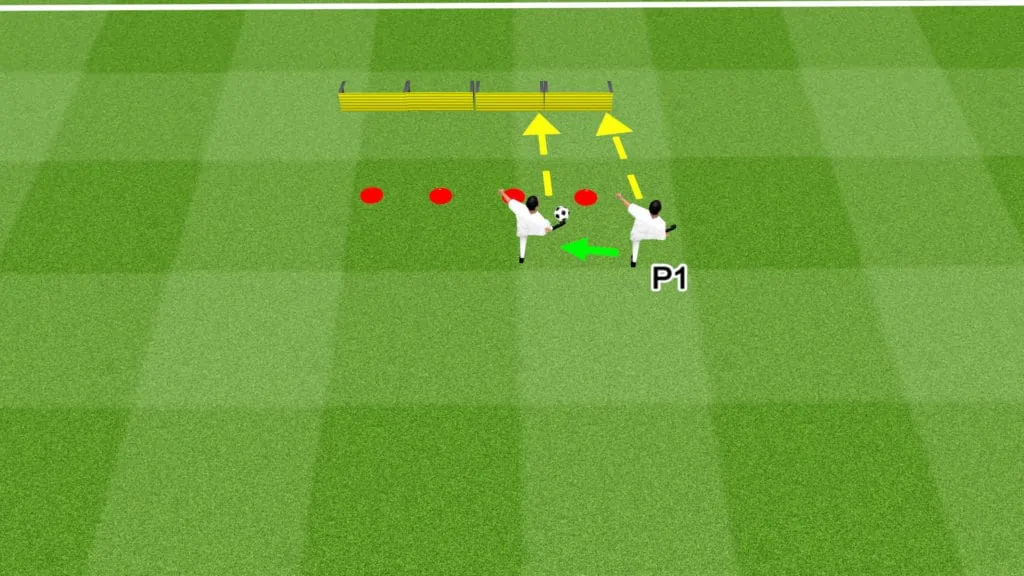
- Place 4 cones in a line approximately 1 yard apart, 5 yards from the wall.
- P1 stands on the right side of the cone line with the ball at their feet.
Drill Instructions
- As a warmup and to get accustomed to how the ball rebounds against the wall, P1 should play a number of short wall passes. They should focus on getting the power and placement right, ensuring the ball returns straight to them at a controllable height and pace.
- P1 starts the drill by passing the ball against the wall.
- When the ball returns, P1 takes a touch, taking the ball to the opposite side of the cone before playing the next wall pass.
- P1 repeats the steps until they reach the end of the grid. P1 then completes the drill from the opposite side.
- P1 repeats the entire process 5 times, then takes a 1-minute break before performing the drill a further 2 times (3 times in total).
Drill Variations
- Increase or decrease the distance between the cones and the wall to practice different passing ranges.
- In the beginning, P1 should focus on taking their first touch with the inside of their foot for maximum control. After a while, they can practice using different parts of the foot, like the sole or the outside of the foot.
- Reduce or increase the number of drill repetitions according to the need and skill set of the player.
Back & Forth Wall Passes: Soccer Drill
Drill Outline
- Drill Name: Back & Forth Wall Passes
- Session Length: 10 minutes
- Age Group: all ages
- Number of players: 1
- Skills learned: Range of passing, first touch, weak foot, movement
- Equipment: 4 cones, 1 ball, 1 wall
Drill Setup
- Set up this drill in front of a wall or fence.
- Place 1 cone, 2 yards from the wall.
- Place 3 more cones, 2 yards apart, in line with the first, creating a perpendicular cone grid to the wall. The final cone should be 8 yards from the wall.
- P1 stands with the ball at their feet at the furthest cone.
Drill Instructions
- P1 should warm up with wall passes to get a feel for how the ball reacts.
- P1 starts to the right of the furthest cone by playing a firm pass against the wall. P1 should try to make sure the ball rebounds to their feet on the same side, without having to alter their position too much.
- When the ball returns, P1 takes a touch, taking the ball to the opposite side of the cone before playing the next wall pass.
- After playing the pass, P1 moves forward toward the next cone before receiving the rebound.
- When the ball returns, P1 takes a touch, taking the ball to the opposite side of the cone before playing the next wall pass.
- P1 then moves forward to the next cone to receive the rebound and play the next pass.
- After reaching the cone closest to the wall, P1 then repeats the drill in reverse.
- P1 completes the entire drill 5 times, takes a 1-minute break, then repeats 2 more times (3 in total).
Drill Variations
- Increase or decrease the distance between the cones and the wall to practice different passing ranges.
- Reduce or increase the number of drill repetitions according to the need and skill set of the player.
Team Keepy Uppie: Soccer Drill
Drill Outline
- Drill Name: Team Keepy Uppies
- Session Length: 10 minutes
- Age Group: all ages
- Number of players: 6 to 18
- Skills learned: Heading, ball control, first touch
- Equipment: 2 balls, 1 ball net
Drill Setup
- There are 2 variations to this drill.
- Both variations require minimal space and equipment.

Drill Instructions
- Round 1: Divide players into 2 even groups. Both groups line up across from each other, with each player approximately 2 yards apart.
- All players work together for this round.
- P1 starts by heading the ball to P2. Each player heads the ball to the player opposite them, gradually moving the ball to the end of the line.
- The final player heads the ball into the ball net.
- If the ball hits the ground, the drill must be restarted.
- Round 2: Divide the team into even groups. Each group has 1 ball.
- On the coach’s signal, the groups start playing keepy-uppies, preventing the ball from hitting the ground.
- Each player is allowed 3 touches before passing to a teammate.
- The team that keeps the ball in the air the longest wins.
Drill Variations
- Limit the number of touches before players have to pass. For elite-level players, consider playing a 1-touch round.
- Play a round with headers only.
Soccer Tennis: Soccer Drill
Drill Outline
- Drill Name: Soccer Tennis
- Session Length: 15 to 20 minutes
- Age Group: all ages
- Number of players: 2 to 16
- Skills learned: Heading, ball control, first touch
- Equipment: 1 ball, 1 net, 4 cones per match
Drill Setup
- Soccer tennis can be played 1 v 1, 2 v 2, or 3 v 3.
- Each court is 15 yards long and 10 yards wide. The net is 1 to 1.5 yards high.
- Depending on the number of players, you can set up multiple courts.
- Decide on the type of match-ups to run and divide the players into teams if necessary.
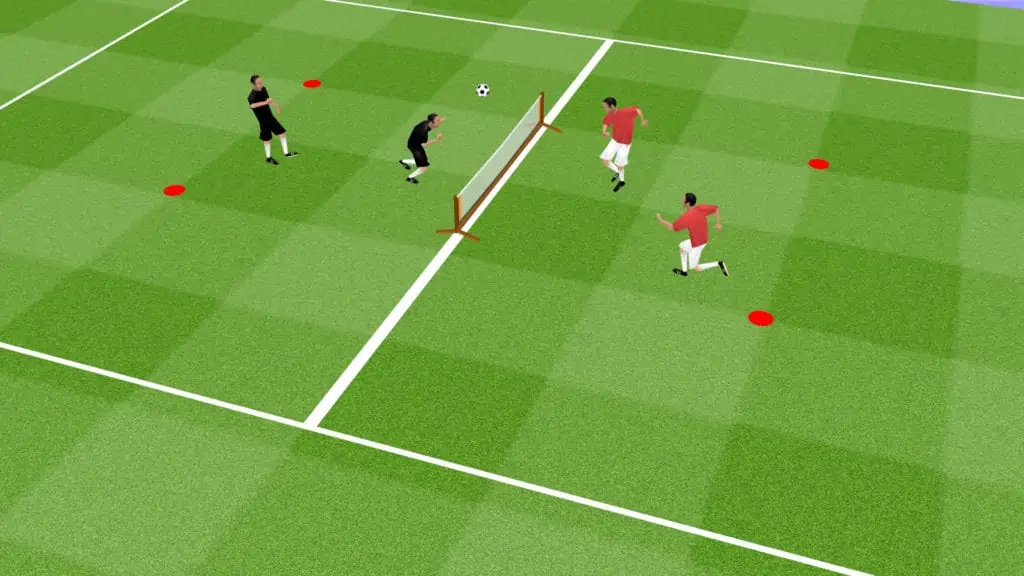
Drill Instructions
- A match starts with a serve from behind the baseline, outside of the court. Players serve by kicking, heading, or striking the ball with any body part other than the arms or hands.
- For a serve to be legal, the ball must pass over the net and touch the opponent’s half of the court or an opposition player.
- Like tennis, the objective is to score points by bouncing an unreturnable shot into your opponent’s half.
- The team that scores always takes the next serve.
- The ball may skim the net on the way over.
- If a player touches the net, a point is awarded to the other team.
- Each team has a maximum of 5 touches to return the pass. Each player can take a maximum of 2 consecutive touches.
- The ball can bounce once per play.
- A set is won when a team reaches 11 points. However, a team must win by 2 clear points.
- If a team reaches 15 points, they win the set, regardless of the points difference.
Drill Variations
- Create a tournament. Consider doing 1 v 1, 2 v 2, and 3 v 3 tournaments.
- Reduce the number of touches per team.
- Limit individual touches to 1.
- Shorten the court and play head tennis only.
- Play the best of 3 sets to determine the winner.
- Create a rule where all players on a team must touch the ball before it can be returned.
Passing Rondo: Soccer Drill
Drill Outline
- Drill Name: Passing rondo
- Session Length: 5 minutes
- Age Group: all ages
- Number of players: 6 to 18
- Skills learned: Quick passing, first touch, quick feet, interceptions
- Equipment: 1 ball (per group)
Drill Setup
- This drill requires just 1 ball.
- Divide the team into groups of 6.
- Assign 1 player per group to begin as the defender.
- The other players form a circle approximately 3 to 5 yards wide around the defender.
- P1 begins the drill with the ball at their feet.
- If you have more than 6 but less than 12 players, scale the drill to accommodate the number of players you have.
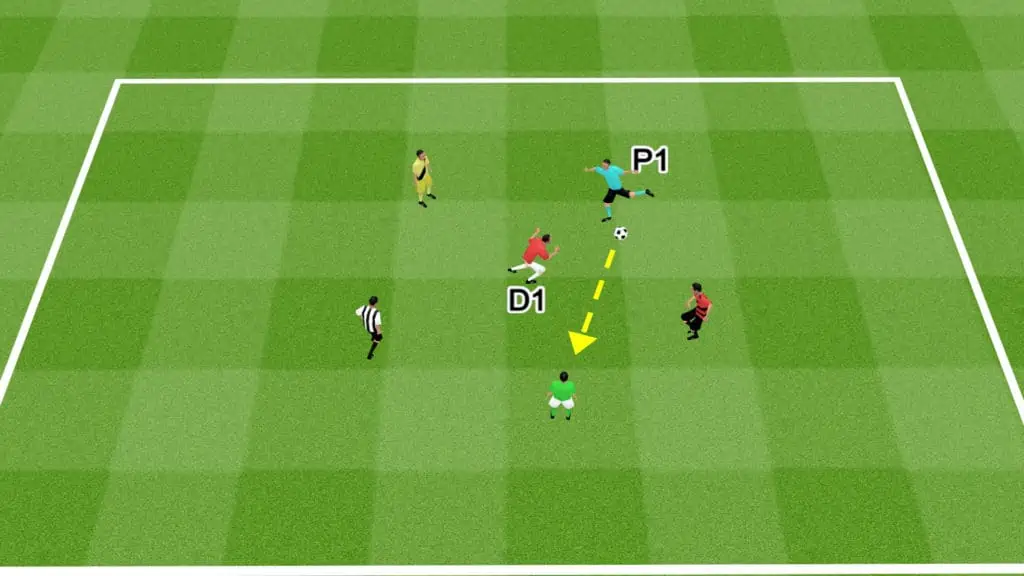
Drill Instructions
- P1 starts the drill by passing the ball to a teammate.
- The attacking players then try to keep possession through quick passing.
- Instruct attacking players to hold their general positions to maintain the circle size.
- D1 attempts to intercept the passes and gain possession. D1 can also press and tackle.
- When D1 wins the ball, the attacking payer responsible for losing possession switches with D1.
- If an attacking player plays a bad pass that strays outside the circle, they must switch with D1.
- The process is repeated for several minutes.
Drill Variations
- Expand the circle size and use 2 defenders.
- Limit the number of touches attacking players can take.
- Set pass completion targets and instruct players to count consecutive passes.
Long passing: Soccer Drill
Drill Outline
- Drill Name: Long passing
- Session Length: 5 minutes
- Age Group: all ages
- Number of players: 2 to 18
- Skills learned: First touch, ball control, long-distance passing
- Equipment: 1 ball, 8 cones (per pair)
Drill Setup
- Divide the team into pairs.
- For each pair, create 2 x 4-cone grids and position them approximately 10 yards apart.
- Each player stands inside their own 4-cone grid.
- 1 player in each pair begins with the ball.
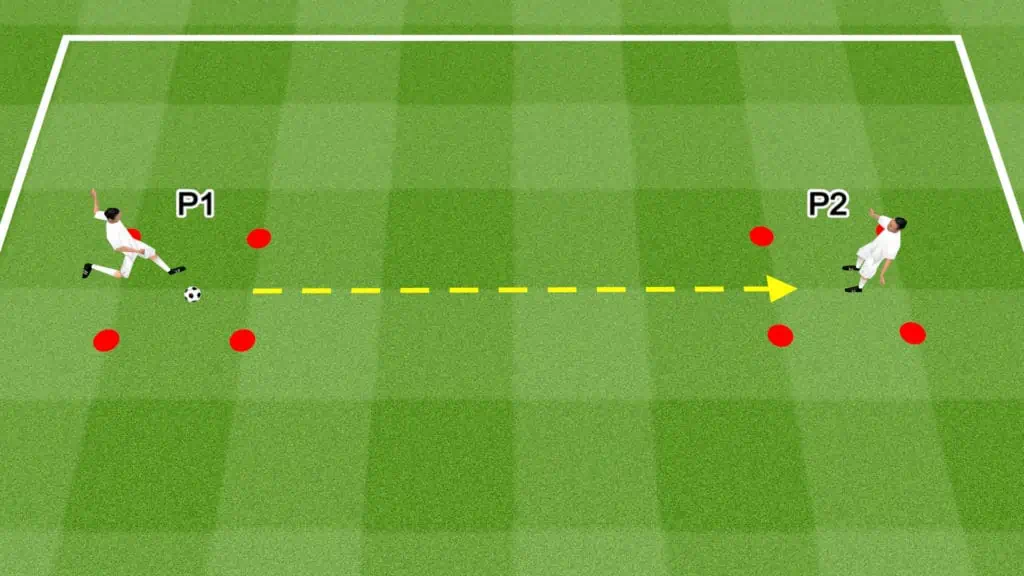
Drill Instructions
- P1 starts the drill by playing a direct pass to their teammate. Passes should be accurate, requiring minimal lateral movement from the receiver. However, allow the passers to vary the power and height of their passes, forcing the receiver to adjust and practice controlling the ball with different parts of their body.
- Instruct the receivers to focus on taking their first touch within the grid, keeping the ball close to their body.
- In the beginning, don’t limit the number of touches each player can take. Once players get used to the drill, encourage them to take a single touch to control the ball before playing a return pass.
- All players must complete 10 passes with their strong foot, then 10 passes with their weaker foot.
- When each player completes their 10 passes on each foot, expand the size of the grid and increase the distance between players to 20 yards. Repeat the entire process at this distance.
Drill Variations
- For advanced players, instruct players to make chest passes for a round.
- For advanced players, instruct players to try landing the ball inside their teammate’s grid, without it hitting the ground beforehand.
Throw & Control: Soccer Drill
Drill Outline
- Drill Name: Throw & Control
- Session Length: 5 minutes
- Age Group: All age groups
- Number of players: 2
- Skills learned: Throwing technique, movement, first touch, passing
- Equipment: 1 ball, 6 cones
Drill Setup
- Create a 3-yard square cone grid.
- Place 1 cone 5 yards from 1 side of the grid to indicate the starting point of the thrower.
- Place 1 cone 5 yards from the opposite side of the grid to indicate the starting point of the receiver.
- If you have multiple players divide them into pairs and create identical grids for each pair.
- P1 starts with the ball in their hands.
Drill Instructions
- P2 starts the drill by running into the square grid from their starting cone.
- P1 throws the ball using the correct technique to the feet of P2.
- P2 takes 1 touch to control the ball inside the square, before playing a return pass to P1.
- P2 then runs back around their starting cone before returning to the square grid.
- Repeat the drill for 10 rounds.
- After 10 rounds P1 and P2 switch roles.
Drill Variations
- Practice 1-touch passing for a round.
- Focus on the left and right feet passing for alternating rounds.
- Practice throwing to different areas of the body, including the head, chest, and knees.
- Increase or reduce the distance of the throw to practice different ranges.
Share the post "Ball Control Soccer Drills (Pro First Touch)"
Joel is a seasoned soccer journalist and analyst with many years of experience in the field. Joel specializes in game analysis, player profiles, transfer news, and has a keen eye for the tactical nuances of the game. He played at various levels in the game and coached teams - he is happy to share his insight with you.