Share the post "Game Situation Soccer Drills (Phases-Duals-Throws-Corners)"
Many soccer drills are great for passing and control, but they don’t always prepare you for a real game. We have game situation drills for you, phases of play, set pieces, and replication duals that you normally face during a big game.
There are over 20 drills in this collection, so you’ve got enough for your team in a season. I’ve also added on a few tactics at the end for the whole team – it’s good to have a plan that the whole team knows, it can take the other team by surprise.

Game Situation Soccer Drills (Combination Communication)
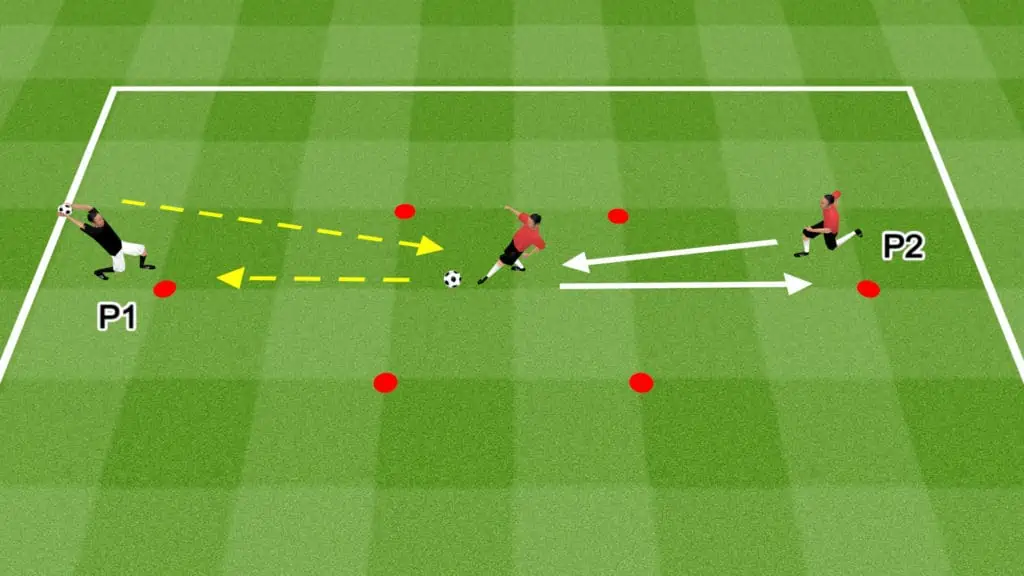
Defending The Goal: Soccer Drill
Drill Outline
- Drill Name: Defending The Goal
- Session Length: 3 to 5 minutes
- Number of players: minimum 2, optimum 4 to 16
- Skills learned: pressing, marking, 1 v 1 defending, tackling, and blocking
- Equipment: 1 ball, 1 goal (can be a mini goal made with cones)
Drill Setup
- If you have a goalkeeper, set up a full-size goal. If not, create a small goal using cones.
- The penalty box is a perfect space to run this drill.
- If your training ground doesn’t have goals or a lined field, place one cone 20 yards in front of the goal. Position another cone next to the goal on the end line.
- Split the team into 2 groups, with one attacking and one defending
- The attacking team lines up behind the cone in front of the goal. The defending team lines up behind the cone on the end line.
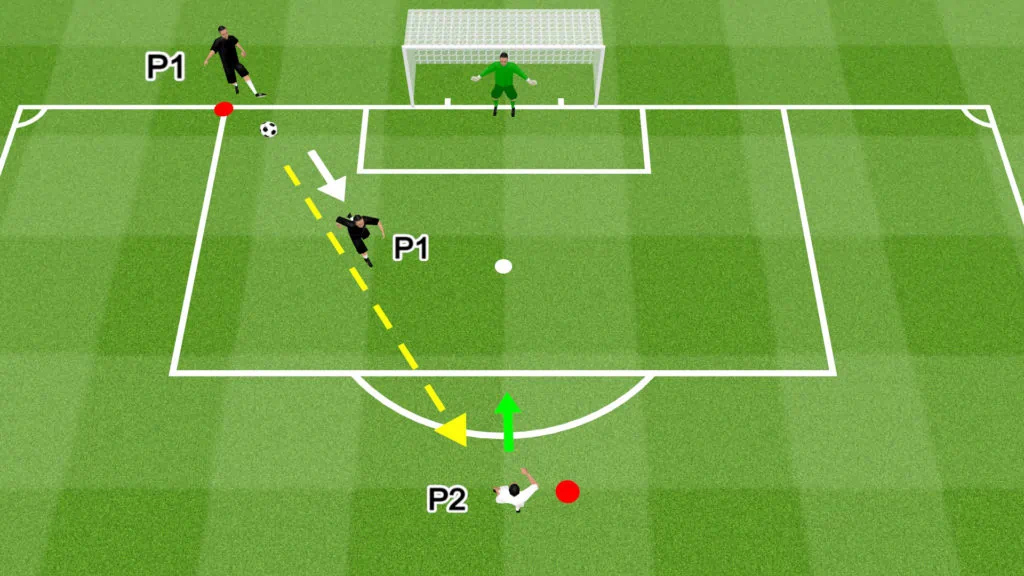
Drill Instructions
- P1 plays a firm, accurate pass to P2.
- P1 then sprints toward P2, closing them down like an in-game situation.
- P2 must take at least 2 touches before shooting to give P1 enough time to defend in a controlled manner.
- P1 should avoid diving into tackles, focusing on shot prevention first, followed by tackling, followed by shot-blocking.
- Instruct defenders to stay on their toes at all times. They should defend with their bodies turned at an angle, guiding the attacker toward their weak side. This is called “side-on” defending.
- While attackers should show intent, this drill is defense-focused.
- The round finishes when P1 dispossesses P2 or when P2 shoots.
- After the round, P1 joins the end of the attacking line and P2 joins the end of the defending line.
- The next set of players start the second round and the drill continues.
Drill Variations
- Adapt the drill to create 2 v 2 or 3 v 3 situations.
- For advanced players, enforce minimum passing requirements before a shot can be taken.
- Instead of the defenders and attackers rotating positions, create a competition between both sides to see which team concedes the least number of goals. Allow all players to complete 2 to 3 rounds before switching the attack and defense.
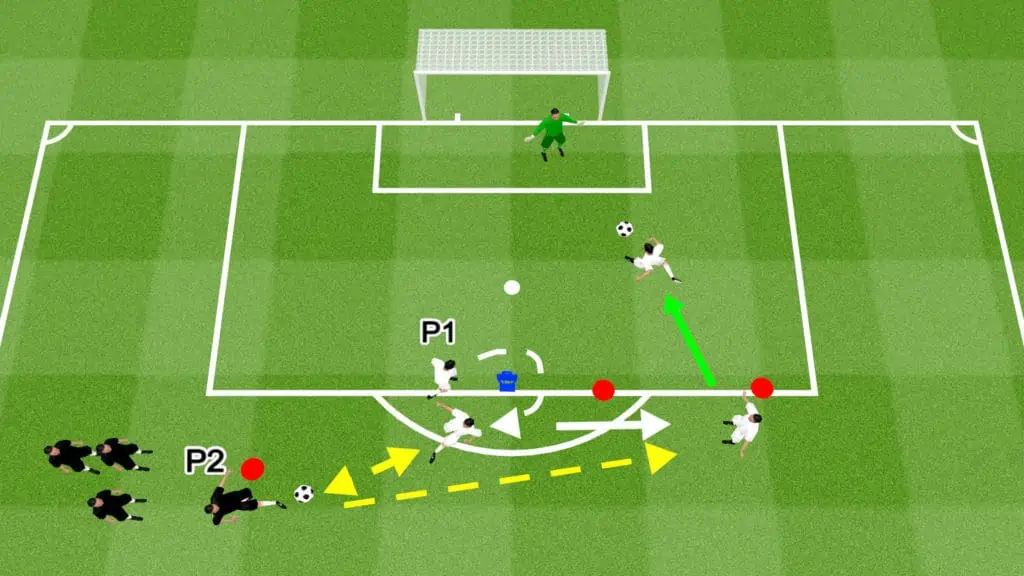
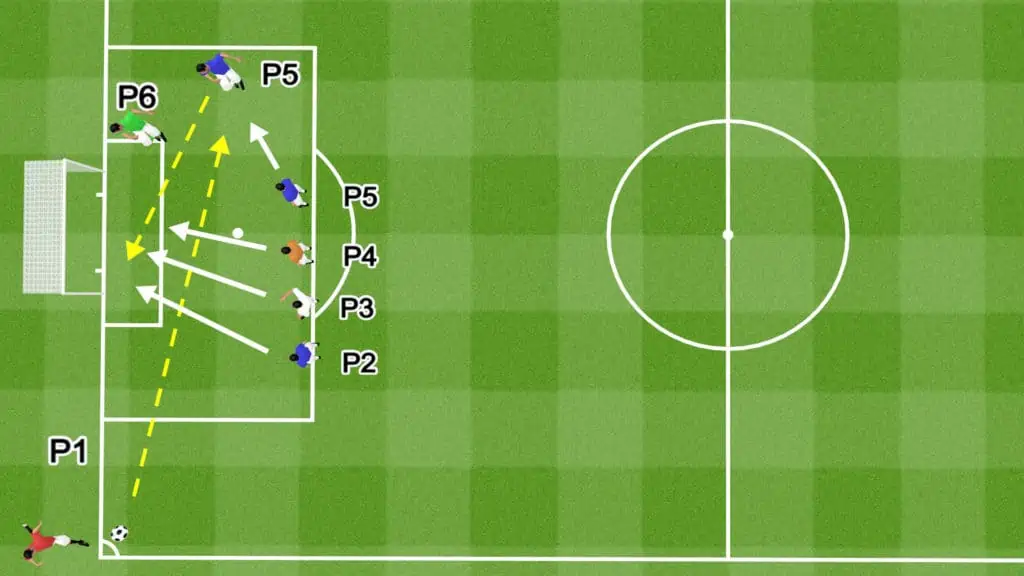
Defending Crosses: Soccer Drill
Drill Outline
- Drill Name: Defending Crosses
- Session Length: 5 minutes
- Number of players: minimum 3, optimum 8 to 16
- Skills learned: defensive positioning, marking, heading, volleying, and clearing the ball
- Equipment: 9 cones, multiple balls, and 1 goal
Drill Setup
- The penalty box is a perfect space to run this drill. If your training ground doesn’t have a lined field, use cones to create a penalty box.
- Set up goalposts or make a goal using cones on the end line of the penalty box.
- Create a 5 x 5-yard square on the outside of the penalty box toward the sideline. This is where players will make crosses from.
- Place a cone 5 yards from the crossing square toward the center of the field.
- Split the team into attackers and defenders.
- The attackers line up at the cone next to the crossing square.
- The defenders line up behind the goal.
Drill Instructions
- P1 and P2 position themselves in the penalty box, anticipating a cross from the wing.
- Attackers line up behind the cone near the sideline.
- P3 dribbles into the small square before crossing the ball into the penalty box.
- P1 and P2 work together to clear the ball away from the goal.
- P1 and P2 must communicate effectively to ensure one of them gets the ball out of the danger zone.
- Defenders should head, volley, or simply kick the ball away.
- Instruct defenders to clear the ball toward the sidelines where possible, avoiding the central areas.
Drill Variations
- Add 1 attacker to compete with the defenders for the crosses.
- Add 2 attackers to complete with defenders.
- Add more attackers and defenders to simulate in-game scenarios. Limit the number of rounds with 4 attackers and 4 defenders or more to avoid potentially dangerous collisions.
- Switch the crossing position to the opposite wing.
- Add a goalkeeper to the drill if you have one.
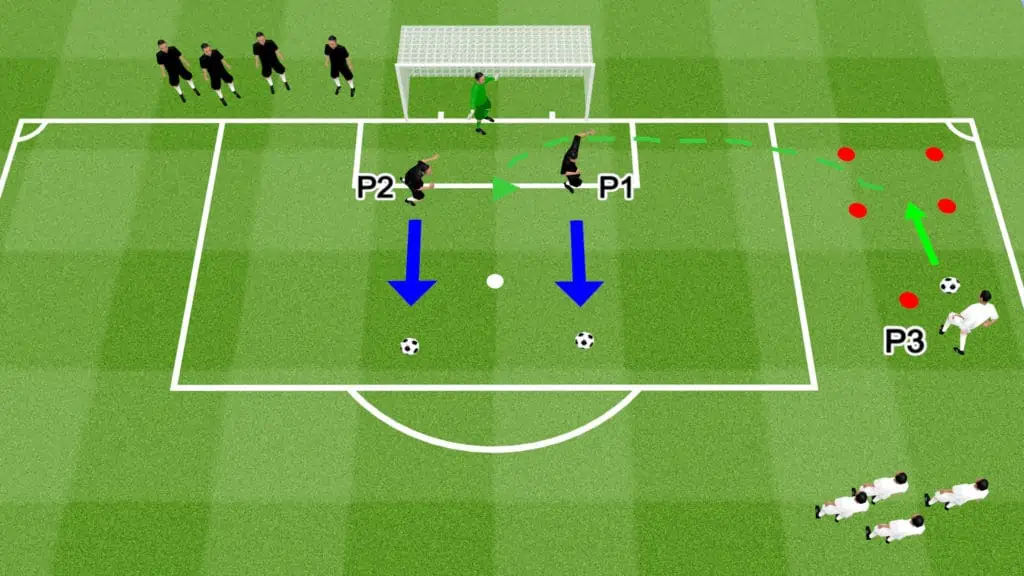
Box-to-box Midfielder Drill: Soccer Drill
Drill Outline
- Drill Name: Box-to-box Midfielder Drill
- Session Length: 5 to 10 minutes
- Number of players: 8 to 16
- Skills learned: Receiving the ball, turning with the ball, quick passing, dribbling, shooting
- Equipment: 9 cones, at least 1 ball
Drill Setup
- Use approximately half of the training field if possible.
- Set up the drill as shown in the graphic.
- Place 1 cone in the center of the field to indicate the starting point.
- Use 2 cones to create a 3-yard gate, 5 yards from the center cone, toward the goal.
- Place another cone 5 yards to the right at a right angle to the gate.
- Using 4 cones positioned 1 yard apart, create a controlled dribbling route at the edge of the penalty box.
- Place 1 more cone 5 yards to the right at a right angle to the final cone in the dribbling zone.
- Set up a full-size goal if you have a goalkeeper. Or, create a mini goal using cones.
Drill Instructions
- P1 starts the drill at the center of the field by playing a low, firm 5-yard pass to P2.
- P2 checks their shoulder before receiving the pass.
- As they receive the pass, P2 opens up their body and turns 180 degrees until they are facing the goal. The touch and turn must be controlled, taking place within the gate.
- P2 plays a give-and-go pass to P3, continuing their run toward the goal.
- After receiving the return pass, P3 accelerates toward the dribbling zone.
- P2 dribbles through the cones, weaving from one side to the other, using multiple soft touches.
- After passing through the dribble zones, P2 enters the penalty box and plays a give-and-go pass with P4.
- P4 continues the run then shoots on goal.
- When the round finishes, P1 joins the P2 line, P2 joins the P3 line, and P3 joins the P4 line.
Drill Variations
- Switch drill to the opposite side.
- Instruct the players to work on their weaker shooting feet.
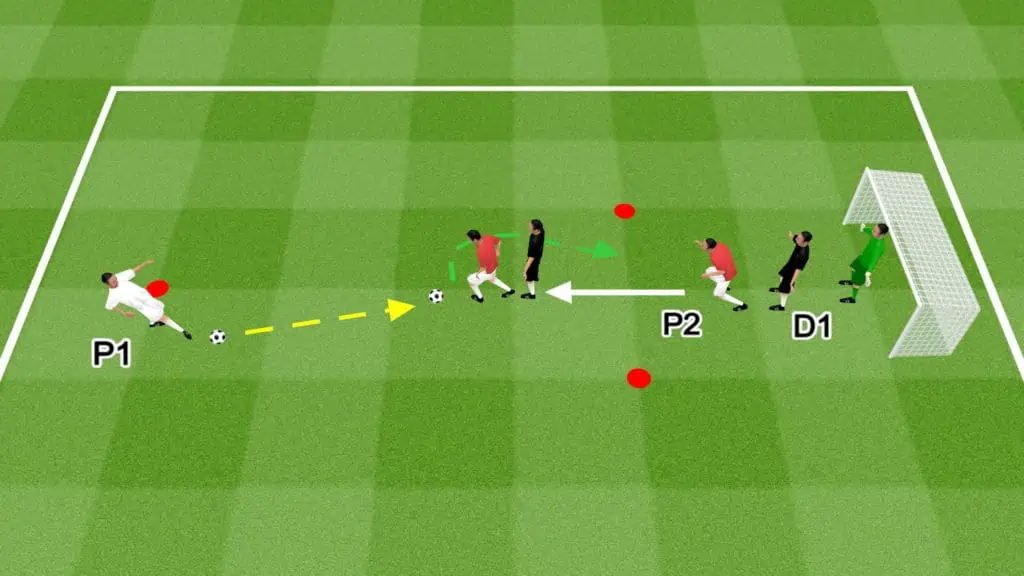
1 v 1 Defending: Soccer Drill
Drill Outline
- Drill Name: 1 v 1 Defending
- Session Length: 5 minutes
- Age Group: All age groups
- Number of players: 4 to 16
- Skills learned: Sprinting, marking, tackling, and blocking
- Equipment: 4 cones, 1 ball, 1 goal
Drill Setup
- Place 2 cones approximately 5 yards apart along the edge of the penalty box.
- Place 2 cones 10 yards from either cone toward the halfway line.
- Set up a full-size goal if you have a goalkeeper. If not, use a small goal or cones.
- Split the team into 2 groups: defenders and attackers (actual player position doesn’t matter)
- Defenders line up behind one cone outside the box.
- Attackers line up behind the other.
- The second attacker (P2) in line starts with the ball.
Drill Instructions
- On the coach’s whistle, D1 and P1 sprint to, then around the cones at the edge of the penalty box.
- After rounding the cone, P1 calls for the pass from P2.
- When the pass is played, the drill becomes a live 1 v 1. P1 tries to score and D1 tries to stop them by tackling or blocking.
- D1 can attempt to intercept the ball when it is passed.
- P1 dribbles toward the goal and takes a shot if an opportunity opens up.
- D1 should practice controlled defending, and tackle timing while avoiding diving in.
- When the round is over, the players join the end of the other lines.
Drill Variations
- Create a competition to see which group gets the most stops.
- Repeat the drill with 2 defenders and 2 attackers.
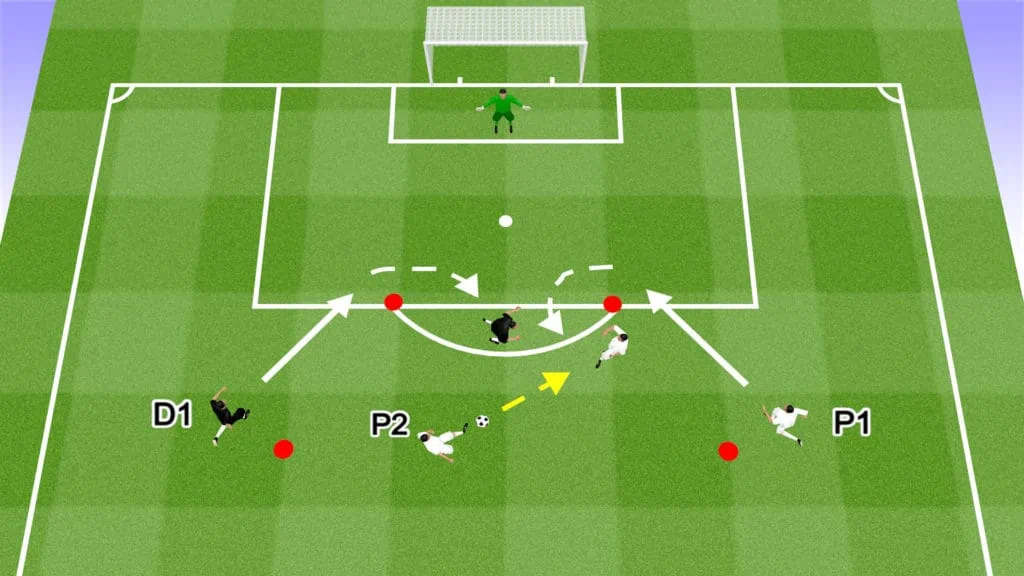
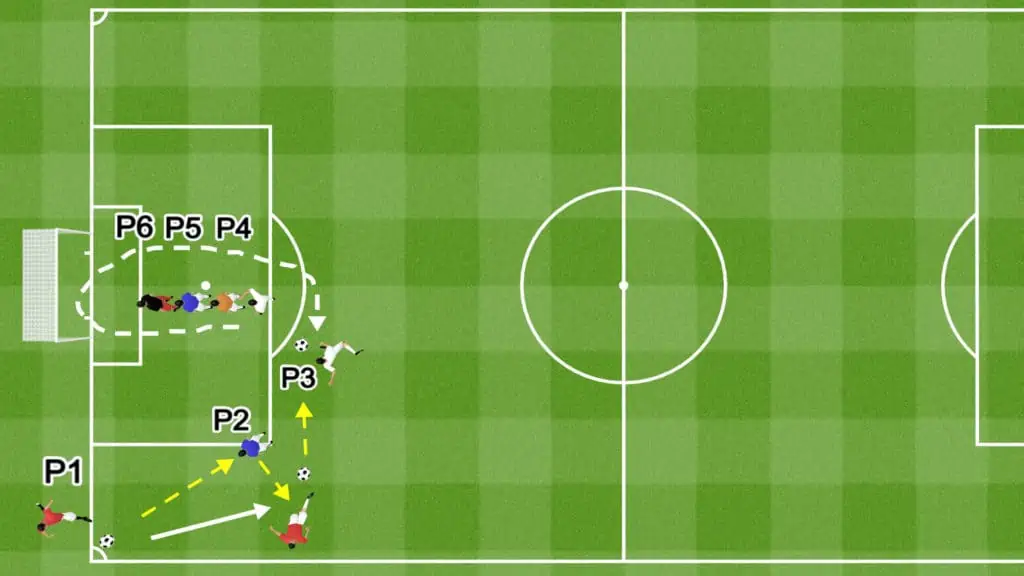
2 v 2 Inside The Box: Soccer Drill
Drill Outline
- Drill Name: 2 v 2 Inside The Box
- Session Length: 10 minutes
- Age Group: 10+
- Number of players: 8 (minimum)
- Skills learned: Marking, tackling, and blocking
- Equipment: 1 ball, 1 goal
Drill Setup
- This drill takes place in the penalty box.
- If you have a goalkeeper, set up a full-size goal. If not, create a small 5-yard goal using cones.
- Split the team into pairs.
- 1 pair is designated as the defensive team (D1 + D2) and another as the attacking team (P1 + P”).
- D1 + D2 and P1 + P2 begin the drill inside the penalty box.
- The attackers start with their back to goal.
- The defenders mark them appropriately.
- At least 3 players from the remaining groups line up outside the penalty box, one of them starting with the ball.
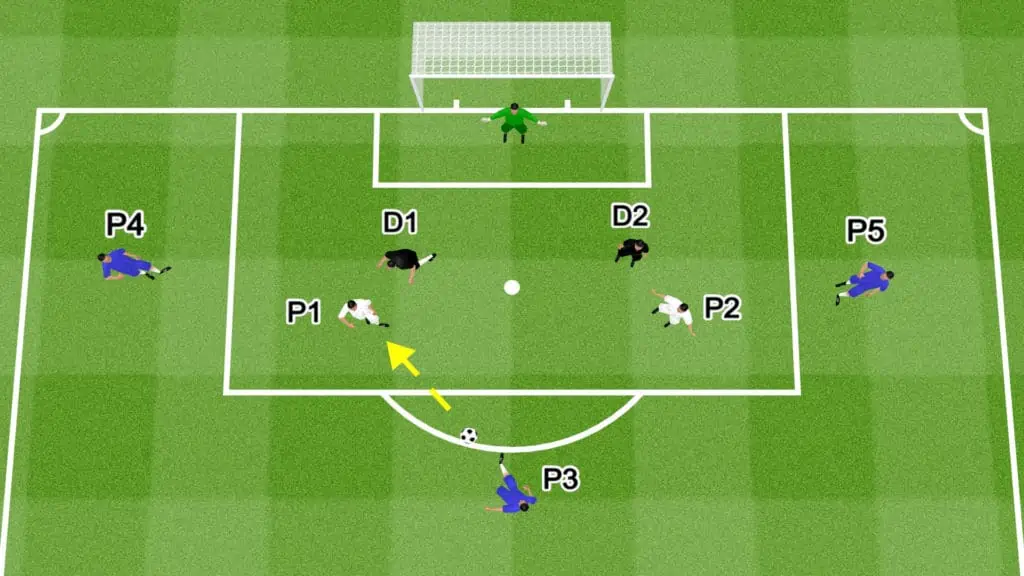
Drill Instructions
- On the coach’s signal, the game goes live.
- P1 and P2 attempt to get free to receive the ball from the player outside the box.
- D1 and D2 mark the attackers closely, trying to stop them from receiving the outside pass.
- The attackers and defenders must stay inside the box.
- When the attackers receive the ball, they work together and try to score.
- The defenders attempt to stop them.
- The attackers can pass to the players outside the penalty box to recycle possession.
- The players outside the penalty box cannot shoot or score.
- The round is over if the attackers score, shoot the ball wide or over the crossbar, or if the defenders win possession.
- The pair that wins the round continues as the defensive team.
Drill Variations
- Create a time limit for each round.
- Limit the number of times the attackers can recycle possession with the outside group.
- Add a third attacker to make things difficult for the defense.
3 v 3 Attacking Waves: Soccer Drill
Drill Outline
- Drill Name: 3 v 3 Attacking Waves
- Session Length: 10 to 15 minutes
- Age Group: 10+
- Number of players: 6 to 18
- Skills learned: Positioning, tackling, and blocking
- Equipment: 2 cones, 1 ball, 1 goal
Drill Setup
- This drill takes place in the penalty box.
- If you have a goalkeeper, set up a full-size goal. If not, create a small 5-yard goal using cones.
- Split the team into groups of 3.
- 3 defenders start inside the penalty box.
- 3 attackers start outside the penalty box with the ball.
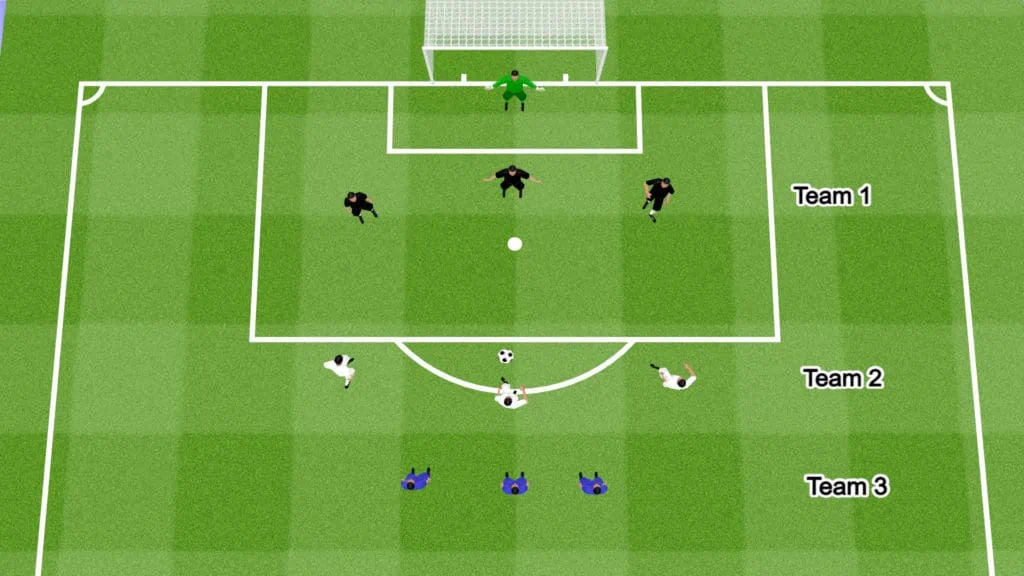
Drill Instructions
- On the coach’s signal, the drill begins as a 3 v 3, attack v defense scenario.
- The attacking team has 15 seconds to score.
- The attackers have unlimited touches and are permitted to pass, dribble, and shoot.
- The attackers cannot score from outside the penalty box.
- Instruct the defenders to communicate effectively and work as a team to snuff out attacks.
- Defenders can tackle, press, block, and intercept.
- The wave is over if the attacker scores, the defense gains possession, or 15 seconds elapses.
- When the wave finishes, the defense has 5-seconds to get back into position before the next group of attackers starts the second wave.
- The defense sustains 5 waves before they switch with another group.
- Repeat the drill until all groups have defended 5 waves.
Drill Variations
- Get rid of the time limit.
- Introduce a maximum touch and/or minimum pass rule for attackers.
- Adjust numbers to 2 v 2 or 4 v 4.
- Add extra attackers to create mismatches for the defensive groups.
Pass, Layoff, and Shoot: Soccer Drill
Drill Outline
- Drill Name: Pass, layoff, and shoot
- Session Length: 5 minutes
- Age Group: All age groups
- Number of players: 2 to 18
- Skills learned: Passing, layoffs, first-time shooting
- Equipment: 2 cones, 1 ball (minimum), 1 goal
Drill Setup
- Use the penalty box for this drill.
- Set up a full-size goal. Even if there is no goalkeeper, it’s important to practice shooting in a regulation goal.
- Place 1 cone on the edge of the penalty box near the middle.
- Place 1 cone 5 yards outside of the penalty box toward center field.
- P2 stands next to the cone at the edge of the box. P2 is the passer.
- The rest of the team line up behind P1 at the cone outside the penalty box.
- P1 starts with the ball.
Drill Instructions
- P1 starts the drill by passing the ball to P2.
- P1 then sprints toward the box and calls for a return pass.
- P2 plays a first-time layoff pass in front of P1.
- P1 takes a touch to control the ball, before shooting on goal.
- This is also a useful drill for goalkeepers.
- The next player in the attacking line continues the drill after the first shot is taken.
- Rotate the passer occasionally.
Drill Variations
- Change the starting position to practice different shooting angles.
- Adjust the shooting distance.
- Focus on first-time shooting only.
- Instruct the passer to chip the ball slightly, forcing the shooter to take a half volley.
Double Movement Finishing: Soccer Drill
Drill Outline
- Drill Name: Double movement finishing
- Session Length: 10 to 15 minutes
- Age Group: 10+
- Number of players: 3 to 18
- Skills learned: First touch, shooting, finishing from a cross, crossing, movement
- Equipment: 1 mannequin (alternatively 1 cone or agility pole), 3 cone, 1 goal, 2 balls (minimum)
Drill Setup
- Use the penalty box for this drill.
- Set up a full-size goal, even if there is no goalkeeper.
- Place a mannequin, cone, or agility pole centrally on the penalty spot inside the box.
- Place 1 cone 5 yards outside the penalty box.
- Place 1 cone next to the goal on the end line.
- Place 1 cone between the right-hand sideline and the edge of the penalty box.
- P2 stands next to the cone on the end line with a ball.
- P3 stands next to the cone near the sideline with a ball.
- P1 and the rest of the players line up behind the cone outside the penalty box.
Drill Instructions
- P2 starts the drill by passing the ball to P1.
- P1 takes one touch to control the pass before taking a shot on goal.
- P1 then makes a dummy run to the left side of the mannequin as if they are heading for the back post. When P1 reaches the mannequin, they quickly check their run, sprinting to the other side toward the front post.
- P3 crosses the ball to P1.
- P1 finishes the ball with a header, volley, or regular shot. Instruct the attackers to try to finish first-time.
- P1 rejoins the end of the attacking line.
- Rotate the passer and crosser occasionally.
Drill Variations
- Switch the passing and crossing positions to the opposite side.
- Instruct strikers to shoot first-time on all shots.
- Change the starting position of the strikers for different shooting angles.
- Change the angle of the runs toward the back post.
- Focus on weak foot shooting.
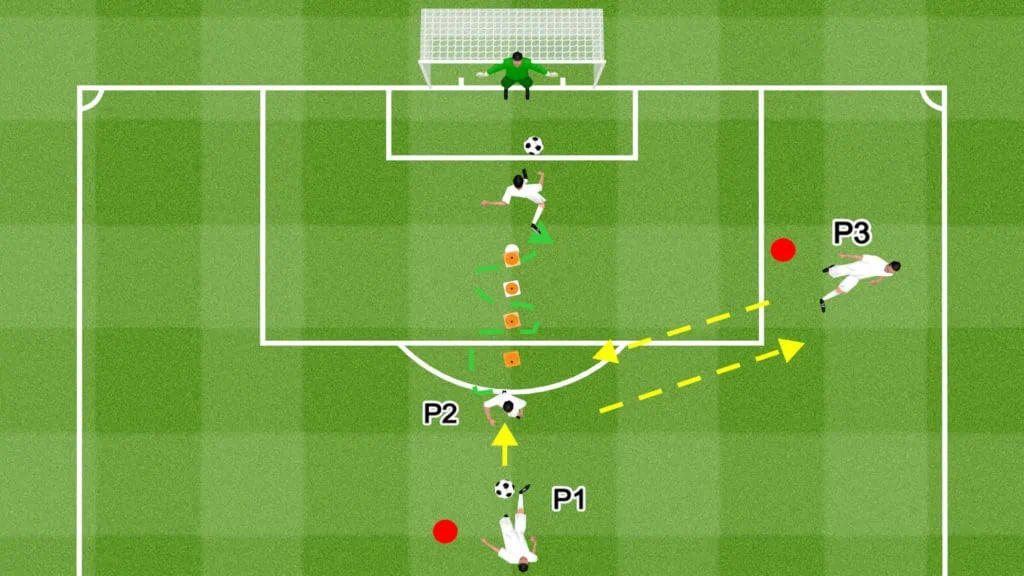
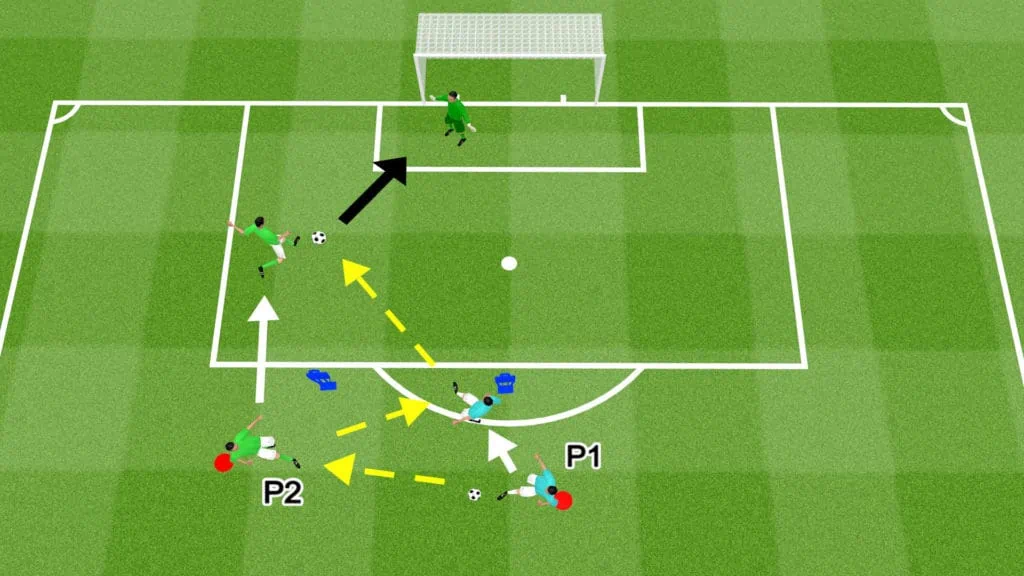
Split the Defense Finishing: Soccer Drill
Drill Outline
- Drill Name: Split the defense finishing
- Session Length: 5 to 10 minutes
- Age Group: 10+
- Number of players: 3 to 18
- Skills learned: Movement, positioning, first touch, finishing
- Equipment: 1 mannequin (alternatively 1 cone or agility pole), 3 cone, 1 goal, 1 balls (minimum)
Drill Setup
- Use the penalty box for this drill.
- Set up a full-size goal, even if there is no goalkeeper.
- Place a mannequin, cone, or agility pole centrally on the edge of the penalty box.
- Place 1 cone 5 yards outside the penalty box.
- Create a 5-yard passing gate to the right of the mannequin using 2 cones.
- P1 stands next to the mannequin.
- P2 and the rest of the players line up behind the cone outside the box.
- P2 starts with the ball.
Drill Instructions
- P1 starts the drill by moving around the mannequin as if it were a defender.
- P1 then sprints in front of the mannequin to receive a pass.
- P2 plays a quick one-two return pass to P1.
- After playing the return pass, P1 backs away toward the 2 cone grid while still facing P2.
- This movement simulates splitting 2 defenders in the back line.
- P2 plays a pass to P1’s feet.
- P1 takes a touch into the penalty box for a 1 v 1 with the goalkeeper.
- P1 joins the end of the passing line.
- P2 takes P1’s position.
- Repeat the drill.
Drill Variations
- Switch the drill to the opposite side to practice different shooting angles.
- Create a competition where each attacker has 2 lives. All players can miss 2 shots. On the third miss, they are eliminated. The last player remaining is the winner.
Give & go shooting: Soccer Drill
Drill Outline
- Drill Name: Give & go shooting
- Session Length: 5 minutes
- Age Group: All age groups
- Number of players: Full squad, including the starting goalkeeper and subs
- Skills learned: passing, dribbling, shooting, and saves
- Equipment: 2 cones, 1 goal, multiple balls
Drill Setup
- Use the penalty box and the surrounding area for this drill.
- Set up 1 full-size goal in the normal position on the end line. The goalkeeper takes their place in between the posts.
- Place 1 cone centrally on the edge of the penalty box. The coach begins at this cone, acting as the passer and defender.
- Place 1 cone centrally 5 yards outside the box.
- P1 and the rest of the outfield players line up behind the cone on the outside of the penalty box.
- P1 and the outfield players begin with the balls.
Drill Instructions
- P1 starts the drill by playing a quick pass to the coach.
- The coach lays the ball off to 1 side, then assumes the role of a defender.
- P1 runs for the return pass, dribbles past the coach, then takes a shot on goal.
- The coach doesn’t actively try to win possession. Instead, they shadow the attacker, allowing them to practice a game-like take-on.
- P1 collects their ball and returns to the end of the line.
- P2 and the rest of the outfield players repeat the drill.
- Outfield players should focus on accurate finishes, picking their spot before shooting.
- This drill doubles as a goalkeeper warm-up.
Drill Variations
- If you have sub-goalkeepers, consider rotating them into the drill.
- The coach should play bobbled return passes or slightly elevated returns to simulate real game scenarios.
- Focus on weak foot shooting for a round.
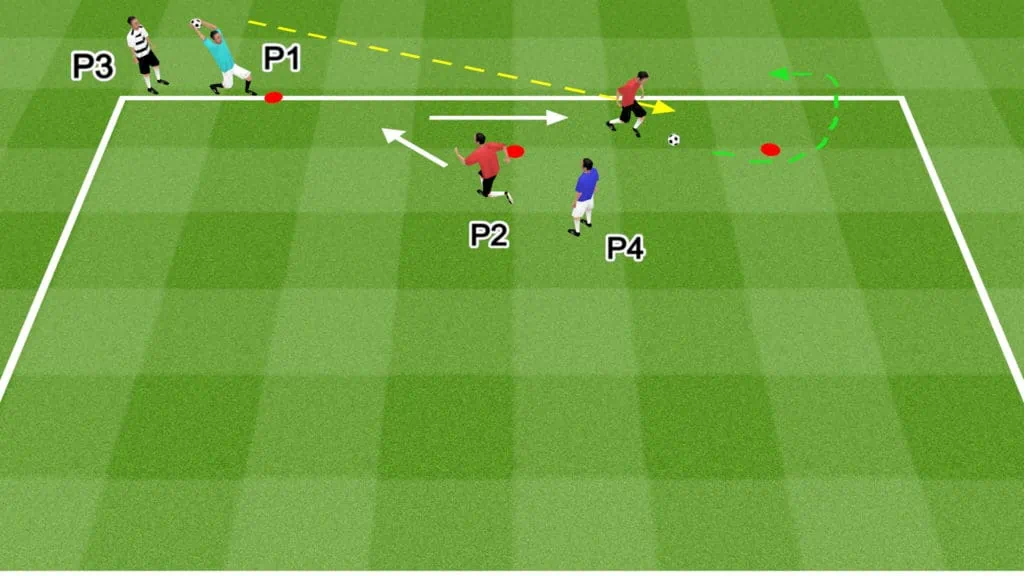
Man-On Drill: Soccer Drill
Drill Outline
- Drill Name: Man-On Drill
- Session Length: 10 minutes
- Age Group: 7+
- Number of players: 3 (minimum)
- Skills learned: First touch, turning, holding off the defender, shielding the ball, finishing
- Equipment: 1 ball (minimum), 3 cones, 1 goal (optional)
Drill Setup
- Set up a 5-yard, 2-cone gate along the edge of the penalty box.
- Place 1 cone 10 yards from the gate toward the center of the field.
- If you have a goalkeeper, consider setting up a goal to include shooting practice as a secondary aspect of the drill.
- P2 (attacker) and D1 (defender) begin at the passing gate.
- P1 and the remaining players line up behind the cone toward centerfield.
- P1 begins with the ball at their feet.
Drill Instructions
- P2 moves around the edge of the penalty box simulating an in-game scenario.
- P2 shakes off the defender, sprints through the gate, and calls for the ball.
- P1 plays a low, hard pass to P2.
- P2 takes a good first touch, holds off the defender, then spins toward the goal. If there is a goalkeeper, P2 takes a shot on goal.
- D1 doesn’t actively try to win the ball. Instead, they apply pressure, allowing P2 to practice taking a solid first touch when surrounded by defenders.
- When the round is over, P2 joins the end of the passing line, D1 takes P2’s place, and P1 takes D1’s place.
- If you have 7 or more outfield players, consider setting up 2 identical grids and running the drills concurrently.
Drill Variations
- Instruct players to focus on different types of touches in each round.
- For 1 round, focus on taking 1 touch, and spinning behind the defender toward the goal.
- For another round, focus on taking a good touch, facing up the defender, and running past them before shooting.
- For another round, instruct P2 to play a give-and-go pass with P1, before running behind the defender for a through pass from P1.
- For advanced players, encourage them to work on different skill moves, touches, flicks, and turns.
Front post flick: Soccer Drill
Drill Outline
- Drill Name: Front post flick
- Session Length: 10 to 15 minutes
- Age Group: 12+
- Number of players: 5 (minimum)
- Skills learned: Crossing technique, positioning, tactical play
- Equipment: 1 goal, multiple balls
Drill Setup
- This drill focuses on the attacking pattern of your 4 best headers or ball winners for a corner. If you have more players, instruct them to occupy other dangerous attacking positions on the edge of the box, at the back post, and around the 6-yard box.
- Use the final third of the field for this drill (entire width plus the penalty box).
- P1 should be your best set-piece taker. If you have multiple corners or set-piece takers, rotate them after 2 to 3 rounds.
- P1 places the ball in a suitable place on the corner spot.
- P2, P3, P4, and P5 stand in a stack formation close together on the edge of the penalty box. This makes it difficult for the defenders to mark them and track their movement.
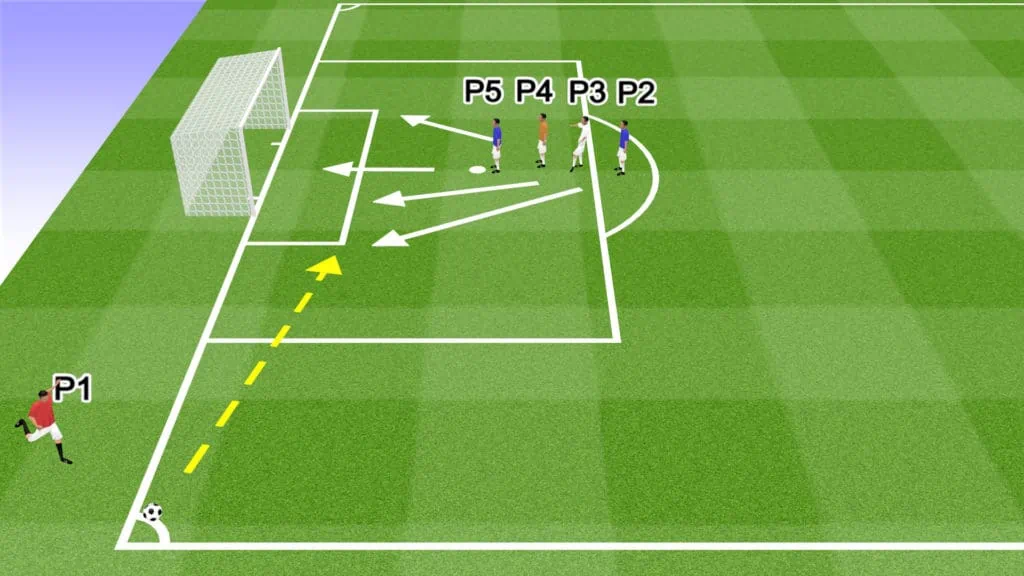
Drill Instructions
- It is a good idea to use hand signals for corner setups. For this drill, the taker should raise their right hand in the air after placing the ball on the corner flag. This indicates what positions the attackers should take up during a game.
- As P1 makes their run-up to kick the ball, the outfield players make their runs into the box.
- P2 runs to the space just in front of the front post, next to the corner of the 6-yard box. P2 is the primary target of the cross.
- P3 runs around 2 yards behind P3 toward the front post, in case P2 misses the ball.
- P4 checks their run and loops around toward the back post, anticipating a flick-on from P2 or P3.
- P5 sprints directly toward the center of the 6-yard box.
- P1 crosses the ball to the front post to P2.
- P2 flicks the ball on goal or toward the back post, where P3, P4, or P5 may then try to score.
- Practice this routine multiple times, working on positioning, timing, and execution.
Drill Variations
- Practice the corner routine from the opposite side.
- For more advanced teams, consider adding extra players to the stack, making different runs.
- Set scoring targets for each training session, encouraging players to improve efficiency.
- Add defenders to simulate an in-game scenario.
Back post hang up: Soccer Drill
Drill Outline
- Drill Name: Back post hang up
- Session Length: 10 to 15 minutes
- Age Group: 12+
- Number of players: 6 (minimum)
- Skills learned: Crossing technique, positioning, tactical play, & movement
- Equipment: 1 goal, multiple balls
Drill Setup
- Use the final third of the field for this drill (entire width plus the penalty box).
- P1 and any designated set-piece takers should rotate turns taking the corners.
- P2, P3, P4, and P5 stand in a tight line along the edge of the penalty box. This makes it difficult for the defenders to mark them and track their movement.
- P6 stands next to the back post.
- P5 and P6 should be the tallest and best headers of the ball on your team.
Drill Instructions
- For this drill, the taker should raise their left hand in the air after placing the ball on the corner flag. This indicates what positions the attackers should take up during a game.
- As P1 makes their run-up to kick the ball, the outfield players make their runs into the box.
- P5 fakes a forward run and then drops toward the backside of the penalty box, 2 to 3 yards inside the line on the edge of the box. P4 is the main target of the corner.
- P6 waits until the corner is taken to judge the flight of the ball. P6 is the secondary target.
- P1 hangs the ball in the air toward P6 and P5.
- P2, P3, and P4 make their runs toward the front post.
- P5 or P6 head the ball back toward the front post to meet the run of the other 3 players.
- P2, P3, or P4 score.
- Practice this routine multiple times, working on positioning, timing, and execution.
Drill Variations
- Practice the corner routine from the opposite side.
- Set scoring targets for each training session.
- Add defenders to simulate an in-game scenario.
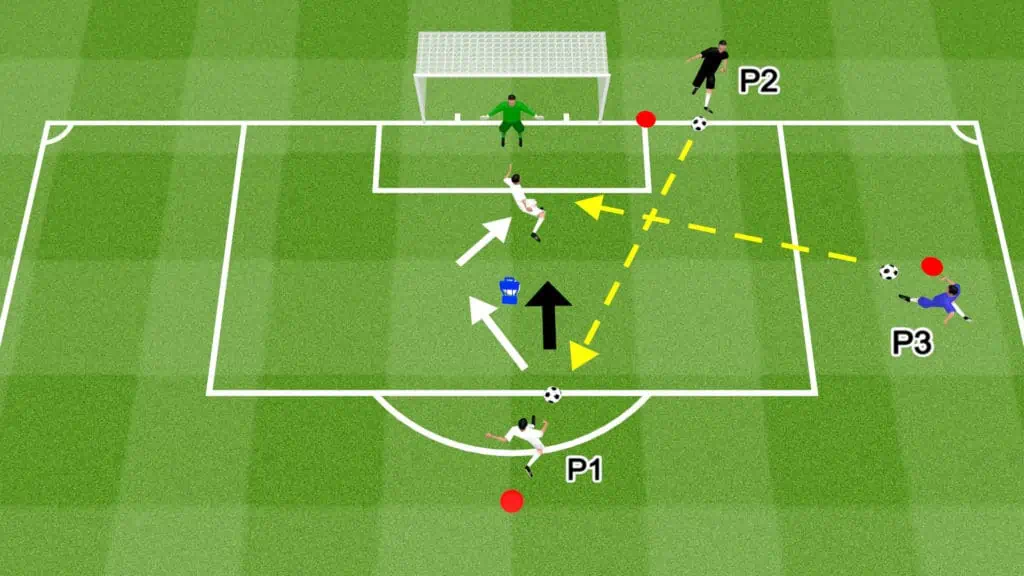
Short corner Shot Setup: Soccer Drill
Drill Outline
- Drill Name: Short corner Shot Setup
- Session Length: 10 to 15 minutes
- Age Group: 12+
- Number of players: 6 (minimum)
- Skills learned: Passing, shooting, positioning, tactical play, & movement
- Equipment: 1 goal, multiple balls
Drill Setup
- Use the final third of the field for this drill (entire width plus the penalty box).
- P3 should be one of the best shot-takers on your team.
- P1 and any designated set-piece takers should rotate turns taking the corners.
- P2 stands at the corner of the penalty box nearest to the corner flag.
- P3, P4, P5, and P6 stand in a tight line from the edge to the inside of the penalty box. This makes it difficult for the defenders to mark them and track their movement.
Drill Instructions
- For this drill, the taker should raise both hands in the air after placing the ball on the corner flag. This indicates what positions the attackers should take up during a game.
- As P1 makes their run-up to kick the ball, P2 sprints toward P1 and calls for the ball.
- P1 lines up like they will cross the ball but plays a short pass to P2’s feet.
- After the first pass, P1 runs past P2 and receives the return.
- At the same time, P3 sprints past P4, P5, and P6, faking a run to the front post.
- After passing P6, P3 loops back around to the edge of the box and calls for the pass from P1.
- P1 lays the ball off to P3 for a first-time shot.
- P3 takes a first-time shot on goal.
- The rest of the attacking players take up positions inside the box, anticipating a rebound or deflection.
Drill Variations
- Practice the corner routine from the opposite side.
- Rotate the role of P3 to give your best strikers a chance to practice shooting in this scenario.
- Add a goalkeeper for realistic shooting practice.
- Set scoring targets for each training session.
- Add defenders to simulate an in-game scenario.
Down the line: Soccer Drill
Drill Outline
- Drill Name: Down the line
- Session Length: 5 minutes
- Age Group: All age groups
- Number of players: 4 (minimum)
- Skills learned: Throwing technique, movement, first touch, dribbling
- Equipment: 2 balls (minimum), 3 cones
Drill Setup
- This drill takes place in a 20-yard stretch along the sideline.
- Place 1 cone on the sideline to indicate the starting point for the throwers.
- Place 1 cone approximately 10 yards from the first, 2 to 3 yards inside the sideline.
- Place 1 cone 10 yards from the second next to the sideline.
- Divide the team into even groups, with each group lining up behind a different cone.
- Each player in the throwing line should have a ball.
Drill Instructions
- On the coach’s signal, P2 starts to move toward P1, then quickly changes direction, running down the line and calling for the ball.
- P1 throws the ball using a proper soccer throw-in technique. The ball starts behind the head and must be released when it is directly above the thrower’s head. Both feet must remain on the ground.
- P1 times P2’s run, ensuring the ball lands in front of them.
- P2 takes the ball in their stride then dribbles past the final cone.
- P2 then takes the ball over the sideline and rejoins the throwing line.
- P1 joins the opposite line.
- P3 and P4 then start the next round, repeating the entire process.
- The drill can be repeated in a cycle.
Drill Variations
- Instruct the receivers to make different movements before calling for the ball.
- Change the angle of the receivers’ runs.
- Increase or reduce the distance of the throw to practice different ranges.
- Introduce a defender to simulate a real game scenario.
Pin the defender: Soccer Drill
Drill Outline
- Drill Name: Pin the defender
- Session Length: 5 minutes
- Age Group: All age groups
- Number of players: 3 (minimum)
- Skills learned: Throwing technique, holding off the defender, first touch
- Equipment: 1 ball, 2 cones
Drill Setup
- This drill takes place in a 5 to 10-yard stretch along the sideline.
- Place 1 cone on the sideline to indicate the starting point for the throwers.
- Place 1 cone approximately 5 to 10 yards from the first, 2 to 3 yards inside the sideline. P2 and D1 stand at this cone.
- The thrower starts with the ball.
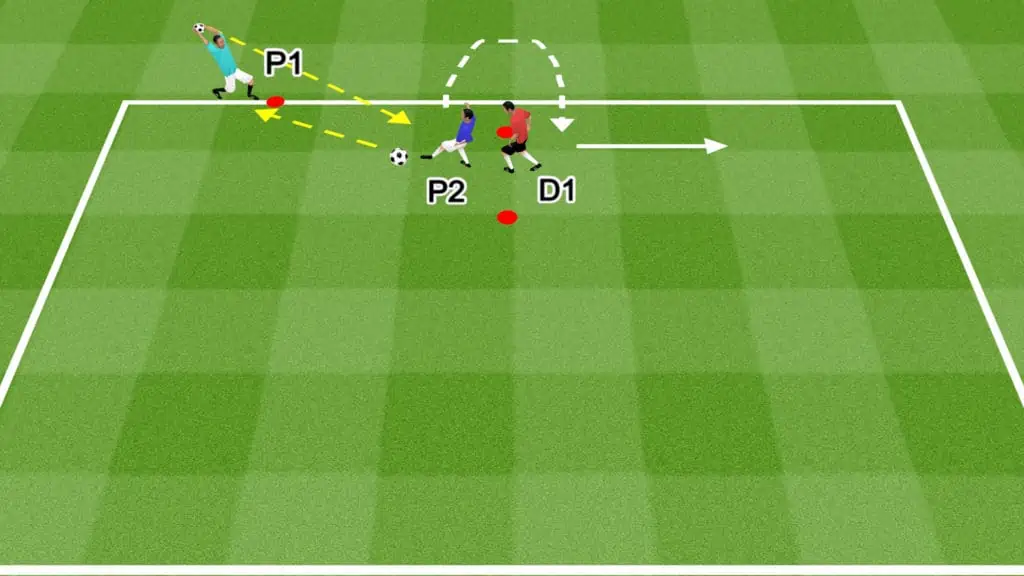
Drill Instructions
- On the coach’s signal, P2 moves slightly toward P1 creating some distance from the defender.
- P1 throws the ball to P2’s feet.
- P2 takes a good first touch and continues to face P1.
- P2 must be aware of D1’s position, leaning into them and holding them off to shield the ball.
- D1 defends passively, applying pressure without trying to win possession.
- P2 then passes the ball back to P1, spins the defender, and runs down the sideline for a few yards. P1 doesn’t play a return pass. This movement forms a positive habit of moving after passing.
- When the round is over, P1 takes P2’s position, P2 takes D1’s position, and D1 takes P1’s position.
Drill Variations
- Increase or reduce the distance of the throw to practice different ranges.
- Instead of playing a return pass to P1, P2 turns to face the defender and dribbles past them in a 1 v 1.
- Increase the intensity of defending to simulate a real game scenario.
- Introduce more passing sequences to practice in-game tactics.
Throw & Control: Soccer Drill
Drill Outline
- Drill Name: Throw & Control
- Session Length: 5 minutes
- Age Group: All age groups
- Number of players: 2
- Skills learned: Throwing technique, movement, first touch, passing
- Equipment: 1 ball, 6 cones
Drill Setup
- Create a 3-yard square cone grid.
- Place 1 cone 5 yards from 1 side of the grid to indicate the starting point of the thrower.
- Place 1 cone 5 yards from the opposite side of the grid to indicate the starting point of the receiver.
- If you have multiple players divide them into pairs and create identical grids for each pair.
- P1 starts with the ball in their hands.
Drill Instructions
- P2 starts the drill by running into the square grid from their starting cone.
- P1 throws the ball using the correct technique to the feet of P2.
- P2 takes 1 touch to control the ball inside the square, before playing a return pass to P1.
- P2 then runs back around their starting cone before returning to the square grid.
- Repeat the drill for 10 rounds.
- After 10 rounds P1 and P2 switch roles.
Drill Variations
- Practice 1-touch passing for a round.
- Focus on the left and right feet passing for alternating rounds.
- Practice throwing to different areas of the body, including the head, chest, and knees.
- Increase or reduce the distance of the throw to practice different ranges.
Halfway Line Goal Kicks: Soccer Drill
Drill Outline
- Drill Name: Halfway Line Goal Kicks
- Session Length: 10 minutes
- Age Group: 12+
- Number of players: 1
- Skills learned: Long passing, kick power, passing accuracy
- Equipment: Half Field, 9 balls, 12 cones
Drill Setup
- Use at least half of the field for this drill.
- Place all 9 balls next to the goal so the goalkeeper doesn’t have to collect their ball after every kick.
- Set up 5-yard square grids across the halfway line, with 1 on the right, 1 in the center, and 1 on the left.
- Ensure goalkeepers warm up appropriately to avoid injury while kicking.

Drill Instructions
- It’s important for a goalkeeper to create a kicking routine, involving the placement of the ball, the distance of their run-up, and their technique. This helps them to settle into their routine during a game.
- The goalkeeper takes 9 total kicks, 3 to the grid on the right, 3 to the grid in the center, and 3 to the grid on the left.
- The objective is to land the ball inside the squares as many times as possible.
- Repeat the entire drill 3 times.
- Record the number of successful kicks in each round. Goalkeepers should aim to beat their score after every round.
- If you have multiple goalkeepers, rotate them after every round.
Drill Variations
- If you have multiple goalkeepers, create a competition among them to see who kicks the most accurate passes.
- Repeat the same drill with a rolling ball. The coach passes the ball back to the goalkeeper and they kick it first time toward the square grids.
- Consider adding defenders to apply pressure to the goalkeeper as they kick it, simulating a real game scenario.
Team Penalty Shootout: Soccer Drill
Drill Outline
- Drill Name: Team Penalty Shootout
- Session Length: 10 to 15 minutes
- Age Group: All age groups
- Number of players: 11 minimum (10 outfield players & 1 goalkeeper)
- Skills learned: shooting, pressure, saving
- Equipment: 1 ball, 1 goal
Drill Setup
- Use the full penalty box for this drill.
- Set up a full-size goal and mark the penalty spot.
- This drill replicates a real 2 team penalty shootout. It works best with a high number of players. However, a minimum of 5 v 5 with a goalkeeper can work.
- Divide the team into 2 even groups.
- If you have multiple goalkeepers, assign them to each group.
- Instruct each group to line up together outside the penalty box.
- Host a coin toss to determine which team goes first.
Drill Instructions
- The teams compete in a 5 shot, penalty shootout.
- Each team takes turns taking penalties, with a different player shooting each time.
- The shootout is decided in a best of 5, meaning the team with the most goals after 5 penalties each is the winner.
- If the scores are tied after 5 penalties each, the shootout goes to sudden death.
- In sudden death, each team takes 1 penalty per round. If both teams score, sudden death continues for another round. If both teams miss, sudden death continues for another round. If 1 team scores and the other misses, the team that scores win.
- Both teams must follow the same shooting order throughout sudden death.
- For more practice, consider mixing up the teams ad repeating the drill.
Drill Variations
- To increase pressure, introduce punishments for missing penalties, such as post-training sprints or push-ups.
- Instruct teams to line up at the halfway line to simulate the long walk to take a penalty during a shootout.
Rush & Flick On: Soccer Drill
Drill Outline
- Drill Name: Rush & Flick On
- Session Length: 10 minutes
- Age Group: 12+
- Number of players: 10
- Skills learned: Long passing, heading, finishing, & positioning
- Equipment: Full Field, 1 ball, 1 goal
Drill Setup
- Line up 10 outfield players in a regular 4-4-2 formation.
- If your right back (D4) is a good long-range passer, they are the designated passer for this drill. If not, put your best passing midfielder into the right-back position temporarily.
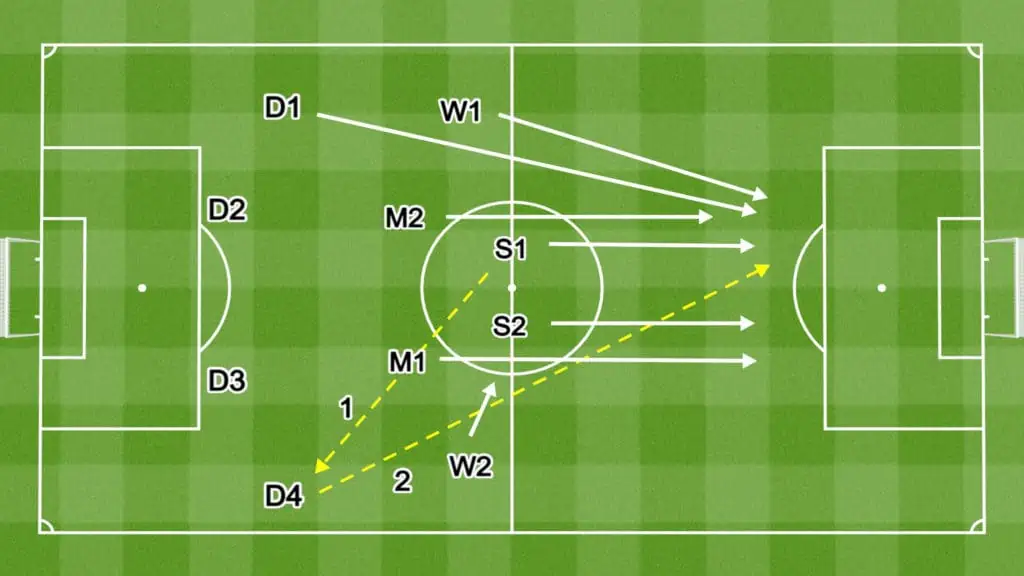
Drill Instructions
- The first pass is one of the most important parts of this tactic so be sure to get it right.
- S1 and S2 take tip-off, then play a pass back to D4. However, this should be a dummy pass that looks as though it is going to M1.
- When the pass is played, M1 lets the ball roll past them or through their legs to D4.
- D1 and W1 sprint down the left side of the field toward the left edge of the penalty box.
- M1, M2, S1, and S2 sprint toward the center of the penalty box.
- W2 drifts toward the center of the field as cover in case the play breaks down.
- D4 plays a long diagonal pass toward D1 and W4.
- D1 or W4 head the ball, flicking it onto the rushing midfielders and strikers.
- The attackers work together to score.
Drill Variations
- Switch this drill to the opposite side of the field.
- Use opposition defenders or mannequins to simulate defenders’ positions.
Overload & Switch Play: Soccer Drill
Drill Outline
- Drill Name: Overload & Switch Play
- Session Length: 10 minutes
- Age Group: 12+
- Number of players: 10
- Skills learned: Long passing, heading, crossing, finishing, & tactics
- Equipment: Full Field, 1 ball, 1 goal
Drill Setup
- Line up 10 outfield players in a 4-4-2 formation.
- Instruct the center backs (D2 & D3) to occupy a high line, halfway between the center circle and the edge of the penalty box.
- Instruct the left back (D1) to push higher up the field, close to the halfway line.
- Instruct the right back (D4) to tuck in narrowly, near the center back.
- Instruct the best passing midfielder (M1) to stand just behind the center circle and to be ready to make a long, diagonal pass.
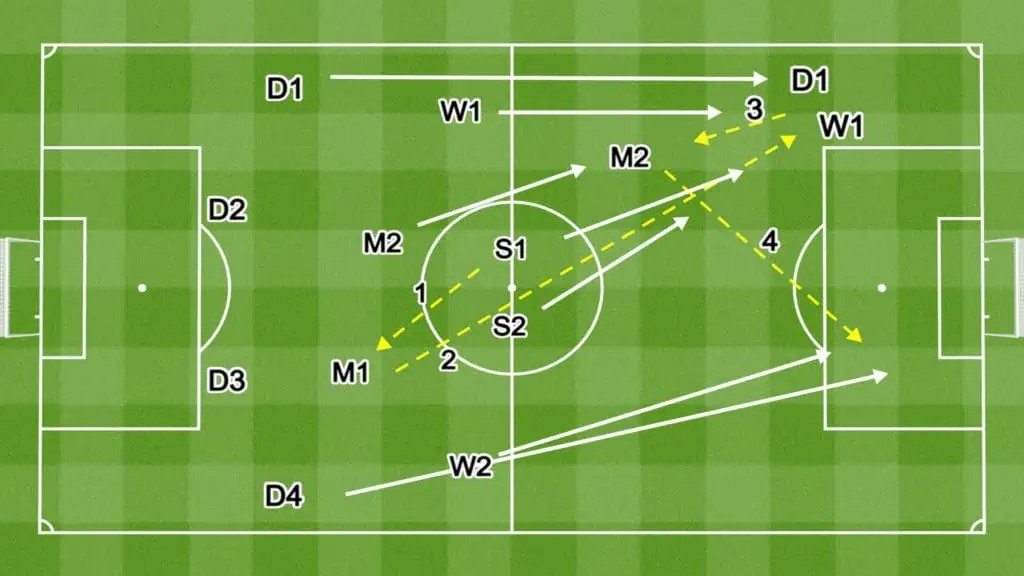
Drill Instructions
- To start, the strikers take tip-off and pass the ball back to M1.
- As soon as the tip is taken, S1 and S2, W1, and D1 sprint down the left wing toward the edge of the penalty box.
- D1, W1, and S1 turn to face the passer. S2 holds their run slightly, anticipating a knockdown. M2 moves into the left channel but keeps distance from the others to create space.
- W3 and D4 run down the right channel, preparing for a back post entry to the penalty box.
- M1 lofts the ball toward the overloaded side.
- D1 and W1 communicate to determine who will head the ball, before cushioning the ball to M2 or S1 and S2.
- The overload should drag the defense over to one side exposing the opposite post.
- The ball is played back to M2, who then crosses the ball to the back post where the right back or right winger scores.
Drill Variations
- Switch this drill to the opposite side of the field.
- Pull back a defender if you want to plan a less aggressive kickoff strategy.
- Push forward another center back for a more aggressive strategy.
- Use opposition defenders or mannequins to simulate defenders’ positions.
Last Minute All-Out: Soccer Drill
Drill Outline
- Drill Name: Last minute hail mary
- Session Length: 10 minutes
- Age Group: 12+
- Number of players: 10
- Skills learned: Long passing, heading, finishing, & positioning
- Equipment: Full Field, 1 ball, 1 goal
Drill Setup
- This drill is designed to help teams prepare for a last-ditch attempt to score after they have just conceded.
- The team lines up in an attacking formation, with the defenders, positioned further forward than usual, since they are typically the biggest and strongest in the air.
- The center back (D2 and D3) begin on the left side of the center circle, ready to create an overload.
- The wingers (W1 and W2) maintain central positions to act as facilitators if the play breaks down.
- Only the best passer (M1) and the left and right backs (D1 and D4) hold defensive positions.

Drill Instructions
- S1 and S2 take the kick-off, before playing a pass back to M1.
- As soon as the first pass is played, D1 and D2 run down the left channel toward the edge of the box, keeping an eye on the kickers.
- S1 and S2 sprint toward the box, anticipating a knockdown or flick-on.
- W1 and W2 run forward but remain outside the penalty box in case the play breaks down.
- M2 runs toward the right side of the penalty box, looking to isolate a defender for a back post cross.
- D1 and D4 push forward slightly, providing passing options if M1 is closed down.
- M1 lofts the ball toward D1 and D2.
- D1 and D2 attack the ball, flicking it onto their teammates who then work together to score.
Drill Variations
- Switch this drill to the opposite side of the field.
- Use opposition defenders or mannequins to simulate defenders’ positions.
- If the passer has a strong kick, instruct players to make more central runs to crowd the penalty box.
Share the post "Game Situation Soccer Drills (Phases-Duals-Throws-Corners)"
Joel is a seasoned soccer journalist and analyst with many years of experience in the field. Joel specializes in game analysis, player profiles, transfer news, and has a keen eye for the tactical nuances of the game. He played at various levels in the game and coached teams - he is happy to share his insight with you.