Receiving and turning can be a game-changing move – quick control, spin and you’re away from the defender.
These soccer drills are great for midfielders and attackers. It’s easy to pass the ball backward, but if you know how, you can turn possession into an attack.

Receiving And Turning Drills
Pass Through the Gates: Soccer Drill
- Age Range: 6-10
- Length of Session: 10 mins
- Number of Players: any
- Skills to Learn: passing, communication
- Equipment: balls and cones, optional pinnies
Description: Players must pass the ball through a gate to their teammate to earn a point.
Drill Set-up:
- Set up a large space based on the number of players you have and their ages.
- Randomly place gates using cones. Gates should be about 3 meters.
- Give each player a partner.
- Optional: use pinnies to distinguish groups.
- Each group of 2 gets 1 ball.
Drill Instructions:
- Kids must dribble around the area and pass through the gates to their partners.
- Each successful pass through the gate earns one point.
- Kids cannot go through the same gate twice in a row.
- Challenge your players to see who gets the most passes in a set time or who can complete all gates first.
- Keep each round to 60 seconds or less.
- Challenge older players to use their weaker foot or complete the drill with smaller gates.
Pass Around the Square: Soccer Drill
- Age Range: 8-10+
- Length of Session: 10 mins
- Number of Players: 5-6 players per square
- Skills to Learn: passing, receiving, movement off the ball
- Equipment: 4 cones and 1 ball per square.
Description: Kids must pass the ball around the square, following their passes. You can add increasingly complex versions.

Drill Set-up:
- Create a square using 4 cones.
- The square can be anywhere from 5×5 meters to 10×10 meters depending on the age and skill level of the kids.
- Position one kid at each cone.
- Place an additional player behind the player with the ball.
- Optional: place an additional player behind another child at a different cone.
Drill Instructions:
- Child A starts with the ball.
- Pass the ball to child B, who will receive the ball, and play to child C.
- Each player follows their pass and waits at that cone.
- Instruct players to “show” for the ball by popping off the cone.
- Focus on body position, opening up to receive, and play in 2 touches.
- Complete the drill in both directions (clockwise and counterclockwise).
- Progress to more advanced patterns. For example, add a wall pass at each corner, or have the play change to up, back, and through.
Box-to-box Midfielder Drill: Soccer Drill
Drill Outline
- Drill Name: Box-to-box Midfielder Drill
- Session Length: 5 to 10 minutes
- Number of players: 8 to 16
- Skills learned: Receiving the ball, turning with the ball, quick passing, dribbling, shooting
- Equipment: 9 cones, at least 1 ball
Drill Setup
- Use approximately half of the training field if possible.
- Set up the drill as shown in the graphic.
- Place 1 cone in the center of the field to indicate the starting point.
- Use 2 cones to create a 3-yard gate, 5 yards from the center cone, toward the goal.
- Place another cone 5 yards to the right at a right angle to the gate.
- Using 4 cones positioned 1 yard apart, create a controlled dribbling route at the edge of the penalty box.
- Place 1 more cone 5 yards to the right at a right angle to the final cone in the dribbling zone.
- Set up a full-size goal if you have a goalkeeper. Or, create a mini goal using cones.
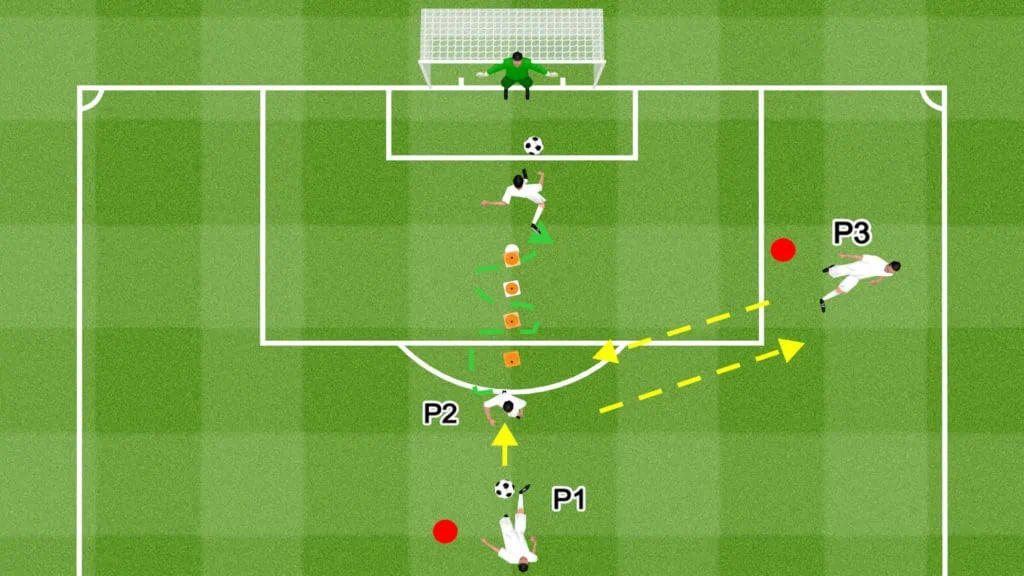
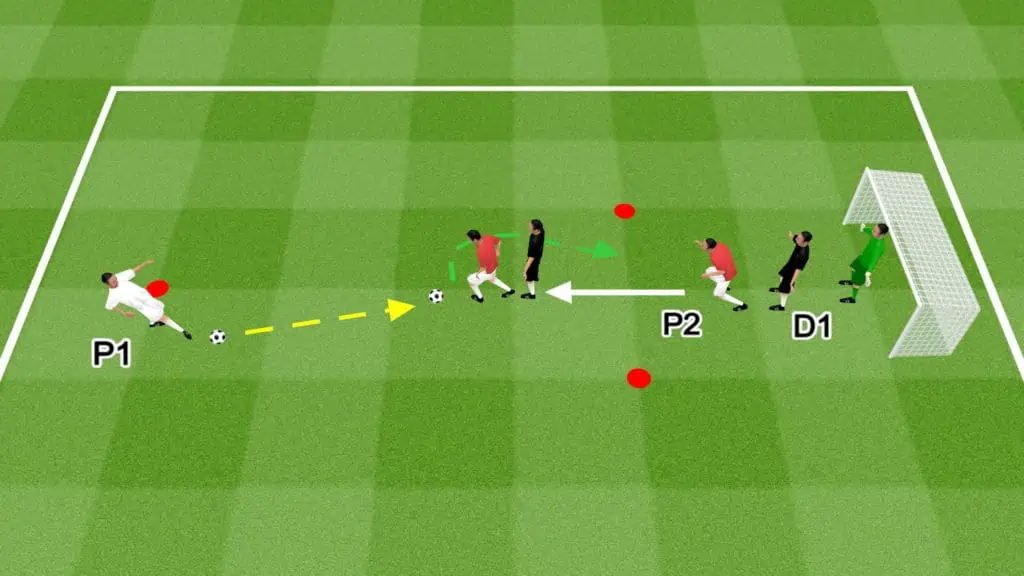
Drill Instructions
- P1 starts the drill at the center of the field by playing a low, firm 5-yard pass to P2.
- P2 checks their shoulder before receiving the pass.
- As they receive the pass, P2 opens up their body and turns 180 degrees until they are facing the goal. The touch and turn must be controlled, taking place within the gate.
- P2 plays a give-and-go pass to P3, continuing their run toward the goal.
- After receiving the return pass, P3 accelerates toward the dribbling zone.
- P2 dribbles through the cones, weaving from one side to the other, using multiple soft touches.
- After passing through the dribble zones, P2 enters the penalty box and plays a give-and-go pass with P4.
- P4 continues the run then shoots on goal.
- When the round finishes, P1 joins the P2 line, P2 joins the P3 line, and P3 joins the P4 line.
Drill Variations
- Switch drill to the opposite side.
- Instruct the players to work on their weaker shooting feet.
Receive Pass Drag Back: Soccer Drill
Drill Outline
- Drill Name: Receive pass drag back
- Session Length: 10 minutes
- Age Group: 10+
- Number of players: 2 to 18
- Skills learned: First touch, drag back, dribbling, ball control
- Equipment: 2 cones (minimum), 1 ball (minimum)
Drill Setup
- This drill requires players to work in pairs.
- For each pair, set up 2 cones 5 yards apart.
- Each player stands at a cone.
- P2 starts with the ball.
- P1 starts behind their cone.
- P1 is the main focus of the drill.
- P2 plays the role of a passer.
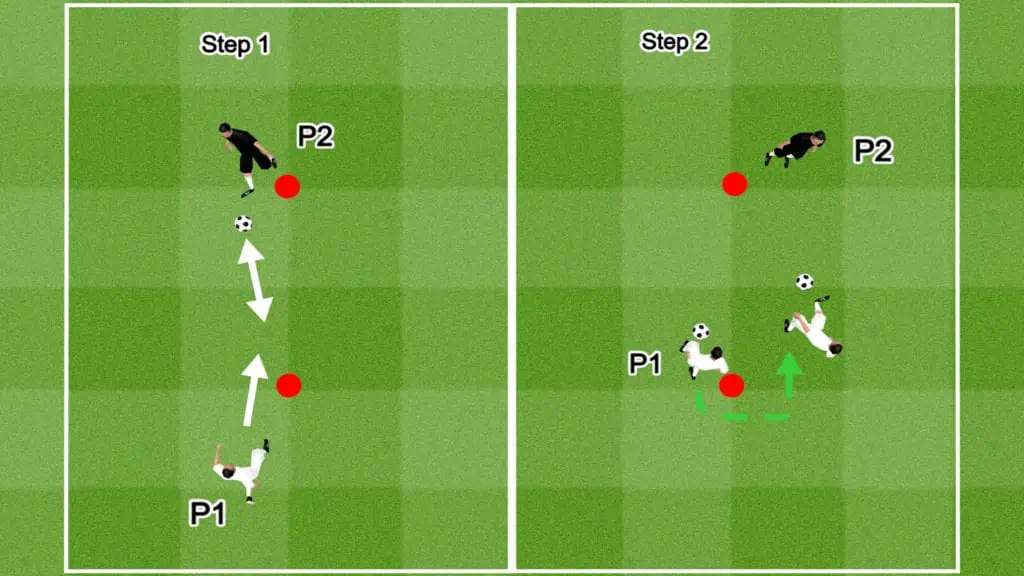
Drill Instructions
- On the coach’s signal, P1 sprints in front of the cone and calls for the pass.
- P2 passes the ball to the feet.
- P1 takes a touch to control the ball, then drags the ball behind the cone, shuffles to the opposite side, and plays a return pass.
- Repeat the drill for 1 to 2 minutes before alternating roles.
- The focus is on moving backward, then sideways while maintaining control of the ball.
- The cone represents a defender, so this drill also helps players practice receiving the ball under pressure.
Drill Variations
- Focus on using both feet for a round.
- Focus on using the right foot for a round.
- Focus on using the left foot for a round.
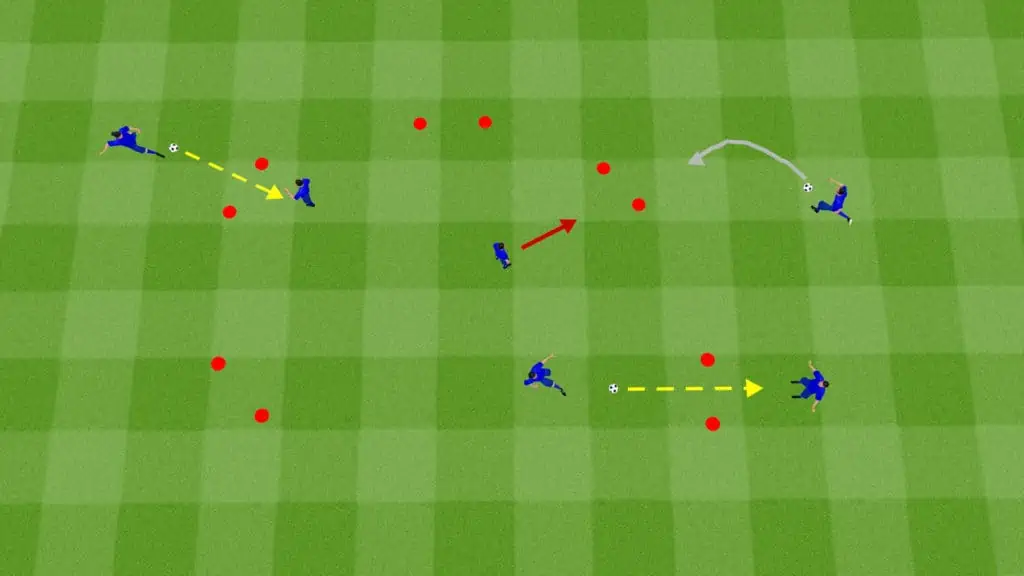
Agility Passing Weave: Soccer Drill
Drill Outline
- Drill Name: Agility Passing Weave
- Session Length: 10 minutes
- Age Group: all ages
- Number of players: 5 (minimum)
- Skills learned: Sprinting, changing direction, back peddling, 1-touch passing
- Equipment: 5 cones, 4 balls
Drill Setup
- Create a square grid using cones positioned 5 to 10 yards apart.
- Place 1 cone 5 yards perpendicular to any corner of the grid to indicate the starting point.
- 4 players stand 5 yards outside each corner of the grid. Each of these players has a ball at their feet.
- P1 and any remaining players line up behind the starting cone.
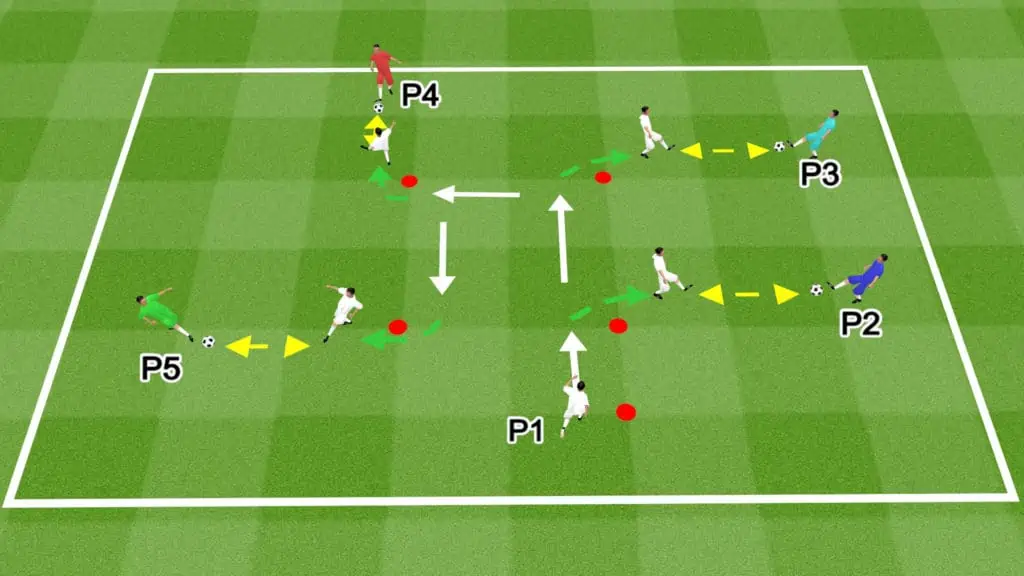
Drill Instructions
- On the coach’s signal, P1 sprints to, then around the first cone and faces P2.
- P1 calls for the ball.
- P2 plays a quick give-and-go pass with P1.
- P1 sprints, then around the next cone, repeating the process until they complete the entire square grid.
- The next player may begin when P1 reaches the second cone.
- Rotate player roles occasionally, giving all players a chance to complete the drill.
- The focus of this drill is quick movements. Sharp turns to simulate getting free from a defender to receive a pass.
- Encourage players to be vocal, calling for a pass as they would in a real game scenario.
Drill Variations
- Focus on the players’ left and right feet each round, ensuring they practice with both.
- Instead of a give-and-go pass, practice headers, volleys, or chest control.
- Increase the passing distance for higher-skilled players.
- Create competition by timing each player’s round.
Pass, turn, & shoot: Soccer Drill
Drill Outline
- Drill Name: Pass, turn, & shoot
- Session Length: 10 minutes
- Age Group: all ages
- Number of players: 2 to 18
- Skills learned: Passing, turning, & shooting
- Equipment: 2 balls, 2 cones, 1 goal
Drill Setup
- Use the penalty box for this drill.
- Set up a full-size goal. Even if there is no goalkeeper, it’s important to practice shooting in a regulation goal.
- Place 1 cone centrally on the edge of the penalty box.
- Place 1 cone 5 yards from the first, toward the center of the field.
- P2 stands at the cone on the edge of the penalty box.
- P1 and the rest of the players line up at the other cone.
- P1 begins with the ball at their feet.
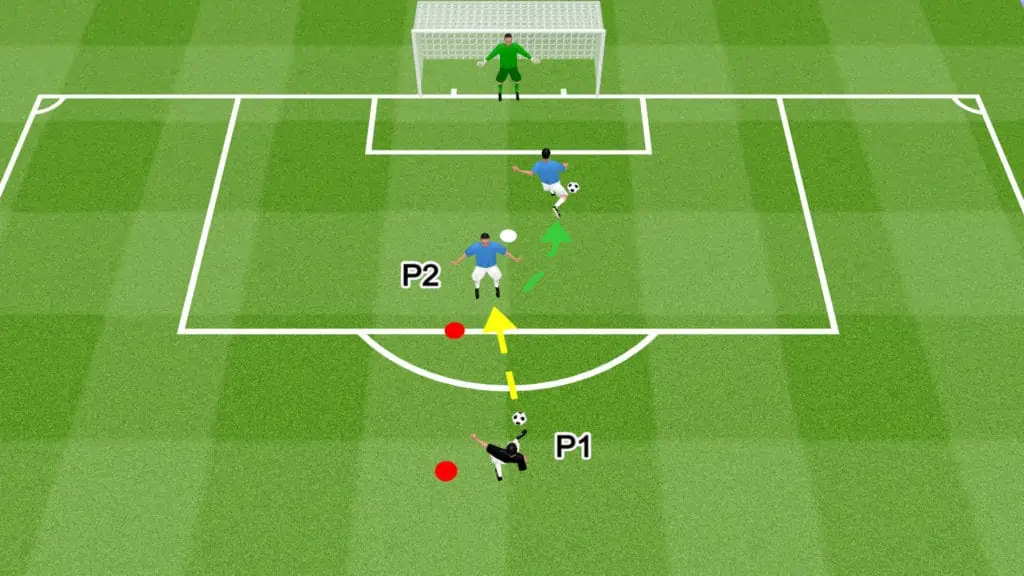
Drill Instructions
- P1 starts the drill by playing a low, hard pass to P2.
- P2 takes a touch to control the ball then turns toward the goal.
- P2 sets the ball in front of them and shoots at goal.
- This drill focuses on technique. Instruct players to work on precision passing, great first touches, and accurate shooting.
- P1 collects their ball, gives it to the next player, and joins the end of the line.
- P1 takes P2’s original position and the next player in line continues the drill.
Drill Variations
- Instruct players to turn to their right and left to focus on shooting from both sides.
- Instruct players to focus on power shots for a round.
- Set accuracy targets, instructing players to aim for specific targets on goal, such as the bottom and top corners.
Give & go shooting: Soccer Drill
Drill Outline
- Drill Name: Give & go shooting
- Session Length: 5 minutes
- Age Group: All age groups
- Number of players: Full squad, including the starting goalkeeper and subs
- Skills learned: passing, dribbling, shooting, and saves
- Equipment: 2 cones, 1 goal, multiple balls
Drill Setup
- Use the penalty box and the surrounding area for this drill.
- Set up 1 full-size goal in the normal position on the end line. The goalkeeper takes their place in between the posts.
- Place 1 cone centrally on the edge of the penalty box. The coach begins at this cone, acting as the passer and defender.
- Place 1 cone centrally 5 yards outside the box.
- P1 and the rest of the outfield players line up behind the cone on the outside of the penalty box.
- P1 and the outfield players begin with the balls.
Drill Instructions
- P1 starts the drill by playing a quick pass to the coach.
- The coach lays the ball off to 1 side, then assumes the role of a defender.
- P1 runs for the return pass, dribbles past the coach, then takes a shot on goal.
- The coach doesn’t actively try to win possession. Instead, they shadow the attacker, allowing them to practice a game-like take-on.
- P1 collects their ball and returns to the end of the line.
- P2 and the rest of the outfield players repeat the drill.
- Outfield players should focus on accurate finishes, picking their spot before shooting.
- This drill doubles as a goalkeeper warm-up.
Drill Variations
- If you have sub-goalkeepers, consider rotating them into the drill.
- The coach should play bobbled return passes or slightly elevated returns to simulate real game scenarios.
- Focus on weak foot shooting for a round.
Give & Go Passing Squares: Soccer Drill
Drill Outline
- Drill Name: Give & Go Passing Squares
- Session Length: 5 to 10 minutes
- Age Group: all ages
- Number of players: 5 (per square)
- Skills learned: Give & go passing, moving, awareness, concentration
- Equipment: 1 ball (per square), 4 cones (per square)
Drill Setup
- Divide the team into groups of 5.
- Set up a 4-cone square grid for each group. All cones should be around 5 yards apart.
- P1 and P5 stand behind 1 cone. All other players stand behind separate cones.
- P1 begins with the ball at their feet.
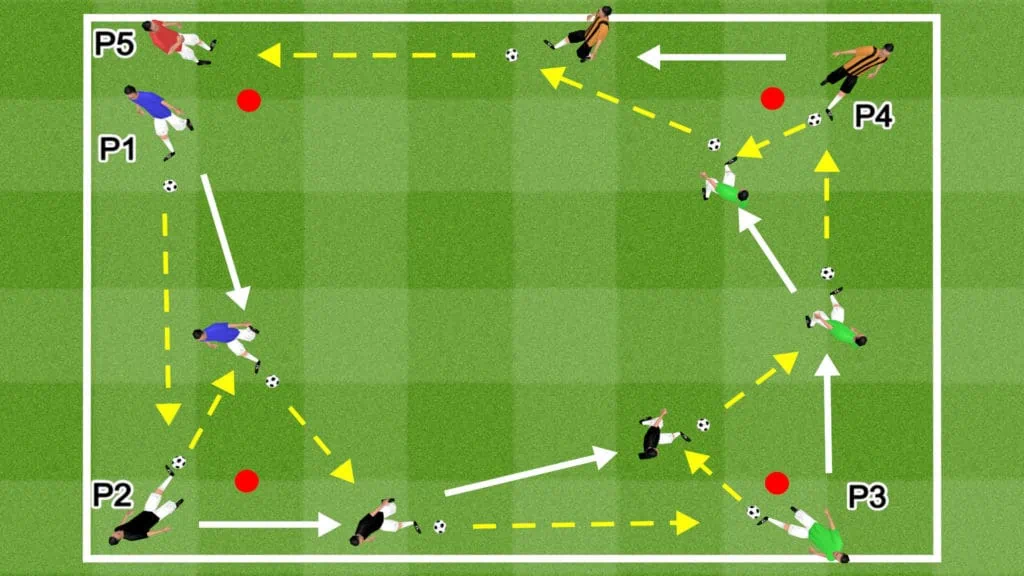
Drill Instructions
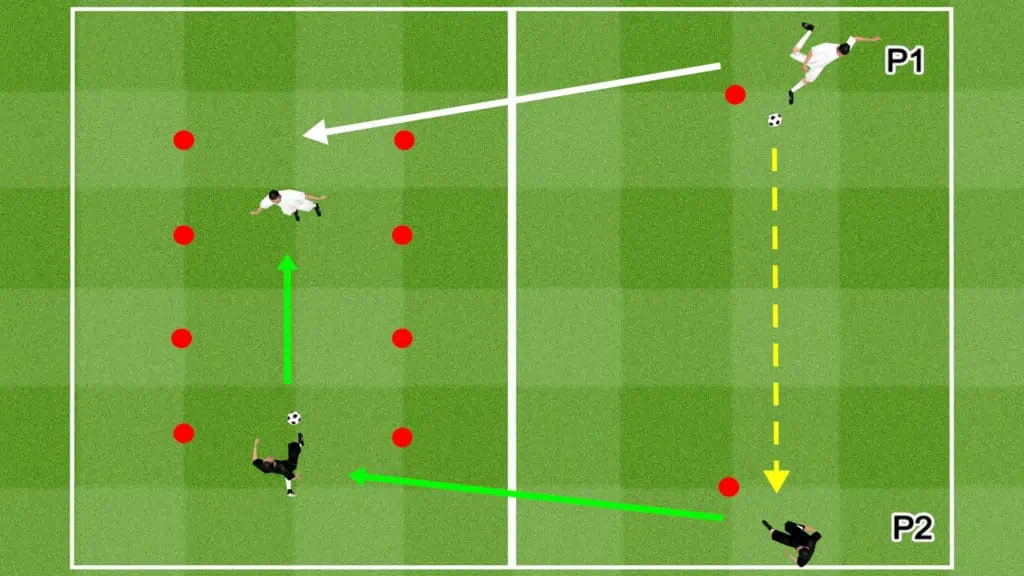
- P1 starts the drill by playing a pass to P2. The pass must travel along the outside of the square.
- P1 follows their pass and heads toward P2’s cone.
- P2 plays a first-time pass in front of P1 to the inside of the square, then starts to run toward P3’s cone along the outside of the square.
- P1 plays a first-time pass to P2 and then stands behind P2’s original cone.
- P2 plays a pass along the outside of the square to P3 then continues to run toward the cone.
- P3 plays a first-time pass in front of P2 to the inside of the square, then starts to run toward P4’s cone along the outside of the square.
- P2 plays a return pass to P3 and then takes P3’s original starting position.
- These steps are continuously repeated, creating a constant passing loop.
Drill Variations
- Occasionally change the direction of the drill.
- Set consecutive passing targets.
- If you have multiple groups, create a competition to see which team can accumulate the most consecutive passes.
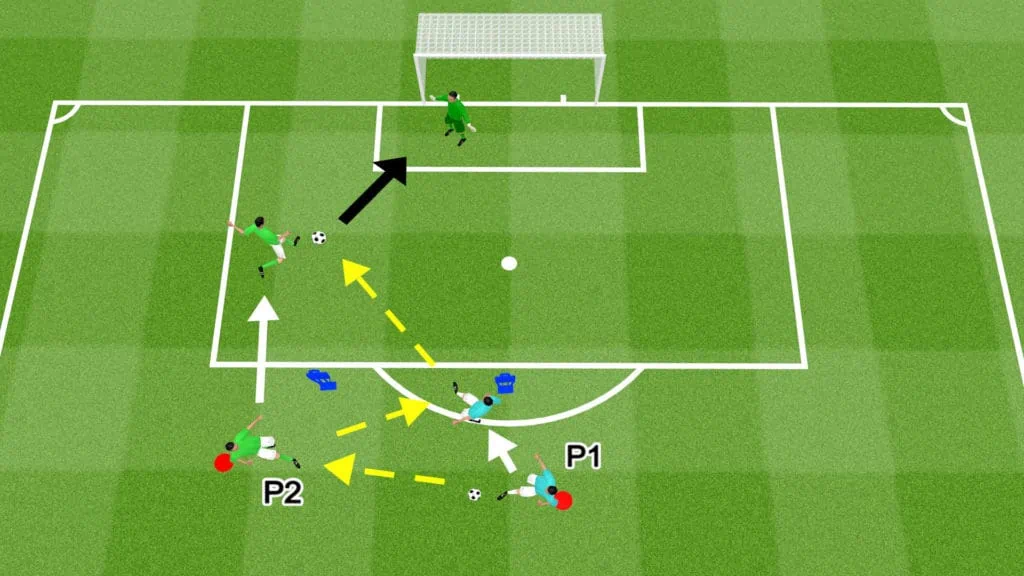
Man-On Drill: Soccer Drill
Drill Outline
- Drill Name: Man-On Drill
- Session Length: 10 minutes
- Age Group: 7+
- Number of players: 3 (minimum)
- Skills learned: First touch, turning, holding off the defender, shielding the ball, finishing
- Equipment: 1 ball (minimum), 3 cones, 1 goal (optional)
Drill Setup
- Set up a 5-yard, 2-cone gate along the edge of the penalty box.
- Place 1 cone 10 yards from the gate toward the center of the field.
- If you have a goalkeeper, consider setting up a goal to include shooting practice as a secondary aspect of the drill.
- P2 (attacker) and D1 (defender) begin at the passing gate.
- P1 and the remaining players line up behind the cone toward centerfield.
- P1 begins with the ball at their feet.
Drill Instructions
- P2 moves around the edge of the penalty box simulating an in-game scenario.
- P2 shakes off the defender, sprints through the gate, and calls for the ball.
- P1 plays a low, hard pass to P2.
- P2 takes a good first touch, holds off the defender, then spins toward the goal. If there is a goalkeeper, P2 takes a shot on goal.
- D1 doesn’t actively try to win the ball. Instead, they apply pressure, allowing P2 to practice taking a solid first touch when surrounded by defenders.
- When the round is over, P2 joins the end of the passing line, D1 takes P2’s place, and P1 takes D1’s place.
- If you have 7 or more outfield players, consider setting up 2 identical grids and running the drills concurrently.
Drill Variations
- Instruct players to focus on different types of touches in each round.
- For 1 round, focus on taking 1 touch, and spinning behind the defender toward the goal.
- For another round, focus on taking a good touch, facing up the defender, and running past them before shooting.
- For another round, instruct P2 to play a give-and-go pass with P1, before running behind the defender for a through pass from P1.
- For advanced players, encourage them to work on different skill moves, touches, flicks, and turns.
1 v 1 Pass & Move: Soccer Drill
Drill Outline
- Drill Name: 1 v 1 Pass & Move
- Session Length: 5 to 10 minutes
- Age Group: All age groups
- Number of players: 2
- Skills learned: Passing, movement, dribbling, tackling, and defensive jockeying
- Equipment: 10 cones, 1 ball
Drill Setup
- Place 2 cones 15 yards apart, marking the starting points for both players.
- 5 yards to either side of these cones, create a dribbling tunnel of the same length. The tunnel should be approximately 5 yards wide.
- Place cones 5 yards apart on both sides of the tunnel to create 3 separate, evenly sized sections within it.
- P1 begins with the ball at their feet.
Drill Instructions
- P1 starts the drill by playing a long pass to P2.
- After the pass, P1 sprints through their end of the dribbling tunnel, making their way to the center section. They cannot enter the furthest section of the tunnel.
- P2 receives the pass, then dribbles through the end of the dribbling tunnel.
- P2 then tries to dribble past P1 and through the opposite end of the tunnel.
- P1 can tackle, block, or jockey the dribbler to try and regain possession.
- The round is over when P2 loses possession or successfully passes through the tunnel.
- If the ball crosses either sideline of the tunnel, the round is over.
- After the round, players switch roles.
Drill Variations
- Create a competition to see who can complete the most successful dribbles in the allocated time frame. Or, create a competition to see which player reaches 5 successful dribbles first.
- Set a time limit for the dribblers to get through the tunnel.
- If the defenders have the edge over the attackers, prohibit them from entering the center section.
- If the attackers have the edge, allow the defenders to enter all sections of the tunnel.
Joel is a seasoned soccer journalist and analyst with many years of experience in the field. Joel specializes in game analysis, player profiles, transfer news, and has a keen eye for the tactical nuances of the game. He played at various levels in the game and coached teams - he is happy to share his insight with you.