Share the post "Goalie Soccer Drills (Crosses-Kicks-Saves-Throws)"
Sometimes goalkeepers are forgotten players for specific training drills, but we have soccer drills just for goalkeepers. This collection of drills is a complete set, and you will practice every skillset you need for a game.
You will need two players as a minimum to do these drills properly. We look at saves, catches, crossing, kicks, and throws.
Goalie Soccer Drills (Crosses – Kicks – Saves – Throws)
Long Shot Saves: Soccer Drills
Drill Outline
- Drill Name: Long Shot Saves
- Session Length: 5 to 10 minutes
- Age Group: All ages
- Number of players: 2
- Skills learned: Catching, diving, parrying, and reflexes
- Equipment: Balls, goal, net
Drill Setup
- If your team has more than 1 goalkeeper, they can break away from the outfield players for this drill. If not, 1 player must accompany the GK.
- Set up a full-size goal in the penalty box.
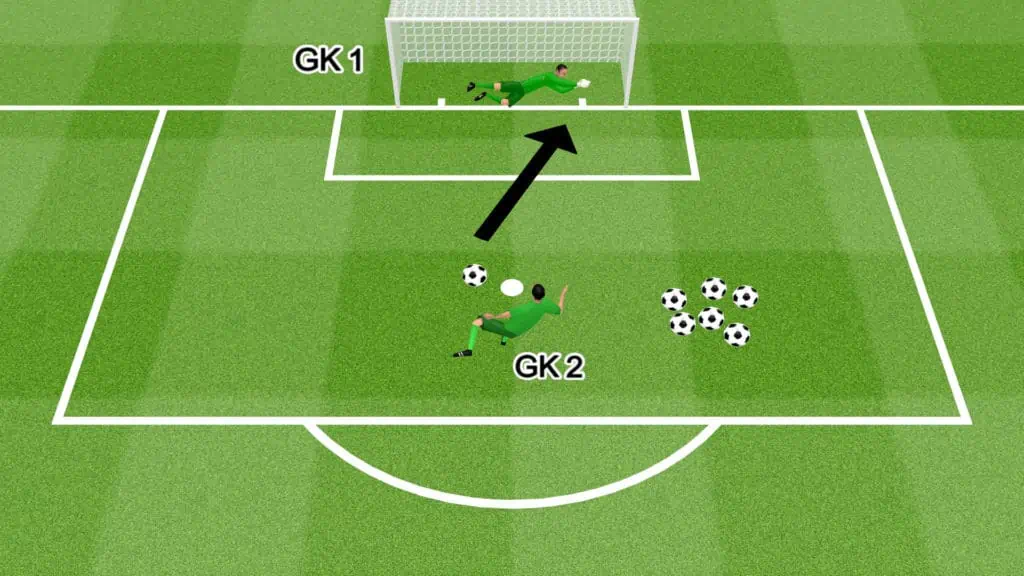
- GK1 starts in the center of the goal.
- GK 2 stands on the penalty spot.
- Place multiple balls next to GK2.
Drill Instructions
- GK2 starts by taking low-power shots toward the center of the goal.
- GK1 catches or parries the shots away from the goal, concentrating on technique.
- After 10 shots, GK2 starts to add more power and lateral direction to the shots.
- After 10 more shots, GK2 increases power again and aims for the corners of the goal.
- After 30 shots, GK1 and GK2 switch roles.
- The focus of the drill is on saving, not scoring. The shooter should gradually make saves more difficult but they shouldn’t focus on scoring every shot.
Drill Variations
- Change shooting angles to improve goalkeeper positioning.
- Increase or decrease the shooting distance.
- If the shooter is struggling with accuracy, they can throw or kick from their hands to improve control.
Reaction Saves: Soccer Drill
Drill Outline
- Drill Name: Reaction Saves
- Session Length: 5 to 10 minutes
- Age Group: All ages
- Number of players: 3
- Skills learned: Catching, diving, parrying, reflexes, and stamina
- Equipment: Balls, goal, net, 2 cones
Drill Setup
- Set up a full-size goal in the penalty box.
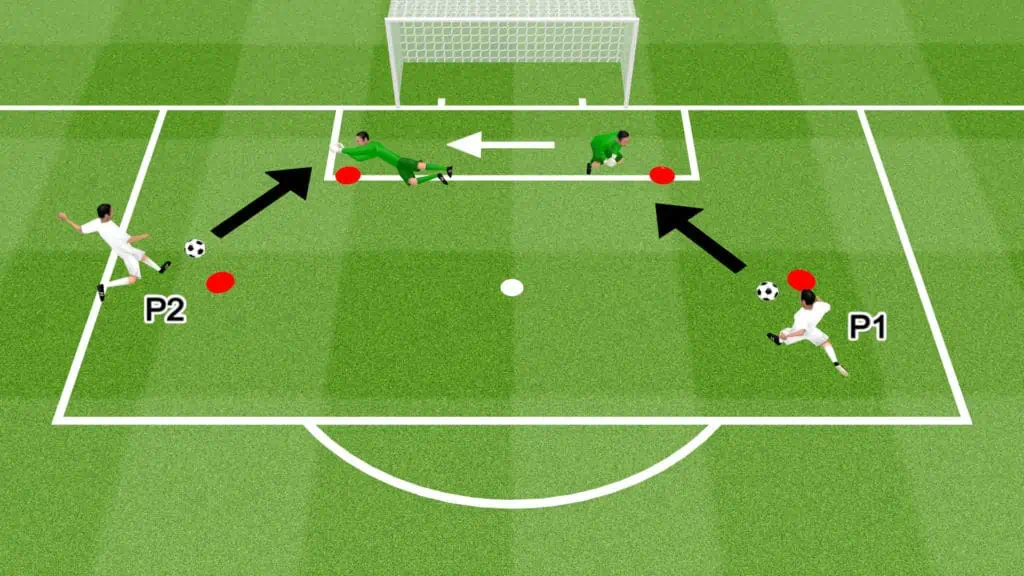
- Place 1 cone 5 yards to the right of the penalty spot.
- Place 1 cone 5 yards to the left of the penalty spot.
- P1 starts at the right side cone with at least 1 ball
- P2 starts at the left-sided cone with at least 1 ball.
Drill Instructions
- P1 starts the drill by taking a low shot on goal. The shot can be firm but the intention is not to score.
- GK1 moves into position and dives low to catch or parry the ball away from goal. Using the correct diving technique, GK1 pushes off the foot closest to the ball and gets their body behind it. The upper legs and arms should bear the most impact. Breaking the fall with the elbows and shoulders can cause accidental spills and may lead to injury.
- After completing the first save, GK1 repositions and prepares for the second shot from P2.
- P2 takes a low shot on goal.
- Repeat this drill for 10 shots.
- If there is more than 1 goalkeeper, rotate them and repeat the drill.
Drill Variations
- Add multiple rounds, increasing the height of shots and widening shooting angles.
- Add an extra round, focusing on short-distance foot saves.
6 Yard Headers On Goal: Soccer Drill
Drill Outline
- Drill Name: 6 Yard Headers On Goal
- Session Length: 5 to 10 minutes
- Age Group: All age groups (according to health recommendations in your area)
- Number of players: 3 to 18
- Skills learned: Powerful, accurate, and diving headers
- Equipment: 1 ball (minimum), 3 cones, 1 goal
Drill Setup
- If you have a goalkeeper, set up a full-size goal. If not, create a small goal using cones.
- The penalty box is a perfect space to run this drill.
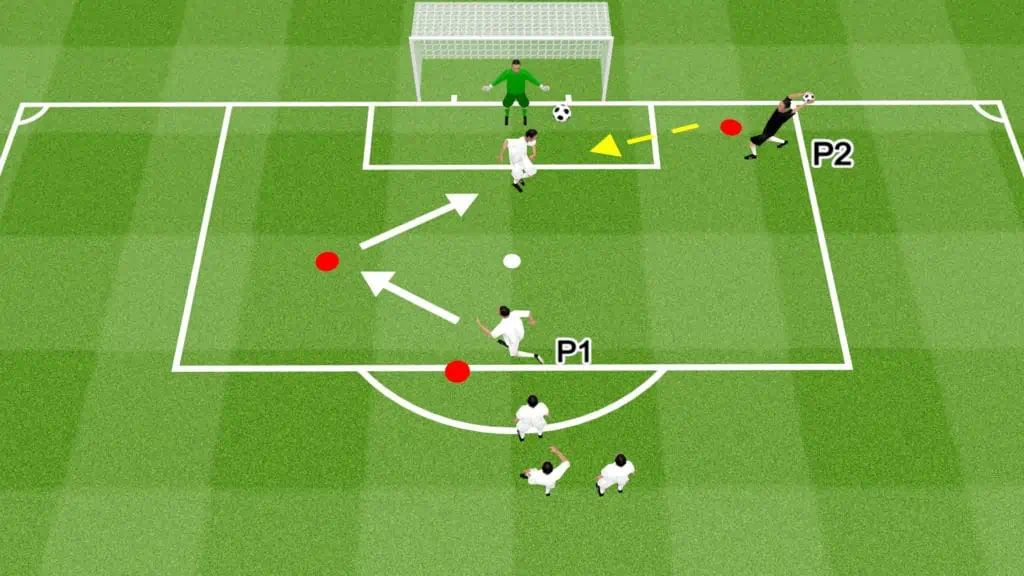
- Place 1 cone centrally at the edge of the penalty box.
- Place 1 cone 5 yards to the left of the penalty spot.
- Place 1 cone a couple of yards to the right of the six-yard box.
- P1 stands at the cone on the edge of the box. The rest of the team lines up behind them.
- P2 stands at the cone near the six-yard box.
Drill Instructions
- P1 runs toward the cone to their left, simulating a back post run.
- Once they reach the cone, P1 quickly changes direction and sprints centrally toward the six-yard box.
- P2 throws the ball in front of P1.
- P1 times the flight of the ball and heads it at the goal.
- Depending on the trajectory of the pass, P1 may have to jump or dive to make good contact.
- The focus should be on making good contact with the ball and executing powerful and accurate headers on goal.
- The goalkeeper does not try to intercept the pass but they can try to save the shots.
- Rotate the thrower occasionally.
Drill Variations
- Adjust the position of the cone inside the box, alternating dummy runs.
- Focus on headers from different positions, including the front post, back post, and centrally.
- Focus on diving headers for a round.
Controlling The Cross: Soccer Drill
Drill Outline
- Drill Name: Controlling The Cross
- Session Length: 5 to 10 minutes
- Age Group: All ages
- Number of players: 3 (minimum)
- Skills learned: Catching, timing, positioning, and jumping.
- Equipment: 2 balls, 3 cones
Drill Setup
- Ideally, you will use the full width of the pitch and the penalty box for this drill.
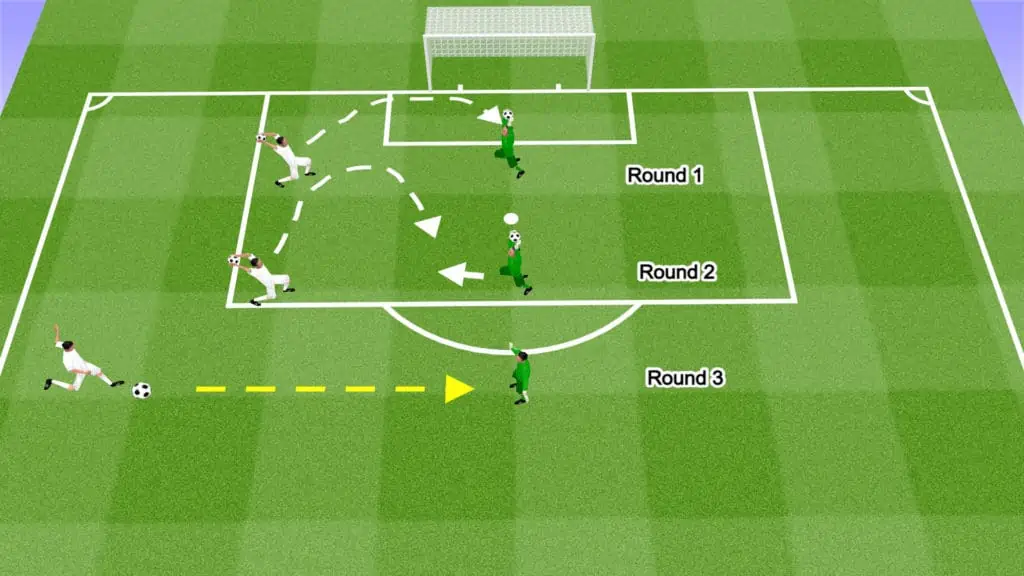
- Create zone 1 by placing 2 cones 10 yards apart in the center of the box.
- Create zone 2 by placing 2 cones outside the penalty box on either wing.
- GK1 begins in the center of the penalty box for rounds 1 and 2.
- GK1 begins on the edge of their 6-yard box for round 3.
- P1 and P2 will occupy the spaces next to the other cones.
Drill Instructions
- In round 1 (zone 1), P1 throws the ball high above GK1, simulating a deep cross.
- GK1 gauges the flight of the ball and catches the ball over their head, jumping if necessary.
- Repeat 10 times.
- In round 2 (zone 1), P1 throws the ball high in the air, a few yards short of GK1’s starting position, forcing them to adjust and intercept the cross.
- GK1 reacts, moves, and catches the ball.
- Repeat 10 times.
- In round 3 (zone 2), P1 crosses the ball toward the center of the penalty box.
- GK1 moves into position to catch the ball. Gk1 then throws the ball back to P1 before returning to the starting position.
- P2 repeats the same steps from the opposite wing.
- Repeat 10 times (5 crosses from each side).
Drill Variations
- Space permitting, this drill can be run with multiple goalkeepers at the same time. Create 3 separate zones and rotate goalkeepers between rounds.
- Add attackers to compete for the ball (passively).
Goalkeeper crossing practice: Soccer Drill
Drill Outline
- Drill Name: Goalkeeper crossing practice
- Session Length: 2 to 3 minutes
- Age Group: All age groups
- Number of players: Starting goalkeeper and subs
- Skills learned: catching, punching, throwing, judging the flight of the ball
- Equipment: 1 goal, multiple balls
Drill Setup
- Use the penalty box for this drill.
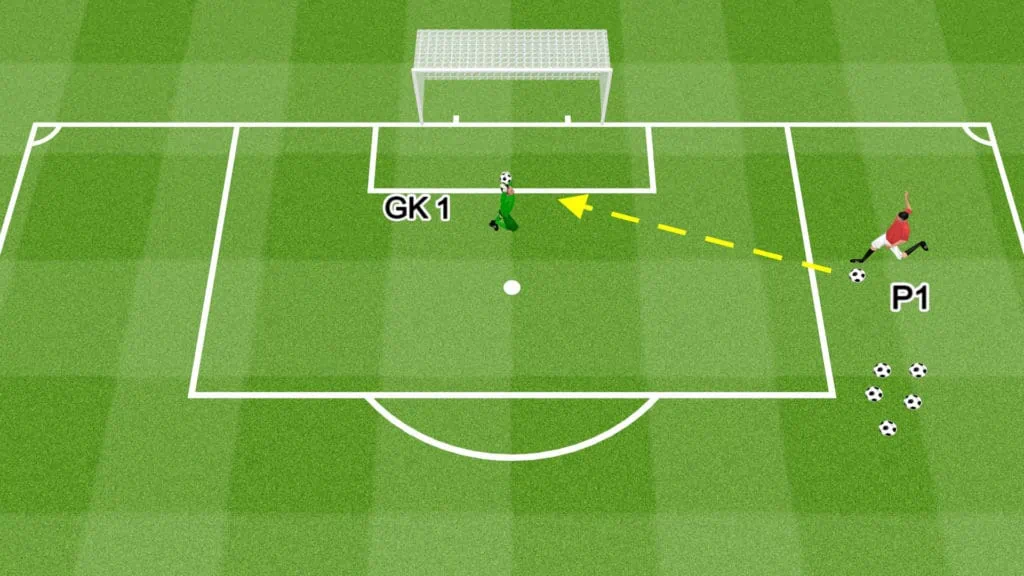
- The starting goalkeeper (GK1) begins in the center of the 6-yard box, anticipating the cross.
- P1 or multiple subs stand on the right side of the penalty box with multiple balls.
Drill Instructions
- P1 starts by kicking or throwing the ball through the air toward the center of the penalty box, between the six-yard line and the penalty spot.
- GK1 judges the flight of the ball and moves to catch the ball cleanly.
- Gk1 then throws the ball back to P1.
- Repeat this process 5 to 10 times from the same side.
- P1 switches to the left side, allowing GK1 to practice catching crosses from the opposite angle.
- Repeat the process 5 to 10 times from this side.
- Instruct P1 to alter the flight pattern of the crosses, simulating in-game scenarios.
Drill Variations
- Repeat the same steps but instead of catching the ball, GK1 punches it, making sure to send the ball as far away from the goal as possible.
- Add a player to contest the crosses with GK1, simulating a real game scenario.
Short Chips: Soccer Drill
Drill Outline
- Drill Name: Short Chips
- Session Length: 10 minutes
- Age Group: 12+
- Number of players: 1
- Skills learned: Range of passing, chip passes, kicking accuracy
- Equipment: Half Field, 9 balls, 12 cones, 9 mannequins
Drill Setup
- Use at least half of the field for this drill.
- Place all 9 balls next to the goal so the goalkeeper doesn’t have to collect their ball after every kick.
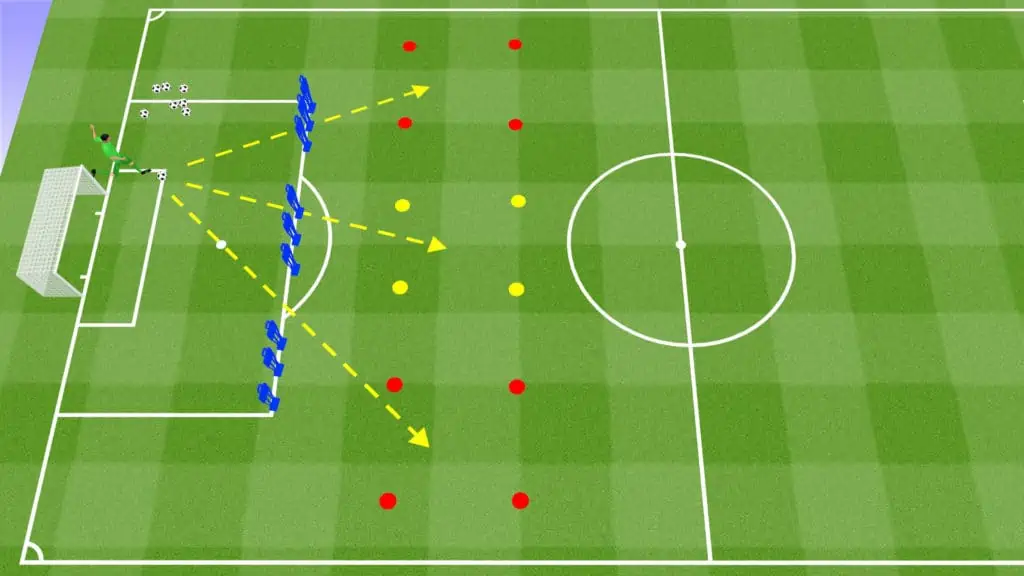
- Set up 5-yard square grids across the field, halfway between the edge of the penalty box and the halfway line, with 1 on the right, 1 in the center, and 1 on the left.
- Place 3 tightly compact mannequins on the edge of the penalty box at the right corner, 3 more in the center, and 3 more on the left corner.
- If you don’t have mannequins, use poles, other players, or some other tall obstacle.
Drill Instructions
- The aim of this drill is to practice short or mid-distance goal kicks.
- The goalkeeper takes 9 total kicks, 3 to the grid on the right, 3 to the grid in the center, and 3 to the grid on the left.
- The mannequins are positioned to partially impede the kicking path. The goalkeeper must chip the ball over the mannequins as if they are defenders. This helps develop kicking competency and confidence required for intense game scenarios.
- Record the number of successful kicks in each round. Goalkeepers should aim to beat their score after every round.
- Repeat the entire drill for 3 rounds.
- If you have multiple goalkeepers, rotate them after every round.
Drill Variations
- If you have multiple goalkeepers, create a competition among them to see who kicks the most accurate passes.
- Repeat the same drill with a rolling ball.
- Reposition the cones and mannequins to practice passing at different distances.
Halfway Line Goal Kicks: Soccer Drill
Drill Outline
- Drill Name: Halfway Line Goal Kicks
- Session Length: 10 minutes
- Age Group: 12+
- Number of players: 1
- Skills learned: Long passing, kick power, passing accuracy
- Equipment: Half Field, 9 balls, 12 cones
Drill Setup
- Use at least half of the field for this drill.
- Place all 9 balls next to the goal so the goalkeeper doesn’t have to collect their ball after every kick.
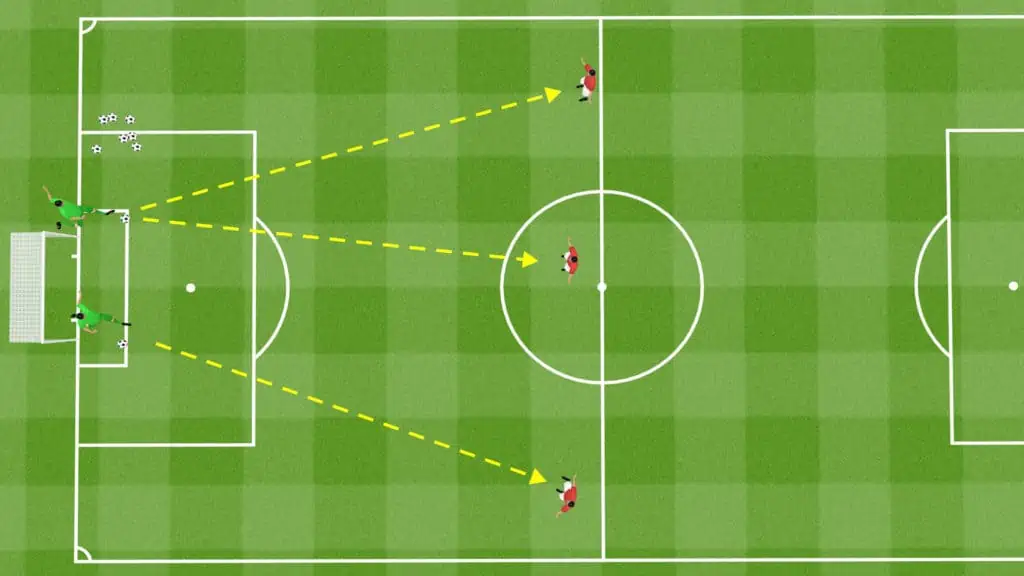
- Set up 5-yard square grids across the halfway line, with 1 on the right, 1 in the center, and 1 on the left.
- Ensure goalkeepers warm up appropriately to avoid injury while kicking.
Drill Instructions
- It’s important for a goalkeeper to create a kicking routine, involving the placement of the ball, the distance of their run-up, and their technique. This helps them to settle into their routine during a game.
- The goalkeeper takes 9 total kicks, 3 to the grid on the right, 3 to the grid in the center, and 3 to the grid on the left.
- The objective is to land the ball inside the squares as many times as possible.
- Repeat the entire drill 3 times.
- Record the number of successful kicks in each round. Goalkeepers should aim to beat their score after every round.
- If you have multiple goalkeepers, rotate them after every round.
Drill Variations
- If you have multiple goalkeepers, create a competition among them to see who kicks the most accurate passes.
- Repeat the same drill with a rolling ball. The coach passes the ball back to the goalkeeper and they kick it first time toward the square grids.
- Consider adding defenders to apply pressure to the goalkeeper as they kick it, simulating a real game scenario.
Fast Break Kicks from The Hands: Soccer Drill
Drill Outline
- Drill Name: Fast break kicks from the hands
- Session Length: 10 minutes
- Age Group: 12+
- Number of players: 4 (1 goalkeeper & 3 outfield players)
- Skills learned: Kicking technique, long-distance passing, kicking power, kicking accuracy
- Equipment: Three-quarters of a field, 9 balls, 3 cones
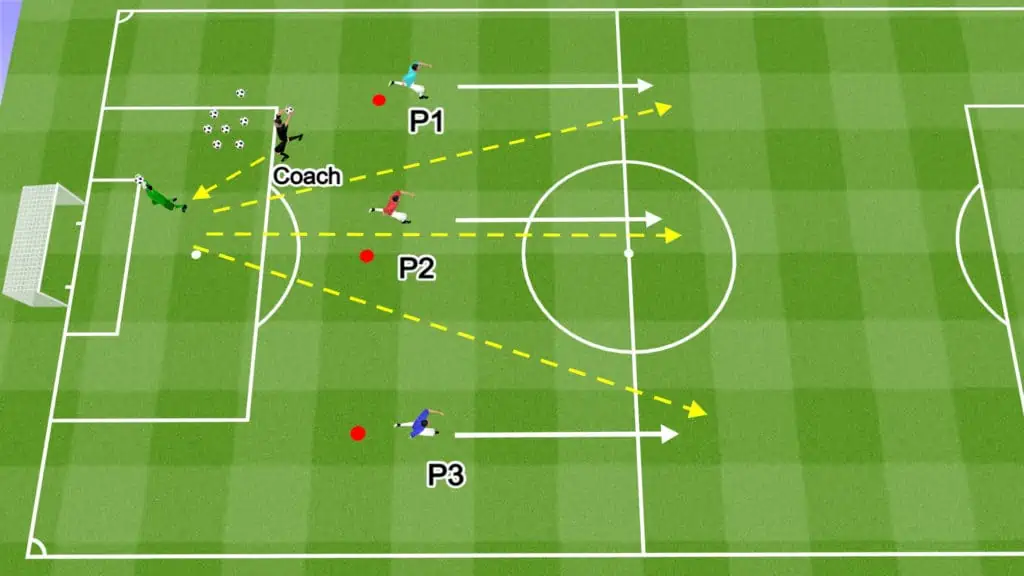
Drill Setup
- Depending on how far your goalkeeper can kick the ball, you may need a half or full-size field for this drill.
- The coach stands on the edge of the penalty box with all 9 balls.
- Place 3 cones at different spots across the field, halfway between the edge of the penalty box and the halfway line, with 1 near the right sideline, 1 in the center, and 1 near the left sideline.
- 1 outfield player stands at each cone, facing downfield.
Drill Instructions
- This drill focuses on goalkeeper-led counterattacks through long kicks out the hands.
- The goalkeeper stands around the six-yard box inside the penalty area.
- The coach starts the drill by throwing the ball toward the goalkeeper.
- When the goalkeeper catches the ball, this triggers the forward runs from the outfield players.
- The goalkeeper times the run of the attacker and plates a long pass into their path. If possible, they should kick the ball across the halfway line.
- The goalkeeper takes 9 total kicks, 3 to the player on the right, 3 to the player in the center, and 3 to the player on the left.
- Repeat the entire drill for 3 rounds.
- If you have multiple goalkeepers, rotate them after every round.
Drill Variations
- Adjust the starting positions and runs of the outfield players to practice different in-game scenarios.
- Encourages goalkeepers to practice different kicking techniques, like cutting across the ball for lower, faster passes.
- Switch the starting position of the coach to practice catching and moving from different angles.
One-On-One Goalkeeper Drill (additional Bonus)
There is one extra drill that you will also need to do as a goalkeeper, that’s one-on-ones. To briefly explain – the goalkeeper starts on their line, an attacker 30 yards away. When the attacker touches the ball the keeper can move.
The attacker tries to score and the goalkeeper tries to get the ball or clear it. The goalkeeper is at a disadvantage with no defenders, so if they stop more than 30% of the attacks, they are doing well.
Share the post "Goalie Soccer Drills (Crosses-Kicks-Saves-Throws)"
Joel is a seasoned soccer journalist and analyst with many years of experience in the field. Joel specializes in game analysis, player profiles, transfer news, and has a keen eye for the tactical nuances of the game. He played at various levels in the game and coached teams - he is happy to share his insight with you.


