Share the post "Defensive Soccer Drills (Shape-Pressure -Tackle-Clear)"
Defend your goal, keep clean sheets, and win games. It sounds simple, but let’s practice these defensive soccer drills and be prepared for the next attack.
We begin these drills with individual drills to warm up your tackling, jockeying and heading skills. Then we look at group play. After practicing these drills you’ll be a much better defender.
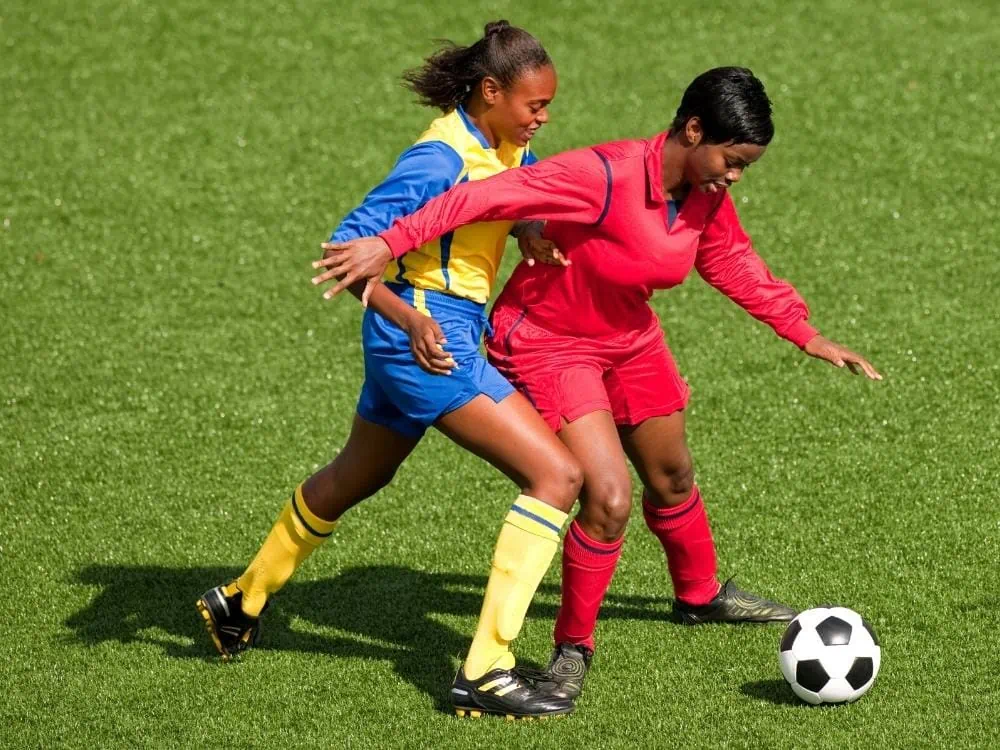
Defensive Soccer Drills (Pressure /Shape/ Tackle/Clear)
Defending The Goal: Soccer Drill
Drill Outline
- Drill Name: Defending The Goal
- Session Length: 3 to 5 minutes
- Number of players: minimum 2, optimum 4 to 16
- Skills learned: pressing, marking, 1 v 1 defending, tackling, and blocking
- Equipment: 1 ball, 1 goal (can be a mini goal made with cones)
Drill Setup
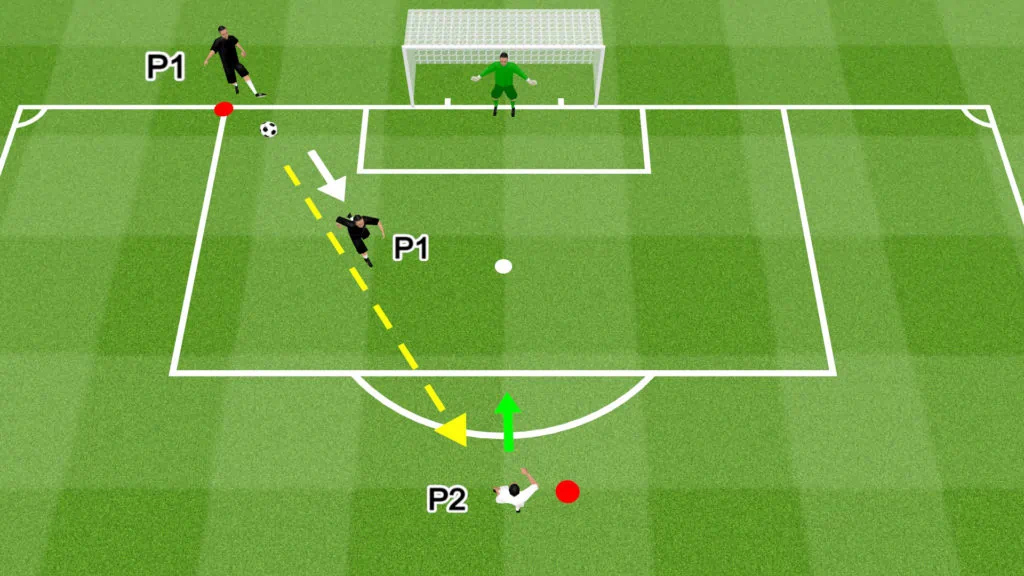
- If you have a goalkeeper, set up a full-size goal. If not, create a small goal using cones.
- The penalty box is a perfect space to run this drill.
- If your training ground doesn’t have goals or a lined field, place one cone 20 yards in front of the goal. Position another cone next to the goal on the end line.
- Split the team into 2 groups, with one attacking and one defending
- The attacking team lines up behind the cone in front of the goal. The defending team lines up behind the cone on the end line.
Drill Instructions
- P1 plays a firm, accurate pass to P2.
- P1 then sprints toward P2, closing them down like an in-game situation.
- P2 must take at least 2 touches before shooting to give P1 enough time to defend in a controlled manner.
- P1 should avoid diving into tackles, focusing on shot prevention first, followed by tackling, followed by shot-blocking.
- Instruct defenders to stay on their toes at all times. They should defend with their bodies turned at an angle, guiding the attacker toward their weak side. This is called “side-on” defending.
- While attackers should show intent, this drill is defense-focused.
- The round finishes when P1 dispossesses P2 or when P2 shoots.
- After the round, P1 joins the end of the attacking line and P2 joins the end of the defending line.
- The next set of players start the second round and the drill continues.
Drill Variations
- Adapt the drill to create 2 v 2 or 3 v 3 situations.
- For advanced players, enforce minimum passing requirements before a shot can be taken.
- Instead of the defenders and attackers rotating positions, create a competition between both sides to see which team concedes the least number of goals. Allow all players to complete 2 to 3 rounds before switching the attack and defense.
Defensive Jockeying: Soccer Drills
Drill Outline
- Drill Name: Defensive Jockeying
- Session Length: 3 to 5 minutes
- Number of players: 4 to 16
- Skills learned: defensive pressure, controlled defending, sideline defending, and jockeying
- Equipment: 8 cones and a ball
Drill Setup
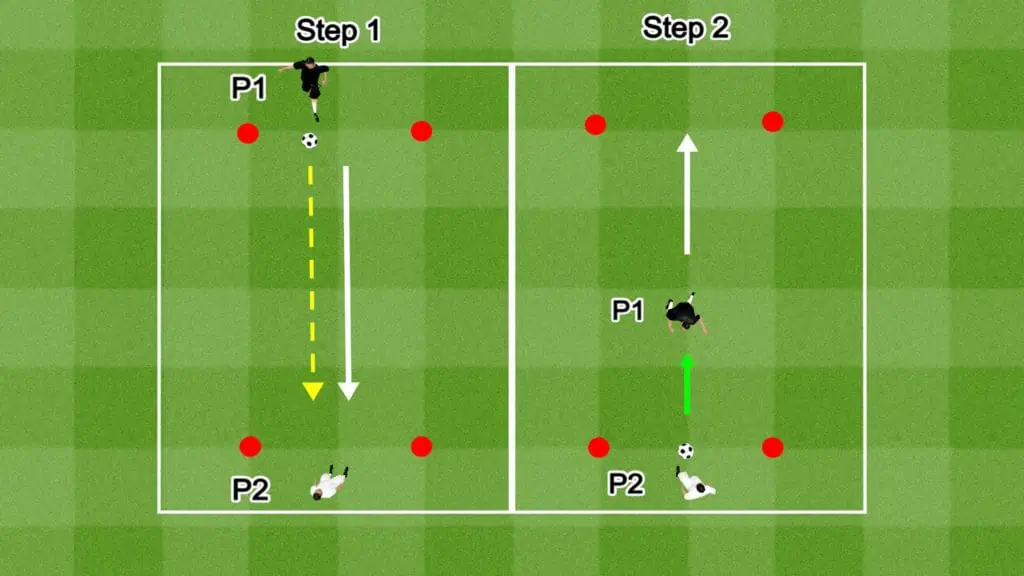
- Create a passing/dribbling lane, 5 yards wide x 10 yards long, using cones.
- Split the team into even groups of attackers and defenders.
- The attackers line up at one end of the lane and the defenders line up at the other.
Drill Instructions
- The defensive group starts with the ball.
- P1 passes the ball to P2 and then sprints toward them, slowing down as they approach touching distance.
- P1 lowers their center of gravity and angles their body to one side, guiding the dribbler in this direction. This simulates an in-game defensive situation along the sideline.
- Defenders should practice showing the dribbler down both sides so they are prepared for all scenarios.
- P2 starts dribbling toward the other end of the lane.
- P1 remains within touching distance of P2, using quick feet to shuffle backward. This is called jockeying. It is a controlled form of defense that keeps the attacker close without overcommitting to a tackle.
- P1 continues to jockey 2 without tackling until they reach the end of the lane.
- P2 can dribble from side to side but they must not try to run past P1.
- After reaching the end of the lane, P1 and P2 join opposite lines and the next players continue the drill.
Drill Variations
- Once the ball passes the halfway point along the lane, allow the attacker to attempt to dribble past the defender and allow the defender to tackle.
Man-On Drill: Soccer Drill
Drill Outline
- Drill Name: Man-On Drill
- Session Length: 10 minutes
- Age Group: 7+
- Number of players: 3 (minimum)
- Skills learned: First touch, turning, holding off the defender, shielding the ball, finishing
- Equipment: 1 ball (minimum), 3 cones, 1 goal (optional)
Drill Setup
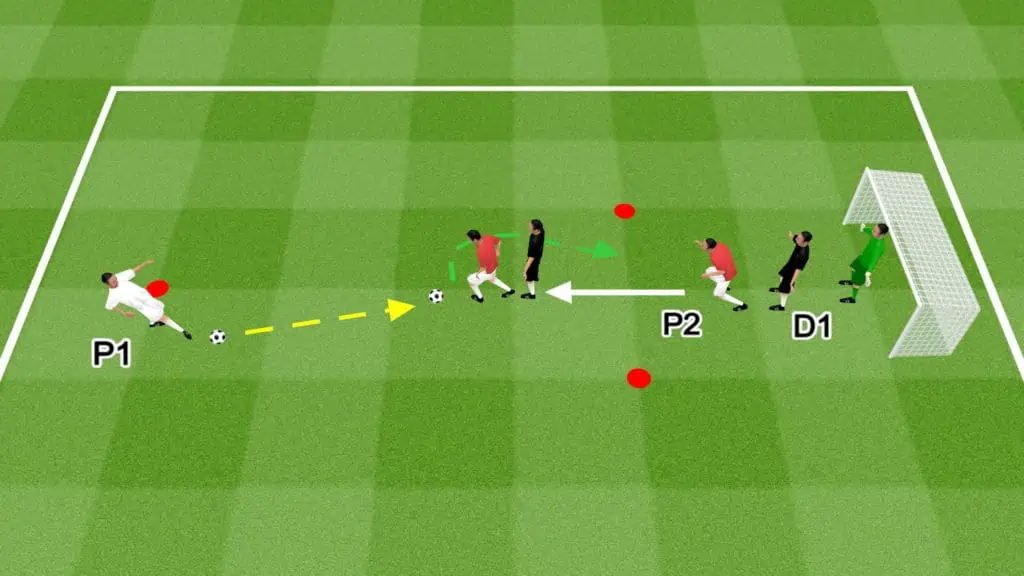
- Set up a 5-yard, 2-cone gate along the edge of the penalty box.
- Place 1 cone 10 yards from the gate toward the center of the field.
- If you have a goalkeeper, consider setting up a goal to include shooting practice as a secondary aspect of the drill.
- P2 (attacker) and D1 (defender) begin at the passing gate.
- P1 and the remaining players line up behind the cone toward centerfield.
- P1 begins with the ball at their feet.
Drill Instructions
- P2 moves around the edge of the penalty box simulating an in-game scenario.
- P2 shakes off the defender, sprints through the gate, and calls for the ball.
- P1 plays a low, hard pass to P2.
- P2 takes a good first touch, holds off the defender, then spins toward the goal. If there is a goalkeeper, P2 takes a shot on goal.
- D1 doesn’t actively try to win the ball. Instead, they apply pressure, allowing P2 to practice taking a solid first touch when surrounded by defenders.
- When the round is over, P2 joins the end of the passing line, D1 takes P2’s place, and P1 takes D1’s place.
- If you have 7 or more outfield players, consider setting up 2 identical grids and running the drills concurrently.
Drill Variations
- Instruct players to focus on different types of touches in each round.
- For 1 round, focus on taking 1 touch, and spinning behind the defender toward the goal.
- For another round, focus on taking a good touch, facing up the defender, and running past them before shooting.
- For another round, instruct P2 to play a give-and-go pass with P1, before running behind the defender for a through pass from P1.
- For advanced players, encourage them to work on different skill moves, touches, flicks, and turns.
Standing and Jumping Headers: Soccer Drill
Drill Outline
- Drill Name: Standing and Jumping Headers
- Session Length: 5 minutes
- Age Group: All age groups (according to health recommendations in your area)
- Number of players: 3 to 18
- Skills learned: Standing and jumping headers
- Equipment: 1 ball (minimum), 6 cones
Drill Setup
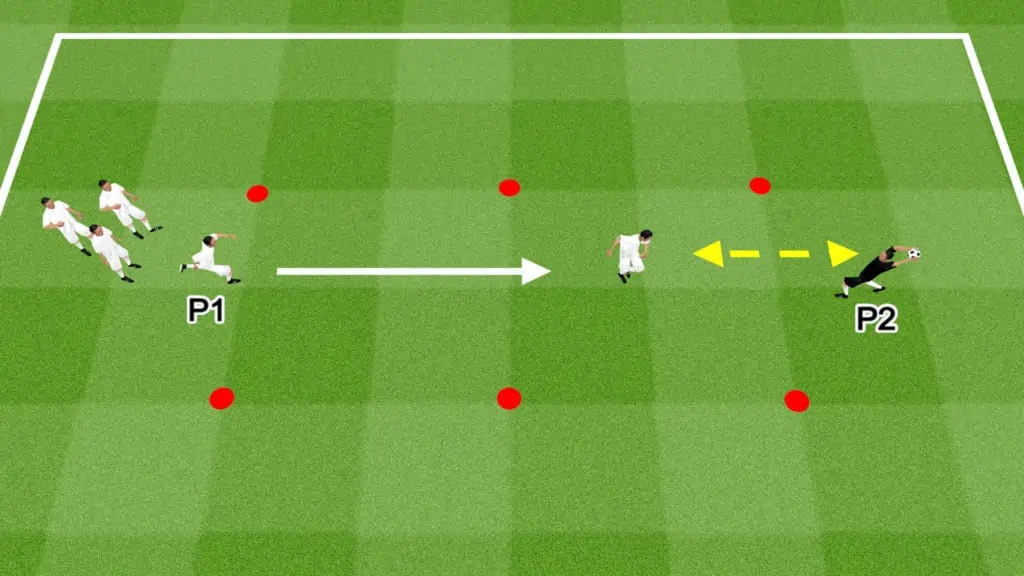
- Build 3 parallel gates, 5 yards apart using cones. This creates the heading channel.
- P1 stands on one end of the channel.
- The rest of the team lines up behind P1.
- P2 stands on the other end of the channel.
- Place multiple balls next to P2.
- P2 starts the drill with the ball in their hands.
- If you have more than 8 players, set out another heading channel.
Drill Instructions
- P1 runs down the channel toward P2.
- When P1 reaches the second gate, they stop and wait for the pass.
- P2 throws a lofted pass toward P1’s head.
- P1 completes a standing header back to P2.
- Instruct players to use the correct heading technique, keeping their eyes on the ball and making contact with their forehead.
- The focus of the drill is on accurate headers.
- After completing the header, P1 slides outside the channel and shuffles backward toward the starting point.
- The next player repeats P1’s steps.
- Rotate the thrower occasionally.
Drill Variations
- The first round practices standing headers.
- For the second round, practice jumping headers. Instruct the throwers to loft the ball high in the air.
- The heading players must learn to time their jump to make optimal contact with the ball.
Defending Crosses: Soccer Drill
Drill Outline
- Drill Name: Defending Crosses
- Session Length: 5 minutes
- Number of players: minimum 3, optimum 8 to 16
- Skills learned: defensive positioning, marking, heading, volleying, and clearing the ball
- Equipment: 9 cones, multiple balls, and 1 goal
Drill Setup
- The penalty box is a perfect space to run this drill. If your training ground doesn’t have a lined field, use cones to create a penalty box.
- Set up goalposts or make a goal using cones on the end line of the penalty box.
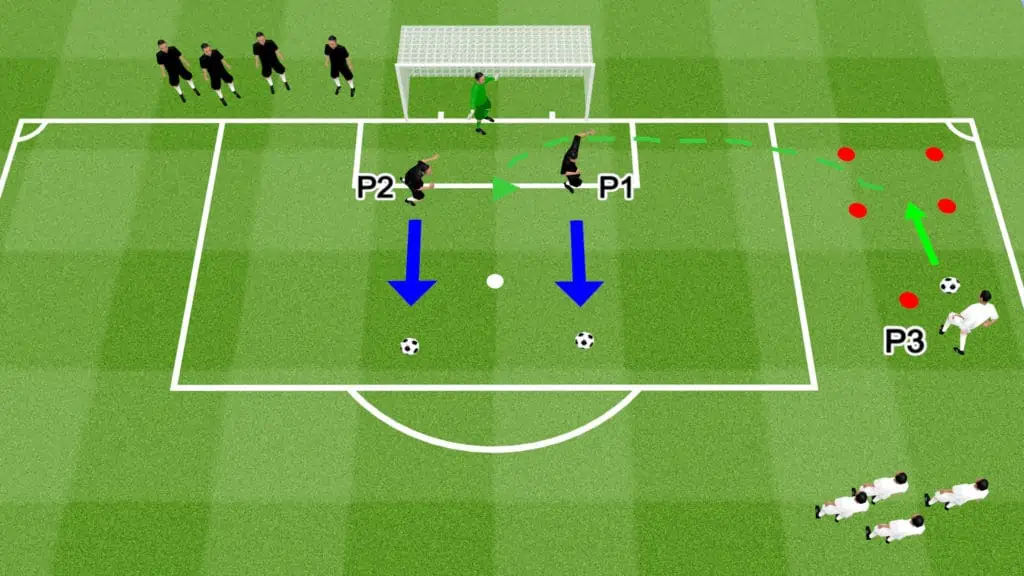
- Create a 5 x 5-yard square on the outside of the penalty box toward the sideline. This is where players will make crosses from.
- Place a cone 5 yards from the crossing square toward the center of the field.
- Split the team into attackers and defenders.
- The attackers line up at the cone next to the crossing square.
- The defenders line up behind the goal.
Drill Instructions
- P1 and P2 position themselves in the penalty box, anticipating a cross from the wing.
- Attackers line up behind the cone near the sideline.
- P3 dribbles into the small square before crossing the ball into the penalty box.
- P1 and P2 work together to clear the ball away from the goal.
- P1 and P2 must communicate effectively to ensure one of them gets the ball out of the danger zone.
- Defenders should head, volley, or simply kick the ball away.
- Instruct defenders to clear the ball toward the sidelines where possible, avoiding the central areas.
Drill Variations
- Add 1 attacker to compete with the defenders for the crosses.
- Add 2 attackers to complete with defenders.
- Add more attackers and defenders to simulate in-game scenarios. Limit the number of rounds with 4 attackers and 4 defenders or more to avoid potentially dangerous collisions.
- Switch the crossing position to the opposite wing.
- Add a goalkeeper to the drill if you have one.
Sharks and Minnows: Soccer Drill
- Age Range: 4-8
- Length of Session: 10 mins
- Number of Players: 6+
- Skills to Learn: dribbling, keeping head up, ball control
- Equipment: balls for each player, cones, pinnies optional.
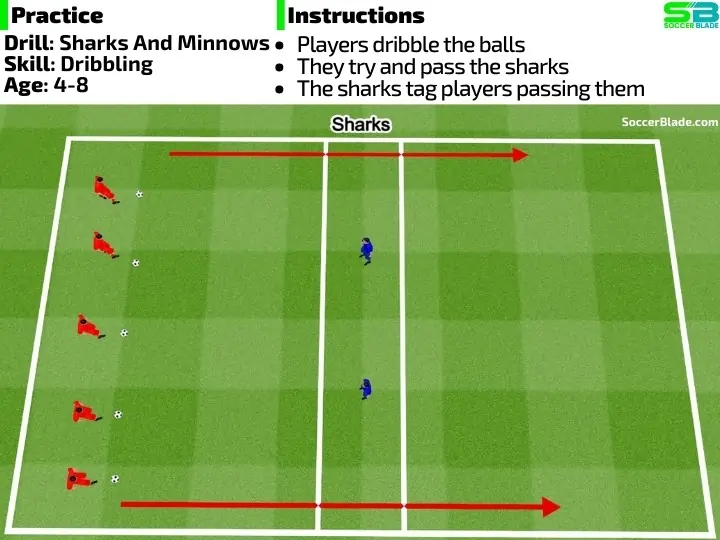
Description: Kids try to dribble from one side to the other without getting tagged by the shark. Anyone tagged becomes a shark.
Drill Set-up:
- Create a large rectangle suitable for the number and age of players. For example, 35 meters long by 20 meters wide for 12-15 6-year-olds.
- Give each player a ball and line them up on the starting line.
- Select a “shark” to start.
Drill Instructions
- Line up all of the “minnows” with their balls.
- Choose 1-2 sharks and place them in the middle of the space.
- When you say go, have the minnows try to dribble across the other side without getting tagged by a shark.
- Anyone who is tagged must become a shark for the next round.
- Challenge players to see who can be the last minnow standing.
- Younger kids, 4-6, can focus on just tagging the player. For kids 6-8, change the rules so they must knock the ball away from the minnow to count. For kids 8-10 or with advanced skills, you can require them to take full possession of the ball.
- Another way to make the drill more challenging is to make the space smaller.
- You can also add specific dribbling challenges within the game (weak foot only, must complete 2 moves before crossing, etc.
1 v 1 Defending: Soccer Drill
Drill Outline
- Drill Name: 1 v 1 Defending
- Session Length: 5 minutes
- Age Group: All age groups
- Number of players: 4 to 16
- Skills learned: Sprinting, marking, tackling, and blocking
- Equipment: 4 cones, 1 ball, 1 goal
Drill Setup
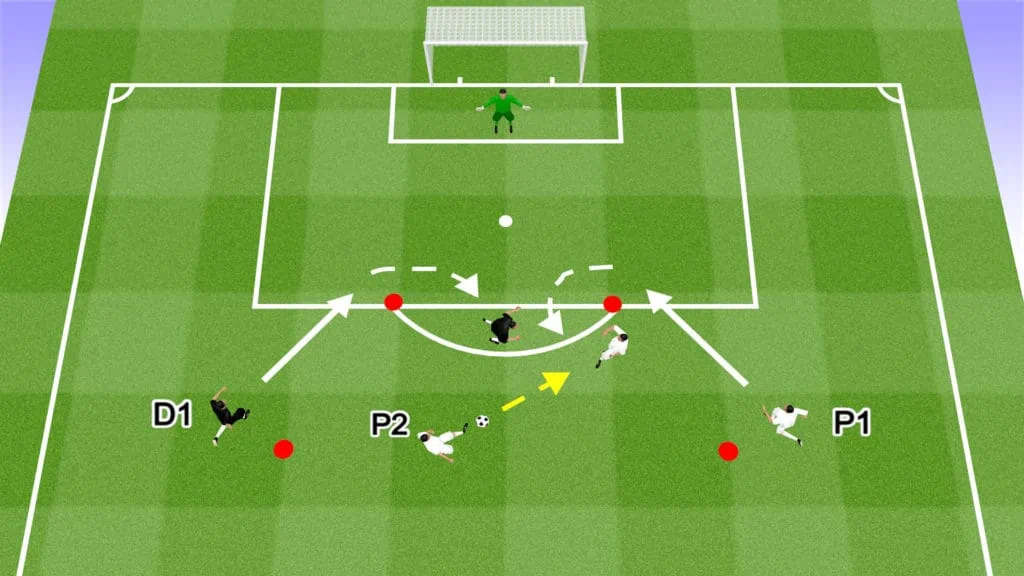
- Place 2 cones approximately 5 yards apart along the edge of the penalty box.
- Place 2 cones 10 yards from either cone toward the halfway line.
- Set up a full-size goal if you have a goalkeeper. If not, use a small goal or cones.
- Split the team into 2 groups: defenders and attackers (actual player position doesn’t matter)
- Defenders line up behind one cone outside the box.
- Attackers line up behind the other.
- The second attacker (P2) in line starts with the ball.
Drill Instructions
- On the coach’s whistle, D1 and P1 sprint to, then around the cones at the edge of the penalty box.
- After rounding the cone, P1 calls for the pass from P2.
- When the pass is played, the drill becomes a live 1 v 1. P1 tries to score and D1 tries to stop them by tackling or blocking.
- D1 can attempt to intercept the ball when it is passed.
- P1 dribbles toward the goal and takes a shot if an opportunity opens up.
- D1 should practice controlled defending, and tackle timing while avoiding diving in.
- When the round is over, the players join the end of the other lines.
Drill Variations
- Create a competition to see which group gets the most stops.
- Repeat the drill with 2 defenders and 2 attackers.
2 v 2 Inside The Box: Soccer Drill
Drill Outline
- Drill Name: 2 v 2 Inside The Box
- Session Length: 10 minutes
- Age Group: 10+
- Number of players: 8 (minimum)
- Skills learned: Marking, tackling, and blocking
- Equipment: 1 ball, 1 goal
Drill Setup
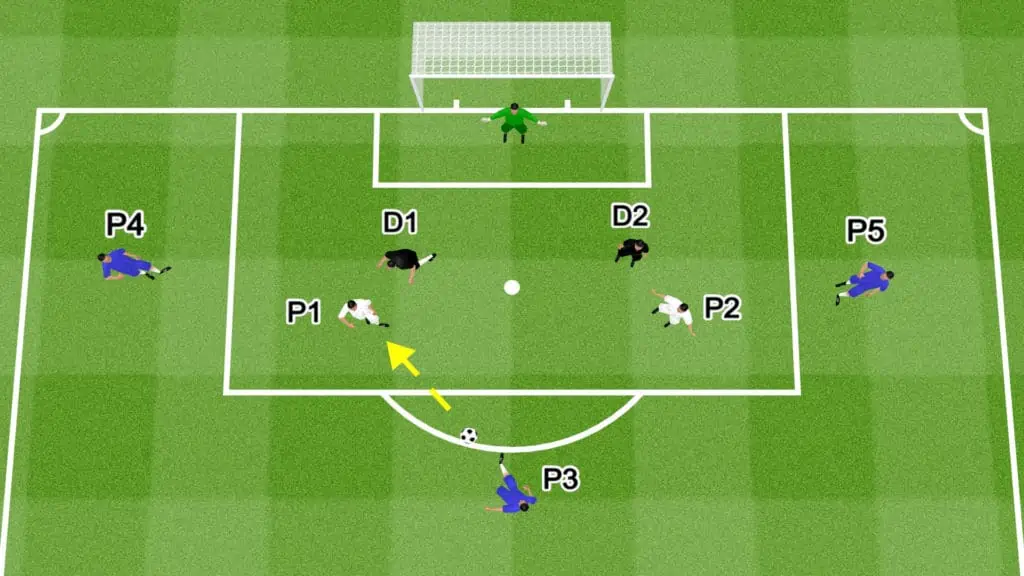
- This drill takes place in the penalty box.
- If you have a goalkeeper, set up a full-size goal. If not, create a small 5-yard goal using cones.
- Split the team into pairs.
- 1 pair is designated as the defensive team (D1 + D2) and another as the attacking team (P1 + P”).
- D1 + D2 and P1 + P2 begin the drill inside the penalty box.
- The attackers start with their back to goal.
- The defenders mark them appropriately.
- At least 3 players from the remaining groups line up outside the penalty box, one of them starting with the ball.
Drill Instructions
- On the coach’s signal, the game goes live.
- P1 and P2 attempt to get free to receive the ball from the player outside the box.
- D1 and D2 mark the attackers closely, trying to stop them from receiving the outside pass.
- The attackers and defenders must stay inside the box.
- When the attackers receive the ball, they work together and try to score.
- The defenders attempt to stop them.
- The attackers can pass to the players outside the penalty box to recycle possession.
- The players outside the penalty box cannot shoot or score.
- The round is over if the attackers score, shoot the ball wide or over the crossbar, or if the defenders win possession.
- The pair that wins the round continues as the defensive team.
Drill Variations
- Create a time limit for each round.
- Limit the number of times the attackers can recycle possession with the outside group.
- Add a third attacker to make things difficult for the defense.
2 v 2 Counterattacks: Soccer Drill
Drill Outline
- Drill Name: 2 v 2 Counterattacks
- Session Length: 10 minutes
- Age Group: 7+
- Number of players: 4 (minimum)
- Skills learned: Passing, dribbling, finishing, defensive positioning, tackling
- Equipment: 4 cones, 1 ball, 2 mini goals, 1 regular goal
Drill Setup
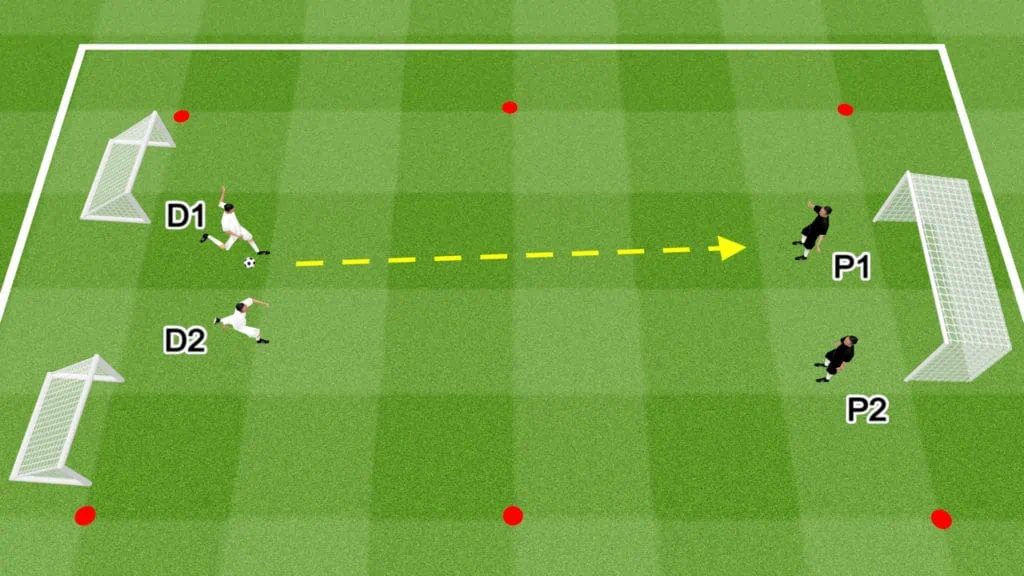
- Create a 15 to 20-yard square playing grid using 4 cones.
- Set up a regular size goal at one end of the grid.
- Set up 2 small goals next to either corner on the opposite end.
- Divide the team into pairs (2 v 2) and elect half as defenders and half as attackers.
- Defenders (D1 + D2) line up at the end with 2 goals.
- Attackers (P1 + P2) begin at the other end.
- The defenders start with the ball.
Drill Instructions
- On the coach’s signal, D1 plays a 15 to 20-yard pass (depending on the size of your grid) to P1 or P2.
- P1 and P2 now take on D1 and D2 in a 2 v 2 situation.
- P1 and P2 try to score in either goal on the opposite end. D1 and D2 attempt to stop them.
- If D1 and D2 win possession, they can counterattack quickly and attempt to score.
- P1 and P2 must try to stop them.
- Each team has a maximum of one attack per round.
- The round is over if either team scores, the ball goes out of play, or a counterattack is unsuccessful.
- After 5 rounds, the players switch roles, then play another 5 rounds.
- The team with the most goals wins.
- If you have multiple pairs, set up identical grids or rotate pairs frequently.
Drill Variations
- Switch the attacking and defending sides, giving players a chance to score dual and single goals.
- If you have a goalkeeper, consider using them for this drill.
- Set a scoring time limit.
- Play 2-touch or 3-touch rounds to work on quick passing and movement.
- Mark a small area next to each goal. Players can only score from inside this zone. This encourages players to focus on build-up play and chance creation, eliminating long-distance pot shots.
2 v 2 Shooting & Defending: Soccer Drill
Drill Outline
- Drill Name: 2 v 2 Shooting & Defending
- Session Length: 10 minutes
- Age Group: 10+
- Number of players: 8 (minimum)
- Skills learned: Passing, dribbling, finishing, tackling, awareness
- Equipment: 6 cones, multiple balls, 2 goals
Drill Setup
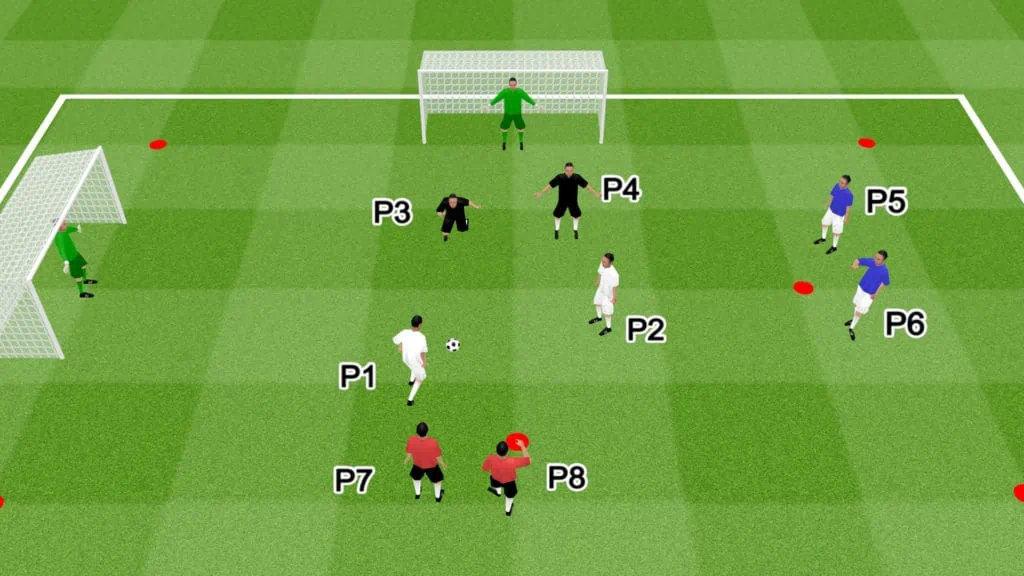
- You can use the penalty box for this drill. Alternatively, create a 4-cone square grid.
- Place 1 cone in the center of 1 side of the grid. Place 1 cone on the center of the side to the right of the first.
- Set up 2 goals along the lines opposite each cone. If you have goalkeepers, set up full-size goals and use this drill as goalkeeping practice.
- Divide the team into pairs.
- Instruct the pairs to line up behind the cones (even groups at each).
- P1 and P2 begin with the ball.
Drill Instructions
- On the coach’s signal, P1 and P2 attack the goal opposite to them.
- P3 and P4 defend them.
- The round is over if the attackers get a shot off or if the defenders win the ball.
- P3 and P4 join the end of the opposite line.
- P1 and P2 are now the defenders.
- As soon as the round is over, P5 and P6 attack the goal opposite to them.
- P1 and P2 attempt to stop them.
- When the round is over, P1 and P2 join the end of the opposite line.
- P5 and P6 are now the defenders.
- As soon as the round is over, P7 and P8 attack the goal opposite to them.
- Repeat the drill for several minutes.
Drill Variations
- Set a scoring time limit.
- Create a minimum passes rule, forcing players to make a certain number of passes before they can shoot.
- Create competition by counting the number of goals each team scores.
- If the drill is becoming congested, increase the size of the grid.
3 v 3 Attacking Waves: Soccer Drill
Drill Outline
- Drill Name: 3 v 3 Attacking Waves
- Session Length: 10 to 15 minutes
- Age Group: 10+
- Number of players: 6 to 18
- Skills learned: Positioning, tackling, and blocking
- Equipment: 2 cones, 1 ball, 1 goal
Drill Setup
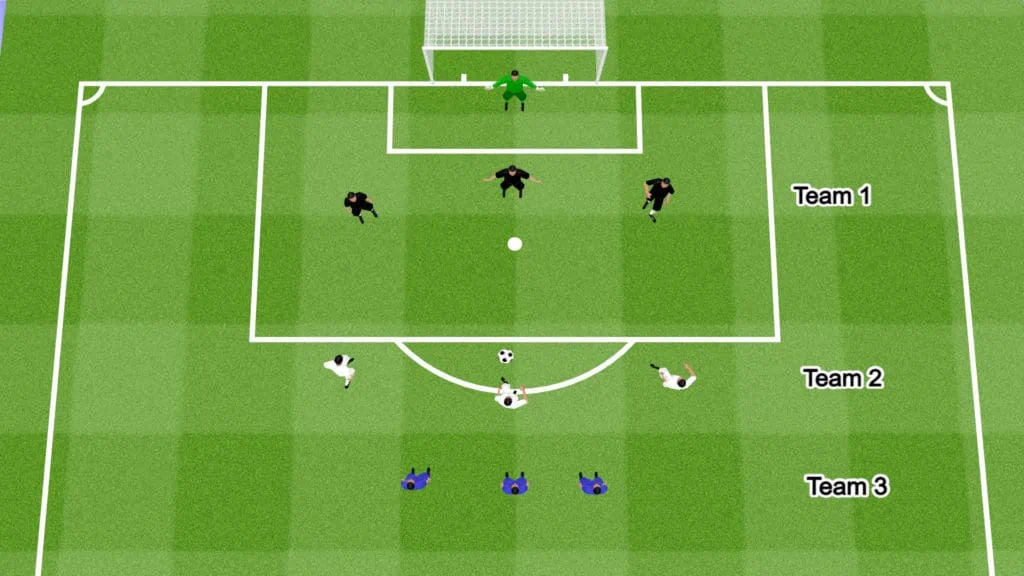
- This drill takes place in the penalty box.
- If you have a goalkeeper, set up a full-size goal. If not, create a small 5-yard goal using cones.
- Split the team into groups of 3.
- 3 defenders start inside the penalty box.
- 3 attackers start outside the penalty box with the ball.
Drill Instructions
- On the coach’s signal, the drill begins as a 3 v 3, attack v defense scenario.
- The attacking team has 15 seconds to score.
- The attackers have unlimited touches and are permitted to pass, dribble, and shoot.
- The attackers cannot score from outside the penalty box.
- Instruct the defenders to communicate effectively and work as a team to snuff out attacks.
- Defenders can tackle, press, block, and intercept.
- The wave is over if the attacker scores, the defense gains possession, or 15 seconds elapses.
- When the wave finishes, the defense has 5-seconds to get back into position before the next group of attackers starts the second wave.
- The defense sustains 5 waves before they switch with another group.
- Repeat the drill until all groups have defended 5 waves.
Drill Variations
- Get rid of the time limit.
- Introduce a maximum touch and/or minimum pass rule for attackers.
- Adjust numbers to 2 v 2 or 4 v 4.
- Add extra attackers to create mismatches for the defensive groups.
Share the post "Defensive Soccer Drills (Shape-Pressure -Tackle-Clear)"
Joel is a seasoned soccer journalist and analyst with many years of experience in the field. Joel specializes in game analysis, player profiles, transfer news, and has a keen eye for the tactical nuances of the game. He played at various levels in the game and coached teams - he is happy to share his insight with you.


