Share the post "2 Player Soccer Drills (One On One-1 V.s 1)"
There are many game situations where players will be faced against another player, making it one on one. It’s challenging but it can be fun.
Face up defenders Vs. attackers or midfielders Vs. midfielders and battle-off. This makes it easier when game-day comes.

One On One Soccer Drills (2 Players)
Long passing: Soccer Drill
Drill Outline
- Drill Name: Long passing
- Session Length: 5 minutes
- Age Group: all ages
- Number of players: 2 to 18
- Skills learned: First touch, ball control, long-distance passing
- Equipment: 1 ball, 8 cones (per pair)
Drill Setup
- Divide the team into pairs.
- For each pair, create 2 x 4-cone grids and position them approximately 10 yards apart.
- Each player stands inside their own 4-cone grid.
- 1 player in each pair begins with the ball.
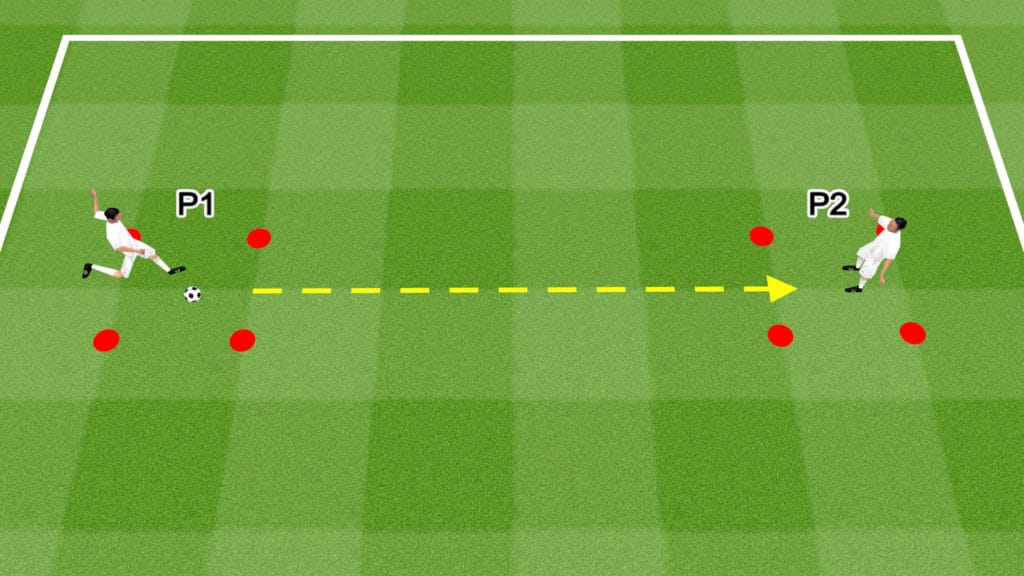
Drill Instructions
- P1 starts the drill by playing a direct pass to their teammate. Passes should be accurate, requiring minimal lateral movement from the receiver. However, allow the passers to vary the power and height of their passes, forcing the receiver to adjust and practice controlling the ball with different parts of their body.
- Instruct the receivers to focus on taking their first touch within the grid, keeping the ball close to their body.
- In the beginning, don’t limit the number of touches each player can take. Once players get used to the drill, encourage them to take a single touch to control the ball before playing a return pass.
- All players must complete 10 passes with their strong foot, then 10 passes with their weaker foot.
- When each player completes their 10 passes on each foot, expand the size of the grid and increase the distance between players to 20 yards. Repeat the entire process at this distance.
Drill Variations
- For advanced players, instruct players to make chest passes for a round.
- For advanced players, instruct players to try landing the ball inside their teammate’s grid, without it hitting the ground beforehand.
1v1 Shooting: Soccer Drill
- Age Range: 6-10
- Length of Session:10 mins
- Number of Players: 2+
- Skills to Learn: dribbling, 1v1 attacking and defending, finishing
- Equipment: balls, cones, a goal
Description: Both players face the goal and engage in a race to the ball and goal. Who can finish first? This fun game is a combination of 1v1 and shooting.
Drill Set-up:
- Place a cone about 25 meters away from the goal.
- Bring all of the balls to the cone.
- If you do not have a goal available, create one with cones or use a mini goal.
- Split players into two even teams.
- Have each team line up on one side of the cone.
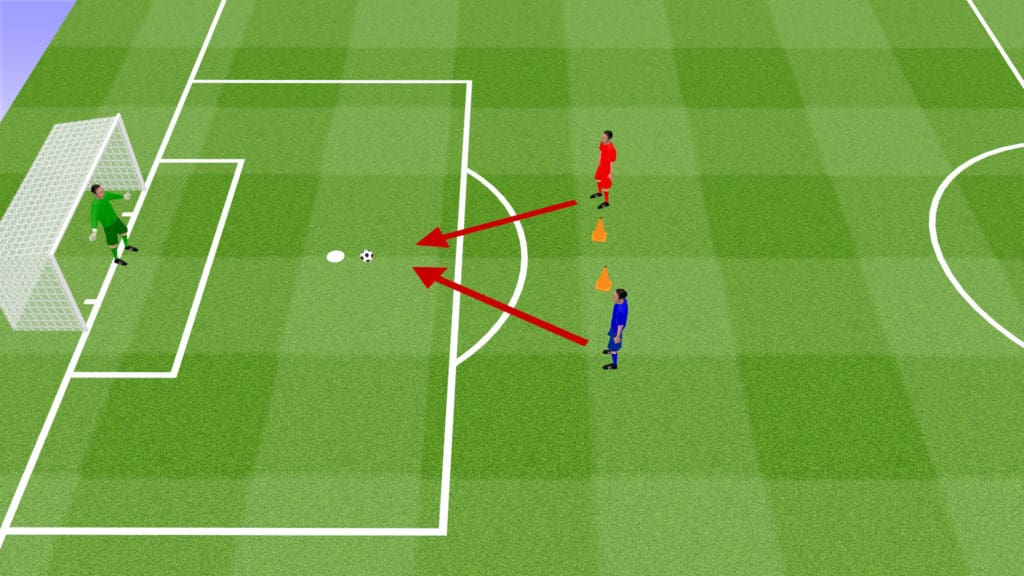
Drill Instructions:
- Have the goalkeeper (s) head to the goal. They can switch off every few times.
- Stand at the cone with the balls.
- Pass the ball forward toward the goal.
- The first player in each line should react to the pass and race to the ball.
- The players should compete to see who can win the ball and finish first.
- If the players are unable to finish right away and engage in a 1v1, keep the game at under 20 seconds.
- Play the first team to 10 goals and then switch sides. Keep the entire activity around 10 minutes or less.
- Have players start in different positions. At first, they can face forward. Then have them face sideways and backward, or start kneeling or in a push-up position. Different starting positions help them work on power and reaction time.
Dribble, Turn, and Shoot: Soccer Drill
Drill Outline
- Drill Name: Dribble, turn, and shoot
- Session Length: 5 to 10 minutes
- Number of players: 2 to 16
- Skills learned: Dribbling, ball control, turning, skill moves, and finishing
- Equipment: 5 cones (or agility poles), mannequin, 1 ball (minimum), and goal posts
Drill Setup
- Set up the drill as shown in the graphic.
- Place 1 cone near the center of the field.
- Place 1 cone 10 yards parallel to the first, toward the sideline.
- Place 2 more cones 10 yards from the first 2 just outside the penalty box.
- Place a mannequin on the edge of the penalty box, in the center of the goal. If you don’t have a mannequin, a cone will suffice.
- Set up full-size goalposts.
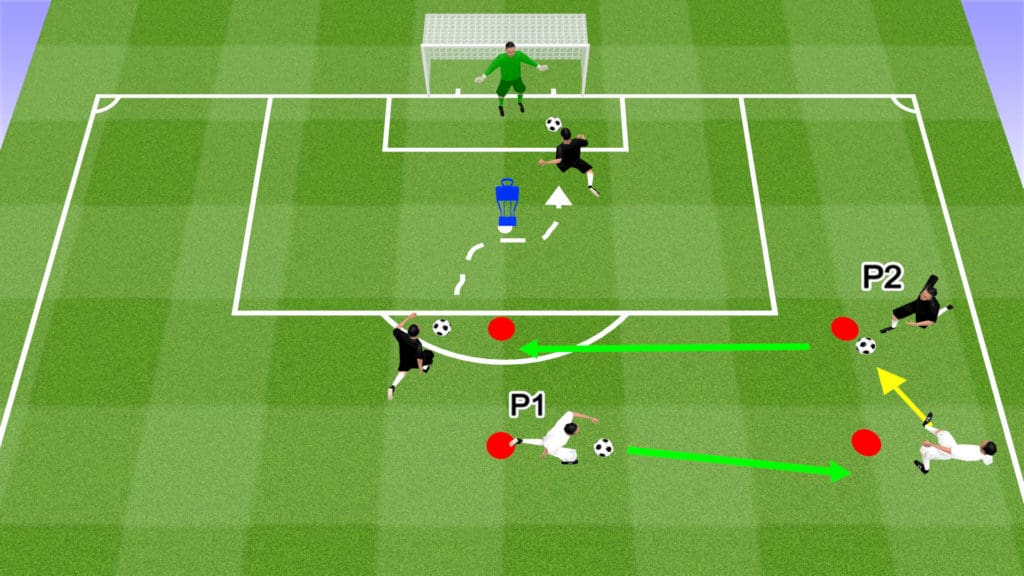
Drill Instructions
- The team lines up at the center field behind the cone. 1 player (P2) stands at the cone on the right side of the penalty box.
- P1 starts the drill by dribbling at, then around the parallel cone toward the sideline.
- After rounding the cone, P1 passes the ball to P2 and then takes its original position.
- P2 dribbles at, then around the cone near the edge of the penalty box.
- After rounding the cone, P2 dribbles at the mannequin and uses a skill move (e.g. step over) to go around it.
- P2 has a 1 v 1 with the goalkeeper.
Drill Variations
- Switch to the opposite side of the field.
- Focus on the left and right-footed shooting.
- If there is no goalkeeper, use small goals to improve finishing accuracy.
1 v 1 Defending: Soccer Drill
Drill Outline
- Drill Name: 1 v 1 Defending
- Session Length: 5 minutes
- Age Group: All age groups
- Number of players: 4 to 16
- Skills learned: Sprinting, marking, tackling, and blocking
- Equipment: 4 cones, 1 ball, 1 goal
Drill Setup
- Place 2 cones approximately 5 yards apart along the edge of the penalty box.
- Place 2 cones 10 yards from either cone toward the halfway line.
- Set up a full-size goal if you have a goalkeeper. If not, use a small goal or cones.
- Split the team into 2 groups: defenders and attackers (actual player position doesn’t matter)
- Defenders line up behind one cone outside the box.
- Attackers line up behind the other.
- The second attacker (P2) in line starts with the ball.

Drill Instructions
- On the coach’s whistle, D1 and P1 sprint to, then around the cones at the edge of the penalty box.
- After rounding the cone, P1 calls for the pass from P2.
- When the pass is played, the drill becomes a live 1 v 1. P1 tries to score and D1 tries to stop them by tackling or blocking.
- D1 can attempt to intercept the ball when it is passed.
- P1 dribbles toward the goal and takes a shot if an opportunity opens up.
- D1 should practice controlled defending, and tackle timing while avoiding diving in.
- When the round is over, the players join the end of the other lines.
Drill Variations
- Create a competition to see which group gets the most stops.
- Repeat the drill with 2 defenders and 2 attackers.
Receive Pass Drag Back: Soccer Drill
Drill Outline
- Drill Name: Receive pass drag back
- Session Length: 10 minutes
- Age Group: 10+
- Number of players: 2 to 18
- Skills learned: First touch, drag back, dribbling, ball control
- Equipment: 2 cones (minimum), 1 ball (minimum)
Drill Setup
- This drill requires players to work in pairs.
- For each pair, set up 2 cones 5 yards apart.
- Each player stands at a cone.
- P2 starts with the ball.
- P1 starts behind their cone.
- P1 is the main focus of the drill.
- P2 plays the role of a passer.
Drill Instructions
- On the coach’s signal, P1 sprints in front of the cone and calls for the pass.
- P2 passes the ball to the feet.
- P1 takes a touch to control the ball, then drags the ball behind the cone, shuffles to the opposite side, and plays a return pass.
- Repeat the drill for 1 to 2 minutes before alternating roles.
- The focus is on moving backward, then sideways while maintaining control of the ball.
- The cone represents a defender, so this drill also helps players practice receiving the ball under pressure.
Drill Variations
- Focus on using both feet for a round.
- Focus on using the right foot for a round.
- Focus on using the left foot for a round.
Passing Practice in Pairs: Soccer Drill
Drill Outline
- Drill Name: Passing practice in pairs
- Session Length: 5 minutes
- Age Group: all ages
- Number of players: 2 to 18
- Skills learned: Passing, volleying, heading, and ball control
- Equipment: 1 ball, 8 cones (per group)
Drill Setup
- Divide the team into pairs.
- Create 2 x 4-cone grids approximately 5 yards apart for each pair.
- Each player stands inside their own 4-cone grid.
- 1 player in each pair begins with the ball.
- There are 4 rounds in this drill. Each round covers a different variation.

Drill Instructions
- Round 1: P1 starts by playing a low pass to the feet of P2. P2 then plays a return pass to P1. Players repeat the process for 10 passes.
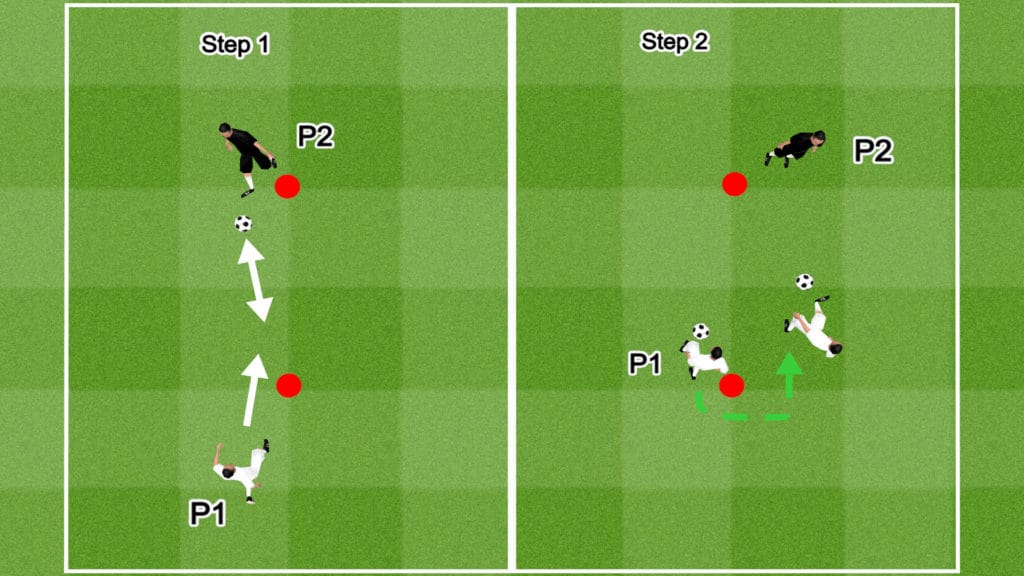
- Round 2: P1 starts with the ball in their hands and gently lobs it toward the feet of P2. P2 volleys the ball back to P1’s hands using the inside of their foot. Players repeat the process for 5 passes then switch roles.
- Round 3: P1 starts with the ball in their hands and lobs it toward P2’s chest. P2 controls the ball with their chest, then volleys it back to P1’s hands as they did in round 2. Players repeat the process for 5 passes then switch roles.
- Round 4: P1 lobs the ball in the air. P2 heads the ball back to P1’s hands, jumping if necessary. Players repeat the process for 5 passes then switch roles.
- Players complete all 4 rounds 3 times.
Drill Variations
- Focus on using weak feet for a round.
- Increase the distance between the grids to practice different ranges of passing.
Quick Fire Passing Drill: Soccer Drill
Drill Outline
- Drill Name: Quick Fire Passing Drill
- Session Length: 10 minutes
- Age Group: 10+
- Number of players: 2 (minimum)
- Skills learned: One touch passing, first touch, lateral movement, give-and-go passing
- Equipment: 1 ball (per pair), 3 cones
Drill Setup
- Divide the team into pairs.
- Each pair operates in a small grid consisting of a 3-yard, 2-cone gate, and a perpendicular cone, 3 yards from the gate.
- Each player takes turns being the focus of the drill.
- P1 begins in the center of the gate.
- P2 begins with the ball at their feet at the perpendicular cone.
Drill Instructions
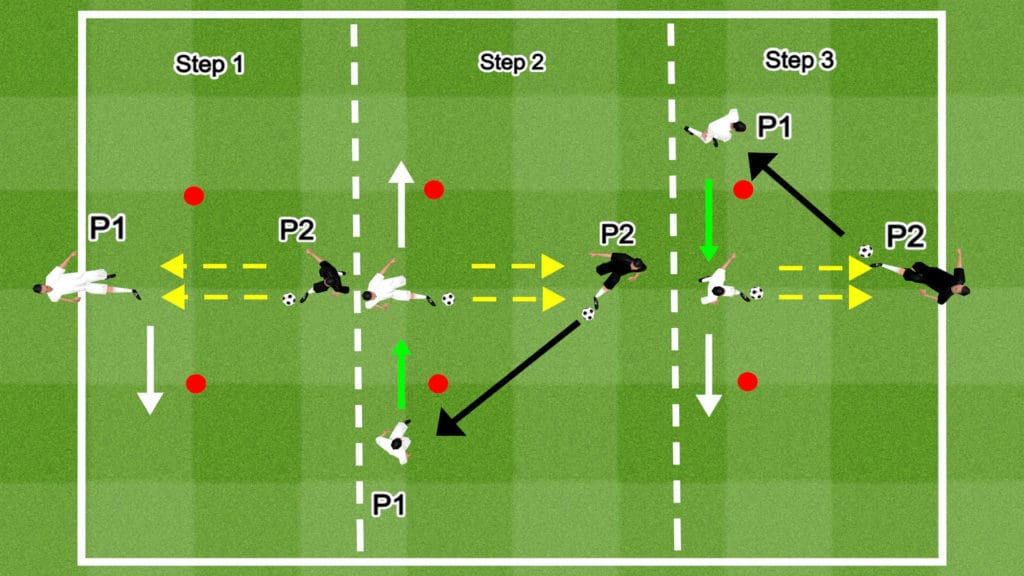
- On the coach’s signal, P2 starts the drill by playing 2 return passes to P1.
- P1 then shuffles to the right side of the right-hand cone to receive the next pass.
- P2 passes the ball when P1 reaches the outside of the cone.
- P1 takes 1 touch (if possible), taking the ball back toward the center of the gate.
- P1 passes the ball to P2.
- P2 plays 2 return passes to P1.
- P1 shuffles to the left side of the left-hand cone to receive the next pass.
- After receiving the pass, P1 takes 1 touch, taking the ball back toward the center of the gate.
- P1 and P2 continue the process for 1 minute then switch roles.
- Each player performs at least 3 rounds of the drill.
Drill Variations
- To add a conditioning focus to the drill, consider increasing the working time or the number of rounds.
- Create competition by tracking the number of mistakes (extra touches, misplaced passes, performing the drill incorrectly, etc.). The team that commits the least number of mistakes wins.
1 v 1 Relay: Soccer Drill
Drill Outline
- Drill Name: 1 v 1 Relay
- Session Length: 10 minutes
- Age Group: All age groups
- Number of players: 2+
- Skills learned: Movement, quick feet, dribbling, tackling, blocking, finishing
- Equipment: 6 cones, 1 ball, 1 goal, 8 agility poles
Drill Setup
- Use the penalty box and the surrounding area for this drill.
- Place a cone, 5 to 10 yards from the corner of the penalty box toward the sideline. This indicates the starting position.
- Place 4 agility poles 5 yards from the cone toward the end line in a weave formation.
- Place another cone 5 yards from the end of the weave.
- Position 1 more cone in line with the first cone and the edge of the penalty box.
- Set up an identical drill on the opposite side of the field.
- Place 1 in the center of the edge of the penalty box.
- P1 and P2 stand at the starting cones on either side of the field.
Drill Instructions
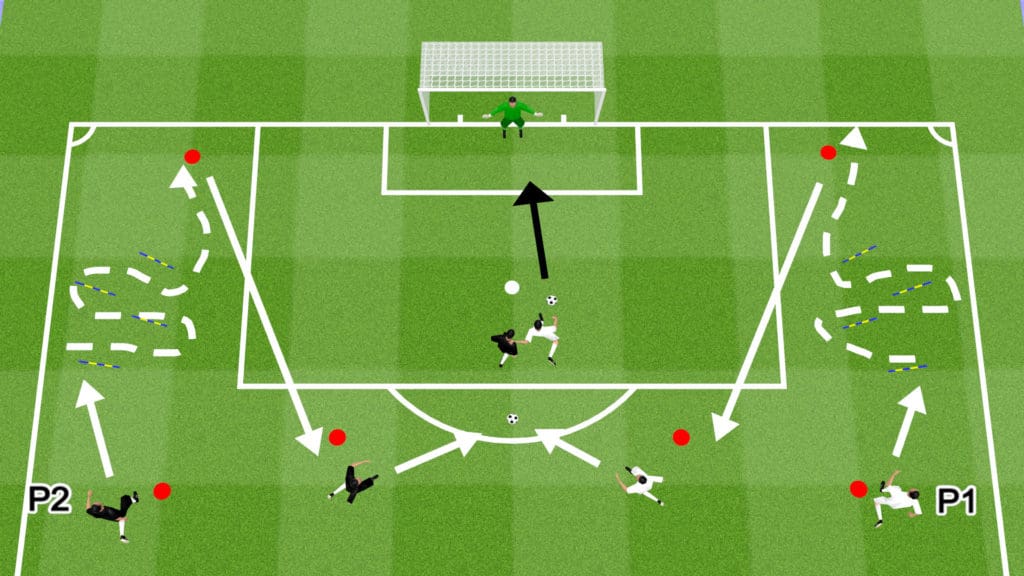
- On the coach’s signal, P1 and P2 sprint to, then through the agility pole weave, moving laterally outside each pole.
- After completing the weave, they spring too, then around the cone near the end line before sprinting toward the final cone next to the starting point.
- After rounding the final cone, both players race to win possession of the ball.
- The player who gets the ball first is the attacker, making the other player the defender.
- From here, they compete in a 1 v 1, with the attacker trying to score.
- If you have a goalkeeper, use a full-size goal. If not, set up a small goal or create a shooting gate using cones.
- Players are awarded 2 points for a goal and 1 point for dispossessing or blocking their opponent. A foul results in a 1 point deduction.
- No points are awarded to either player for a miss.
- Repeat the drill until 1 player reaches 5 points.
Drill Variations
- Get creative with the agility course by adding more obstacles or sections.
- If you want to focus on player conditioning, consider increasing the winning points tally to 10.
- To add a fun twist, award point for nutmegs (kicking the ball through the defender’s legs).
- If 1 player consistently passes through the grid faster than the other, consider lengthening their route to create a more even contest.
1 v 1 Pass & Move: Soccer Drill
Drill Outline
- Drill Name: 1 v 1 Pass & Move
- Session Length: 5 to 10 minutes
- Age Group: All age groups
- Number of players: 2
- Skills learned: Passing, movement, dribbling, tackling, and defensive jockeying
- Equipment: 10 cones, 1 ball
Drill Setup
- Place 2 cones 15 yards apart, marking the starting points for both players.
- 5 yards to either side of these cones, create a dribbling tunnel of the same length. The tunnel should be approximately 5 yards wide.
- Place cones 5 yards apart on both sides of the tunnel to create 3 separate, evenly sized sections within it.
- P1 begins with the ball at their feet.
Drill Instructions
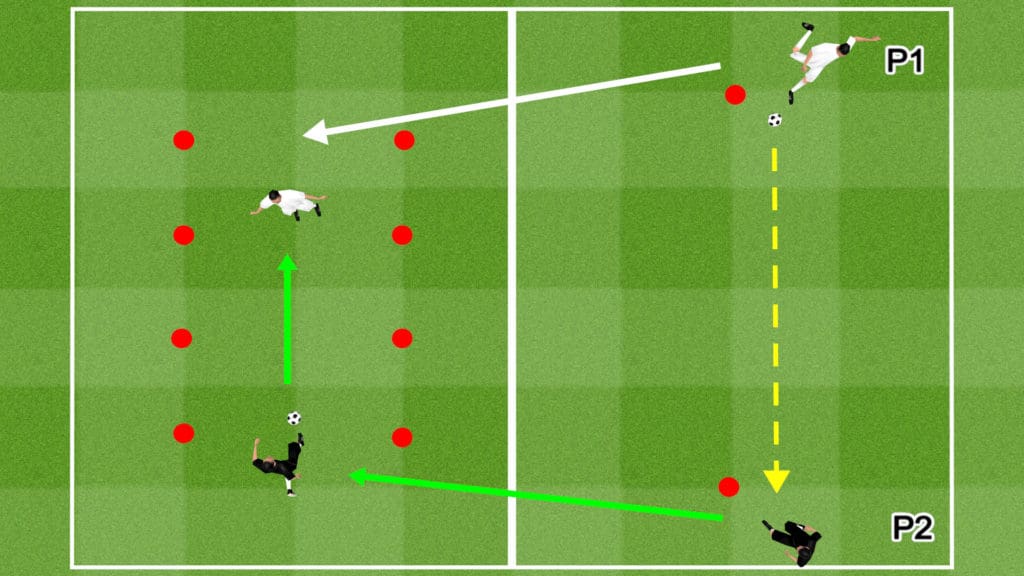
- P1 starts the drill by playing a long pass to P2.
- After the pass, P1 sprints through their end of the dribbling tunnel, making their way to the center section. They cannot enter the furthest section of the tunnel.
- P2 receives the pass, then dribbles through the end of the dribbling tunnel.
- P2 then tries to dribble past P1 and through the opposite end of the tunnel.
- P1 can tackle, block, or jockey the dribbler to try and regain possession.
- The round is over when P2 loses possession or successfully passes through the tunnel.
- If the ball crosses either sideline of the tunnel, the round is over.
- After the round, players switch roles.
Drill Variations
- Create a competition to see who can complete the most successful dribbles in the allocated time frame. Or, create a competition to see which player reaches 5 successful dribbles first.
- Set a time limit for the dribblers to get through the tunnel.
- If the defenders have the edge over the attackers, prohibit them from entering the center section.
- If the attackers have the edge, allow the defenders to enter all sections of the tunnel.
1 v 1 Mini-Game: Soccer Drill
Drill Outline
- Drill Name: 1 v 1 Mini-Game
- Session Length: 5 to 10 minutes
- Age Group: All age groups
- Number of players: 2
- Skills learned: Passing, dribbling, defensive positioning, tackling, finishing
- Equipment: 10 cones, 1 ball
Drill Setup
- Create a 10 to 15-yard square playing grid, placing 1 cone on each of the 4 corners, and using 2 cones to mark the halfway point on either side.
- Create 2 x 3-yard goals using cones.
- P1 begins at 1 goal with the ball at their feet, while P2 begins at the other goal.

Drill Instructions
- The drill begins on the coach’s signal.
- P1 dribbles toward P2’s goal and tries to score. P2 can defend whatever way they choose, either pressing the ball aggressively or protecting their goal more conservatively.
- If the defender wins the ball, they have 3 seconds to score a goal on a counterattack.
- The round is over if either player scores, if the ball goes out of play, or if the 3-second counterattack is unsuccessful.
- The drill is then reset. After every round, the players switch roles, altering who starts with the ball.
- The first player to score 5 goals wins.
Drill Variations
- Increase the winning goal tally to improve player fitness.
- Set a time limit for the attacking player to score.
- Increase or decrease the size of the playing grid.
- Consider adjusting the points system, rewarding players for tackling, or doubling points for counterattack goals.
1 v 1 Dual Goal Drill: Soccer Drill
Drill Outline
- Drill Name: 1 v 1 Dual Goal Drill
- Session Length: 5 to 10 minutes
- Age Group: All age groups
- Number of players: 2
- Skills learned: Dribbling, defensive positioning, tackling, finishing
- Equipment: 4 cones, 1 ball, 2 mini goals
Drill Setup
- Create a 5 to 10-yard square playing grid using cones.
- Place 2 mini goals at the corners of one side of the grid.
- P1 begins with the ball at their feet in between the goals.
- P2 begins at the opposite end of the grid.

Drill Instructions
- P1 starts the drill by passing the ball to P2.
- When they receive the ball, P2 attempts to score in either goal.
- P1 should quickly close the distance to give themselves the best chance at preventing a goal.
- P1 can tackle, block or jockey P2 to stop them from scoring.
- After every round, the players switch roles, changing who starts with the ball.
- The first player to score 10 goals wins.
Drill Variations
- Increase the winning goal tally to improve player fitness.
- Set a time limit for the attacking player to score.
- If the defensive players are struggling to stop the attackers, consider shortening the distance between the goals.
Share the post "2 Player Soccer Drills (One On One-1 V.s 1)"
Joel is a seasoned soccer journalist and analyst with many years of experience in the field. Joel specializes in game analysis, player profiles, transfer news, and has a keen eye for the tactical nuances of the game. He played at various levels in the game and coached teams - he is happy to share his insight with you.