Share the post "Soccer Drills for Corners, Penalty, Free Kicks, Throw-Ins (Set-Piece Drills)"
Set-piece soccer drills are effective. Some teams will spend 10% of their training time on set pieces. The number of goals scored in the English Premier League by a set piece is around 30%
That’s a high number of goals, so you need to make sure your team is practicing corners, penalties, free kicks, and throw-ins. We got you covered! Here are some great drills to perfect your set pieces.
Soccer Drills for Corners, Penalty, Free Kicks, Throw-Ins (Set-Piece Drills)
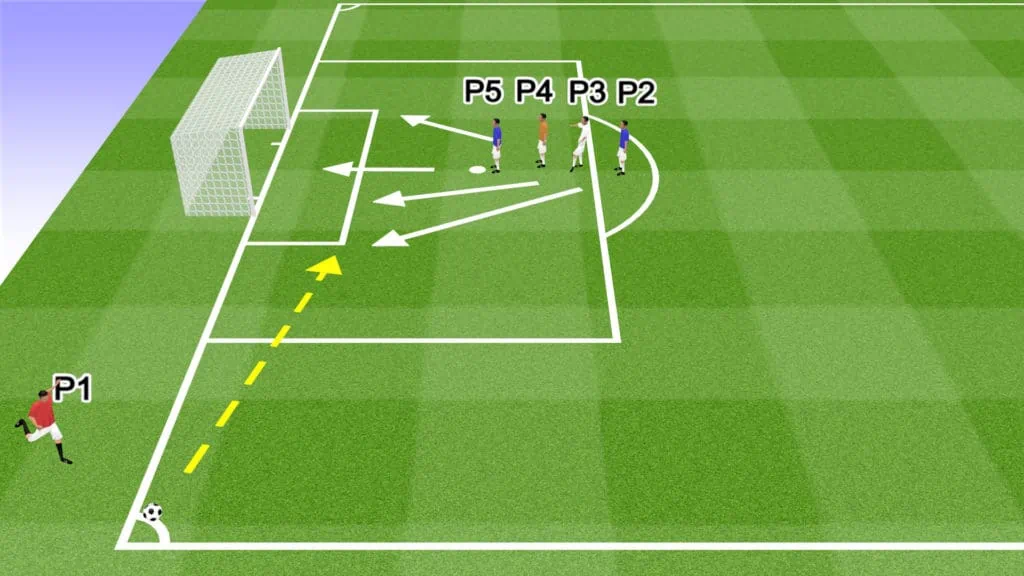
Front post flick: Soccer Drill
Drill Outline
- Drill Name: Front post flick
- Session Length: 10 to 15 minutes
- Age Group: 12+
- Number of players: 5 (minimum)
- Skills learned: Crossing technique, positioning, tactical play
- Equipment: 1 goal, multiple balls
Drill Setup
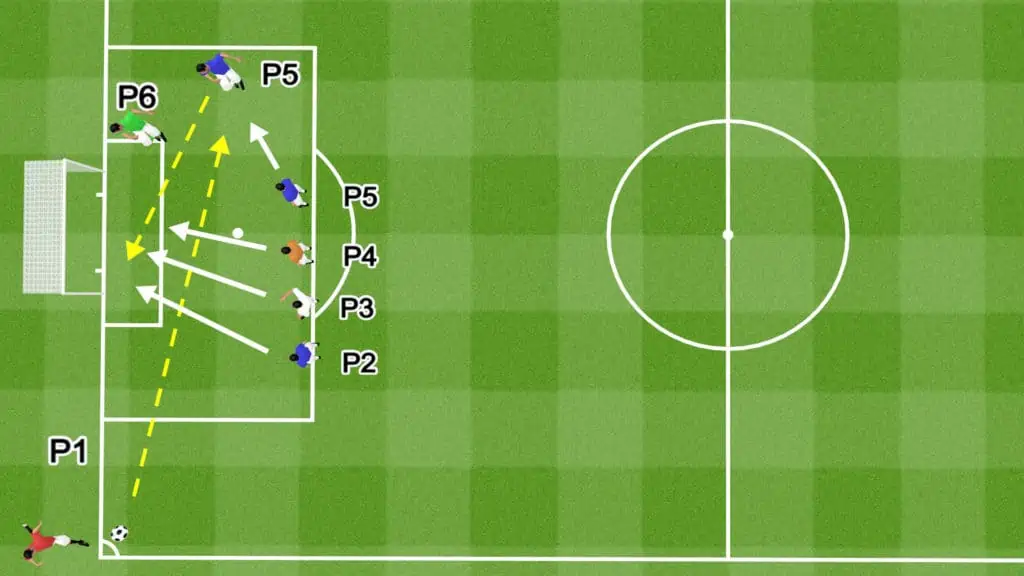
- This drill focuses on the attacking pattern of your 4 best headers or ball winners for a corner. If you have more players, instruct them to occupy other dangerous attacking positions on the edge of the box, at the back post, and around the 6-yard box.
- Use the final third of the field for this drill (entire width plus the penalty box).
- P1 should be your best set-piece taker. If you have multiple corners or set-piece takers, rotate them after 2 to 3 rounds.
- P1 places the ball in a suitable place on the corner spot.
- P2, P3, P4, and P5 stand in a stack formation close together on the edge of the penalty box. This makes it difficult for the defenders to mark them and track their movement.
Drill Instructions
- It is a good idea to use hand signals for corner setups. For this drill, the taker should raise their right hand in the air after placing the ball on the corner flag. This indicates what positions the attackers should take up during a game.
- As P1 makes their run-up to kick the ball, the outfield players make their runs into the box.
- P2 runs to the space just in front of the front post, next to the corner of the 6-yard box. P2 is the primary target of the cross.
- P3 runs around 2 yards behind P3 toward the front post, in case P2 misses the ball.
- P4 checks their run and loops around toward the back post, anticipating a flick-on from P2 or P3.
- P5 sprints directly toward the center of the 6-yard box.
- P1 crosses the ball to the front post to P2.
- P2 flicks the ball on goal or toward the back post, where P3, P4, or P5 may then try to score.
- Practice this routine multiple times, working on positioning, timing, and execution.
Drill Variations
- Practice the corner routine from the opposite side.
- For more advanced teams, consider adding extra players to the stack, making different runs.
- Set scoring targets for each training session, encouraging players to improve efficiency.
- Add defenders to simulate an in-game scenario.
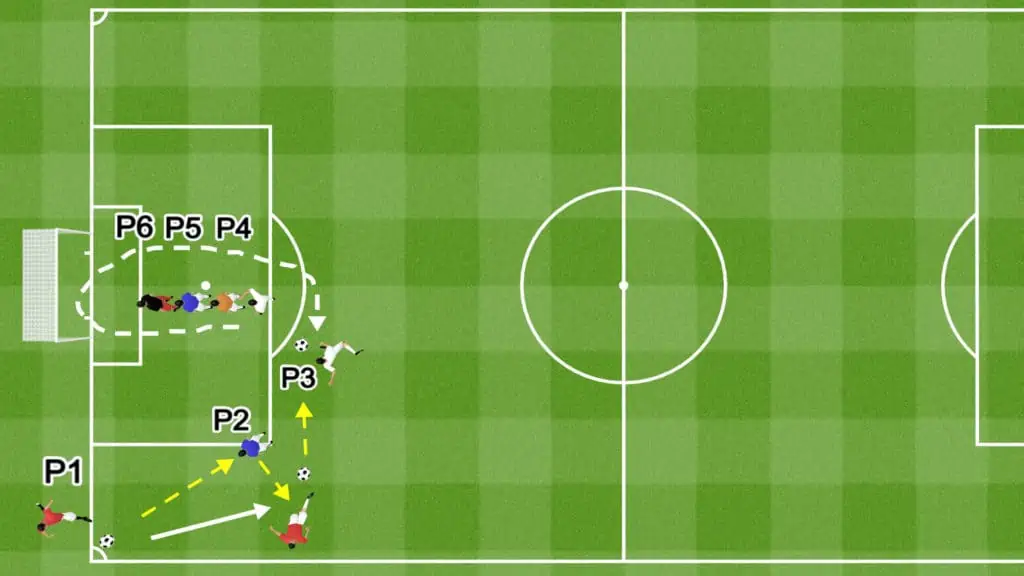
Short corner Shot Setup: Soccer Drill
Drill Outline
- Drill Name: Short corner Shot Setup
- Session Length: 10 to 15 minutes
- Age Group: 12+
- Number of players: 6 (minimum)
- Skills learned: Passing, shooting, positioning, tactical play, & movement
- Equipment: 1 goal, multiple balls
Drill Setup
- Use the final third of the field for this drill (entire width plus the penalty box).
- P3 should be one of the best shot-takers on your team.
- P1 and any designated set-piece takers should rotate turns taking the corners.
- P2 stands at the corner of the penalty box nearest to the corner flag.
- P3, P4, P5, and P6 stand in a tight line from the edge to the inside of the penalty box. This makes it difficult for the defenders to mark them and track their movement.
Drill Instructions
- For this drill, the taker should raise both hands in the air after placing the ball on the corner flag. This indicates what positions the attackers should take up during a game.
- As P1 makes their run-up to kick the ball, P2 sprints toward P1 and calls for the ball.
- P1 lines up like they will cross the ball but plays a short pass to P2’s feet.
- After the first pass, P1 runs past P2 and receives the return.
- At the same time, P3 sprints past P4, P5, and P6, faking a run to the front post.
- After passing P6, P3 loops back around to the edge of the box and calls for the pass from P1.
- P1 lays the ball off to P3 for a first-time shot.
- P3 takes a first-time shot on goal.
- The rest of the attacking players take up positions inside the box, anticipating a rebound or deflection.
Drill Variations
- Practice the corner routine from the opposite side.
- Rotate the role of P3 to give your best strikers a chance to practice shooting in this scenario.
- Add a goalkeeper for realistic shooting practice.
- Set scoring targets for each training session.
- Add defenders to simulate an in-game scenario.
Back post hang up: Soccer Drill
Drill Outline
- Drill Name: Back post hang up
- Session Length: 10 to 15 minutes
- Age Group: 12+
- Number of players: 6 (minimum)
- Skills learned: Crossing technique, positioning, tactical play, & movement
- Equipment: 1 goal, multiple balls
Drill Setup
- Use the final third of the field for this drill (entire width plus the penalty box).
- P1 and any designated set-piece takers should rotate turns taking the corners.
- P2, P3, P4, and P5 stand in a tight line along the edge of the penalty box. This makes it difficult for the defenders to mark them and track their movement.
- P6 stands next to the back post.
- P5 and P6 should be the tallest and best headers of the ball on your team.
Drill Instructions
- For this drill, the taker should raise their left hand in the air after placing the ball on the corner flag. This indicates what positions the attackers should take up during a game.
- As P1 makes their run-up to kick the ball, the outfield players make their runs into the box.
- P5 fakes a forward run and then drops toward the backside of the penalty box, 2 to 3 yards inside the line on the edge of the box. P4 is the main target of the corner.
- P6 waits until the corner is taken to judge the flight of the ball. P6 is the secondary target.
- P1 hangs the ball in the air toward P6 and P5.
- P2, P3, and P4 make their runs toward the front post.
- P5 or P6 head the ball back toward the front post to meet the run of the other 3 players.
- P2, P3, or P4 score.
- Practice this routine multiple times, working on positioning, timing, and execution.
Drill Variations
- Practice the corner routine from the opposite side.
- Set scoring targets for each training session.
- Add defenders to simulate an in-game scenario.
Down the line: Soccer Drill
Drill Outline
- Drill Name: Down the line
- Session Length: 5 minutes
- Age Group: All age groups
- Number of players: 4 (minimum)
- Skills learned: Throwing technique, movement, first touch, dribbling
- Equipment: 2 balls (minimum), 3 cones
Drill Setup
- This drill takes place in a 20-yard stretch along the sideline.
- Place 1 cone on the sideline to indicate the starting point for the throwers.
- Place 1 cone approximately 10 yards from the first, 2 to 3 yards inside the sideline.
- Place 1 cone 10 yards from the second next to the sideline.
- Divide the team into even groups, with each group lining up behind a different cone.
- Each player in the throwing line should have a ball.
Drill Instructions
- On the coach’s signal, P2 starts to move toward P1, then quickly changes direction, running down the line and calling for the ball.
- P1 throws the ball using a proper soccer throw-in technique. The ball starts behind the head and must be released when it is directly above the thrower’s head. Both feet must remain on the ground.
- P1 times P2’s run, ensuring the ball lands in front of them.
- P2 takes the ball in their stride then dribbles past the final cone.
- P2 then takes the ball over the sideline and rejoins the throwing line.
- P1 joins the opposite line.
- P3 and P4 then start the next round, repeating the entire process.
- The drill can be repeated in a cycle.
Drill Variations
- Instruct the receivers to make different movements before calling for the ball.
- Change the angle of the receivers’ runs.
- Increase or reduce the distance of the throw to practice different ranges.
- Introduce a defender to simulate a real game scenario.
Pin the defender: Soccer Drill
Drill Outline
- Drill Name: Pin the defender
- Session Length: 5 minutes
- Age Group: All age groups
- Number of players: 3 (minimum)
- Skills learned: Throwing technique, holding off the defender, first touch
- Equipment: 1 ball, 2 cones
Drill Setup
- This drill takes place in a 5 to 10-yard stretch along the sideline.
- Place 1 cone on the sideline to indicate the starting point for the throwers.
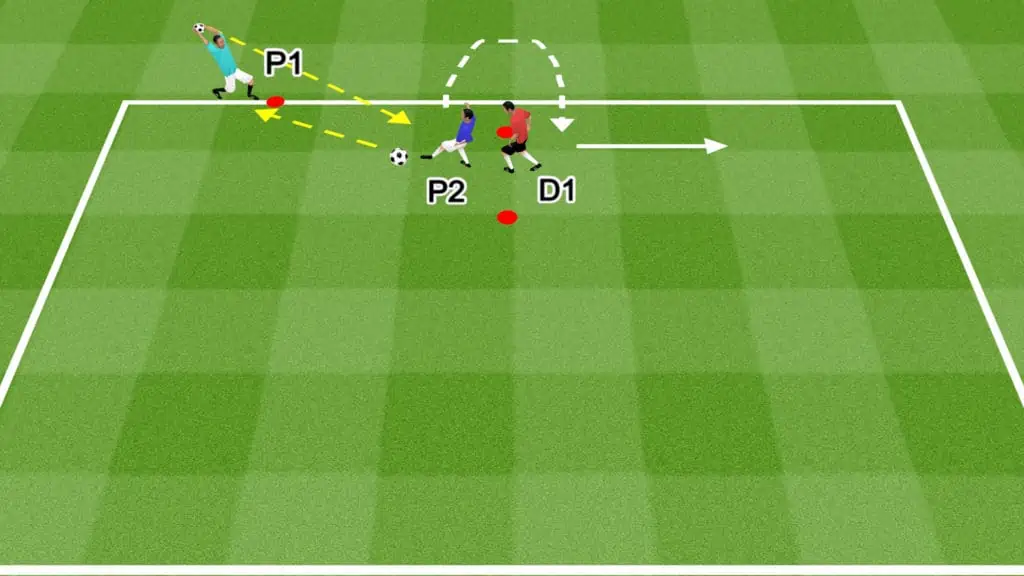
- Place 1 cone approximately 5 to 10 yards from the first, 2 to 3 yards inside the sideline. P2 and D1 stand at this cone.
- The thrower starts with the ball.
Drill Instructions
- On the coach’s signal, P2 moves slightly toward P1 creating some distance from the defender.
- P1 throws the ball to P2’s feet.
- P2 takes a good first touch and continues to face P1.
- P2 must be aware of D1’s position, leaning into them and holding them off to shield the ball.
- D1 defends passively, applying pressure without trying to win possession.
- P2 then passes the ball back to P1, spins the defender, and runs down the sideline for a few yards. P1 doesn’t play a return pass. This movement forms a positive habit of moving after passing.
- When the round is over, P1 takes P2’s position, P2 takes D1’s position, and D1 takes P1’s position.
Drill Variations
- Increase or reduce the distance of the throw to practice different ranges.
- Instead of playing a return pass to P1, P2 turns to face the defender and dribbles past them in a 1 v 1.
- Increase the intensity of defending to simulate a real game scenario.
- Introduce more passing sequences to practice in-game tactics.
Throw & Control: Soccer Drill
Drill Outline
- Drill Name: Throw & Control
- Session Length: 5 minutes
- Age Group: All age groups
- Number of players: 2
- Skills learned: Throwing technique, movement, first touch, passing
- Equipment: 1 ball, 6 cones
Drill Setup
- Create a 3-yard square cone grid.
- Place 1 cone 5 yards from 1 side of the grid to indicate the starting point of the thrower.
- Place 1 cone 5 yards from the opposite side of the grid to indicate the starting point of the receiver.
- If you have multiple players divide them into pairs and create identical grids for each pair.
- P1 starts with the ball in their hands.
Drill Instructions
- P2 starts the drill by running into the square grid from their starting cone.
- P1 throws the ball using the correct technique to the feet of P2.
- P2 takes 1 touch to control the ball inside the square, before playing a return pass to P1.
- P2 then runs back around their starting cone before returning to the square grid.
- Repeat the drill for 10 rounds.
- After 10 rounds P1 and P2 switch roles.
Drill Variations
- Practice 1-touch passing for a round.
- Focus on the left and right feet passing for alternating rounds.
- Practice throwing to different areas of the body, including the head, chest, and knees.
- Increase or reduce the distance of the throw to practice different ranges.
Team Penalty Shootout: Soccer Drill
Drill Outline
- Drill Name: Team Penalty Shootout
- Session Length: 10 to 15 minutes
- Age Group: All age groups
- Number of players: 11 minimum (10 outfield players & 1 goalkeeper)
- Skills learned: shooting, pressure, saving
- Equipment: 1 ball, 1 goal
Drill Setup
- Use the full penalty box for this drill.
- Set up a full-size goal and mark the penalty spot.
- This drill replicates a real 2 team penalty shootout. It works best with a high number of players. However, a minimum of 5 v 5 with a goalkeeper can work.
- Divide the team into 2 even groups.
- If you have multiple goalkeepers, assign them to each group.
- Instruct each group to line up together outside the penalty box.
- Host a coin toss to determine which team goes first.
Drill Instructions
- The teams compete in a 5 shot, penalty shootout.
- Each team takes turns taking penalties, with a different player shooting each time.
- The shootout is decided in a best of 5, meaning the team with the most goals after 5 penalties each is the winner.
- If the scores are tied after 5 penalties each, the shootout goes to sudden death.
- In sudden death, each team takes 1 penalty per round. If both teams score, sudden death continues for another round. If both teams miss, sudden death continues for another round. If 1 team scores and the other misses, the team that scores win.
- Both teams must follow the same shooting order throughout sudden death.
- For more practice, consider mixing up the teams ad repeating the drill.
Drill Variations
- To increase pressure, introduce punishments for missing penalties, such as post-training sprints or push-ups.
- Instruct teams to line up at the halfway line to simulate the long walk to take a penalty during a shootout.
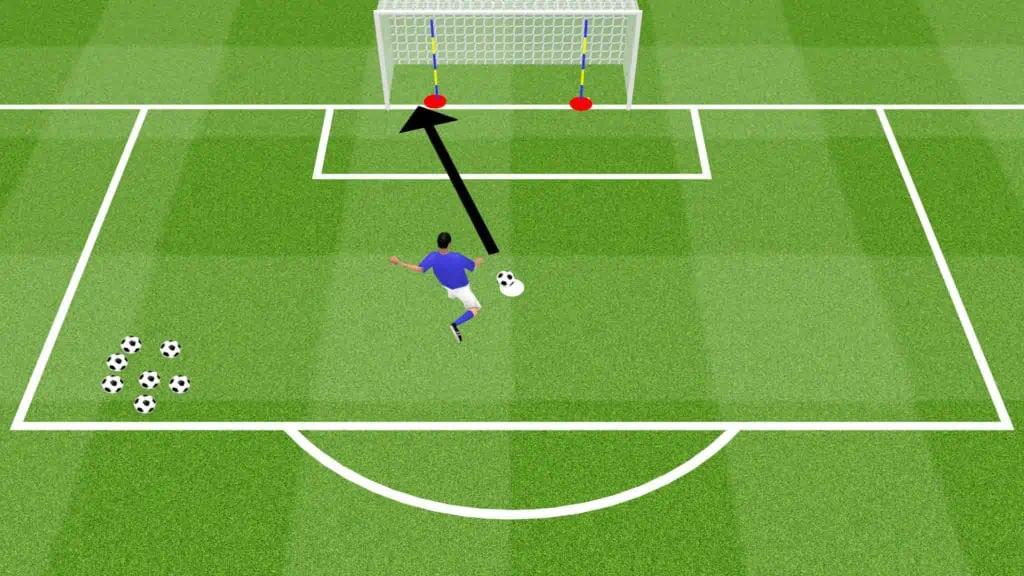
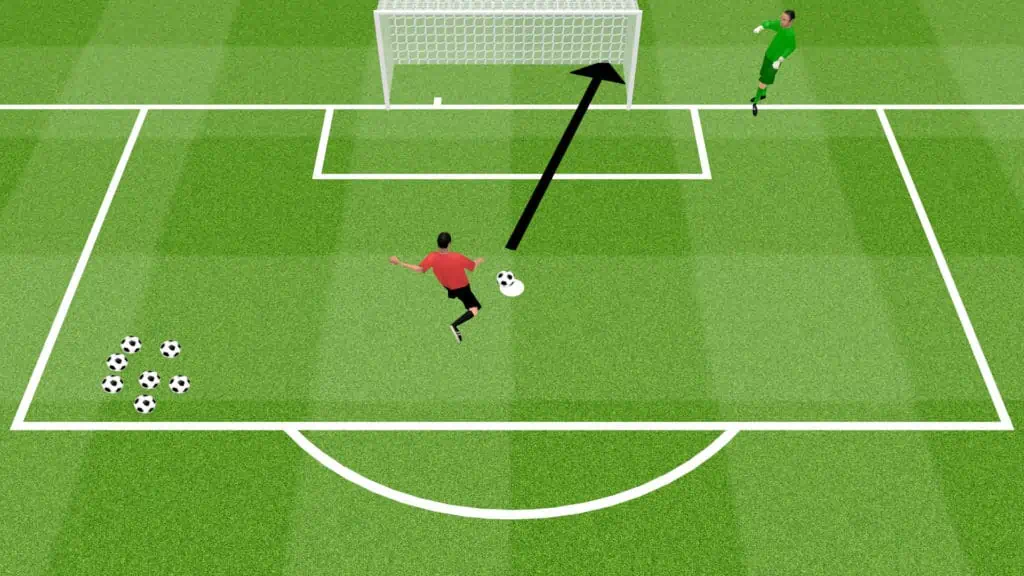
Individual Penalty Practice: Soccer Drill
Drill Outline
- Drill Name: Individual Penalty Practice
- Session Length: 10 to 15 minutes
- Age Group: All age groups
- Number of players: 1 player (goalkeeper optional)
- Skills learned: shooting accuracy, shot power
- Equipment: 1 ball (minimum), 1 goal, 2 cone or agility poles, 2 tires
Drill Setup
- Use the full penalty box for this drill.
- Set up a full-size goal and mark the penalty spot.
- This drill is designed to improve penalty accuracy and power.
Drill Instructions
- The first 5 penalties are a warm-up, where P1 practices their ball placement, run-up, and shooting technique.
- For the next 5 penalties, P1 practices shooting into the bottom left corner of the goal. Place a cone around 1 yard to the inside of the post. P1 should aim to get every shot between the cone and the post.
- For the next 5 penalties, P1 repeats this process in the bottom right corner of the goal.
- For the next 5 penalties, P1 aims slightly higher in the left-hand corner. Place an agility pole 1 yard to the inside of the post to better identify the target.
- For the next 5 penalties, P1 repeats this process in the mid-right of the goal.
- For the next 5 penalties, P1 aims for the top left corner of the goal. If possible, hang a tire from the crossbar as the target. If not, P1 should just focus on accuracy.
- For the next 5 penalties, P1 repeats this process in the top right side of the goal.
Drill Variations
- Set scoring and accuracy targets for each corner.
- Reduce the distance between the cones and posts to improve accuracy.
- Advanced players can practice striking the ball using different parts of their feet (e.g. instep, outside of the boot, and laces).
- Introduce a goalkeeper to simulate a real game scenario.
Low Power – High Power Penalties: Soccer Drill
Drill Outline
- Drill Name: Low Power – High Power Penalties
- Session Length: 10 to 15 minutes
- Age Group: All age groups
- Number of players: 1 player (goalkeeper optional)
- Skills learned: shooting accuracy, shot power
- Equipment: 1 ball (minimum), 1 goal
Drill Setup
- Use the full penalty box for this drill.
- Set up a full-size goal and mark the penalty spot.
- This drill is designed to improve penalty accuracy and power.
Drill Instructions
- Before each penalty, P1 identifies the area of the goal that they’re aiming for.
- For the first 5 penalties, the focus is purely on accuracy.
- For the next 5 penalties, P1 identifies the area of the goal that they’re aiming for but increases the power slightly.
- Repeat the process for several rounds, gradually increasing the power each time.
- Once P1 has taken 20 to 25 penalties, introduce a goalkeeper.
Drill Variations
- Set scoring and accuracy targets for each corner.
- Advanced players can practice striking the ball using different parts of their feet (e.g. instep, outside of the boot, and laces).
Beat the wall: Soccer Drill
Drill Outline
- Drill Name: Beat the wall
- Session Length: 10 to 15 minutes
- Age Group: 10+
- Number of players: 1 minimum (goalkeeper optional)
- Skills learned: Shooting technique, power, accuracy, shot elevation
- Equipment: Multiple balls, 1 goal, 5 mannequins
Drill Setup
- Use the penalty box and the surrounding area for this drill.
- Set up a full-size goal.
- For the first round, place 3 mannequins 3 yards inside the box on P1’s right-hand side.
- For the second round, place 3 mannequins 3 yards inside the box on P1s in the center.
- For the third round, place 3 mannequins 3 yards inside the box on P1’s left-hand side.
Drill Instructions
- For the first round, P1 shoots from 25 yards on the right side of the field. The shooting position is 7 yards outside the edge of the penalty box.
- P1 takes 5 shots aiming for 1 corner, and 5 shots aiming for the other corner. They must try to hit the ball over or around the ball, using accuracy, curve, dip, or a combination of all 3.
- For the second round, P1 shoots from 25 yards in a central position. P1 takes 5 shots aiming for 1 corner, and 5 shots aiming for the other corner.
- For the third round, P1 shoots from 25 yards on the left side of the field. P1 takes 5 shots aiming for 1 corner, and 5 shots aiming for the other corner.
- P1 should keep track of the number of goals scored and try to improve their record every time they take part in this drill.
Drill Variations
- Add more mannequins to the wall to make it more difficult for the shooter.
- Introduce a goalkeeper to simulate real game scenarios.
- If you have multiple players, create a goal-scoring competition between them.
- Adjust the distance and shooting angles to practice scoring from different positions.
Near Post – Far Post: Soccer Drill
Drill Outline
- Drill Name: Near Post – Far Post
- Session Length: 10 to 15 minutes
- Age Group: 10+
- Number of players: 1 minimum (goalkeeper optional)
- Skills learned: Shooting accuracy, power, technique
- Equipment: Multiple balls, 1 goal
Drill Setup
- This drill is designed to improve shooting accuracy from different distances and angles.
- Use the penalty box and the surrounding area for this drill.
- Set up a full-size goal.

Drill Instructions
- Starting from the edge of the penalty box, P1 takes multiple shots from different angles. P1 alternates aiming for either corner with each shot.
- After every 6 shots, P1 moves 3-yards further away from the goal and repeats the process, shooting from different angles and aiming for a different corner each time.
- The focus of this drill is shooting accuracy and aiming at different targets. While players may favor a certain side of the goal from specific angles, the position of the goalkeeper should also be considered. This drill forces players to practice shooting at both corners.
- Only advanced players should continue with this drill past 30 yards.
Drill Variations
- Set scoring and accuracy targets for each corner.
- Advanced players can practice striking the ball using different parts of their feet (e.g. instep, outside of the boot, and laces).
- Practice shooting high and low.
- Introduce a goalkeeper to simulate in-game scenarios.
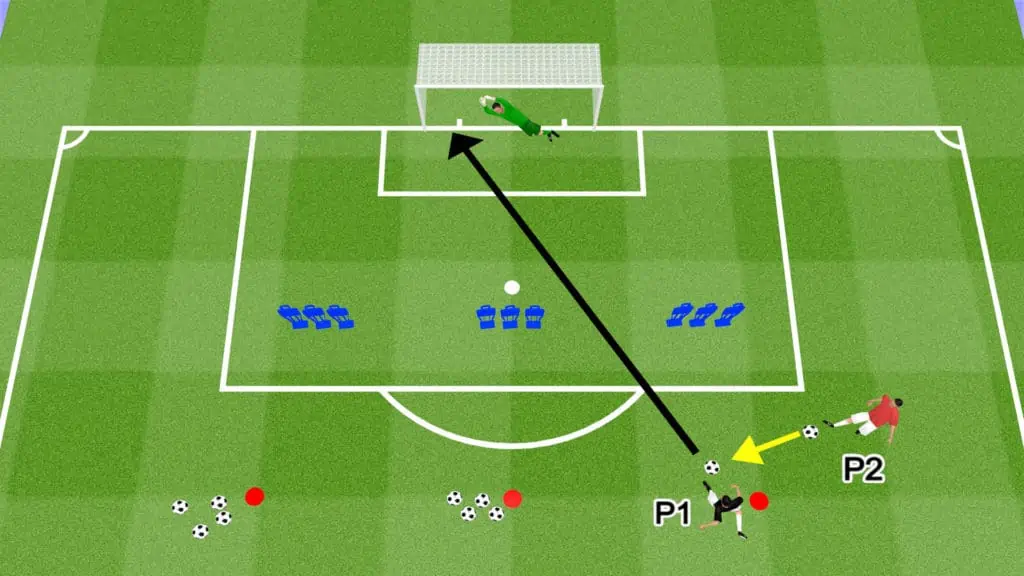
Roll & Shoot: Soccer Drill
Drill Outline
- Drill Name: Roll & Shoot
- Session Length: 10 to 15 minutes
- Age Group: 10+
- Number of players: 2 minimum (goalkeeper optional)
- Skills learned: Shooting accuracy, shot power, technique, tactical play
- Equipment: Multiple balls, 1 goal, 5 mannequins
Drill Setup
- Use the penalty box and the surrounding area for this drill.
- Set up a full-size goal.
- For the first round, place 3 mannequins 3 yards inside the box on P1’s right-hand side.
- For the second round, place 3 mannequins 3 yards inside the box on P1s in the center.
- For the third round, place 3 mannequins 3 yards inside the box on P1’s left-hand side.
- P1 is designated as the shooter, while P2 is designated as the passer (roller).
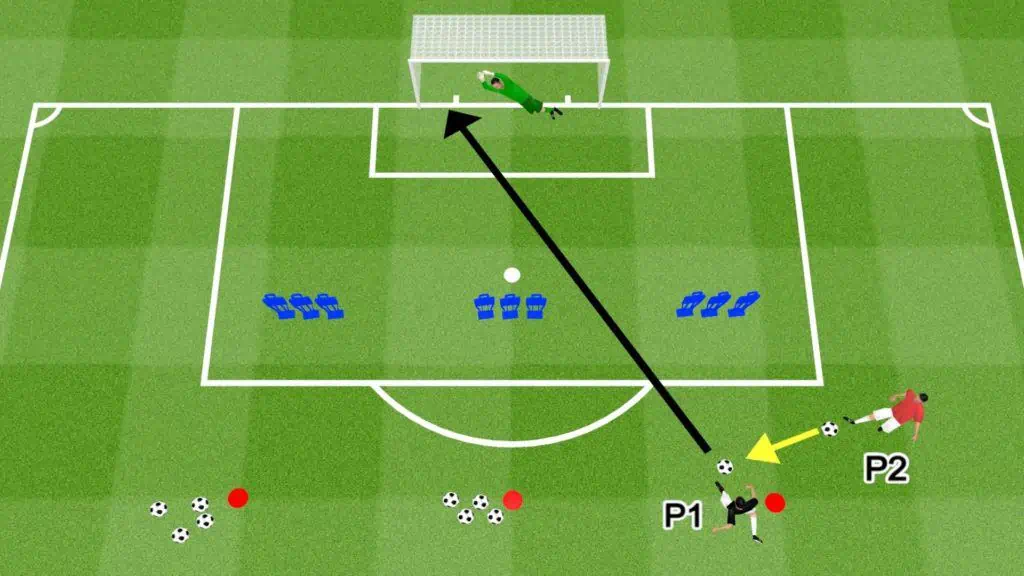
Drill Instructions
- The aim of this drill is to create better shooting angles for the freekick taker by rolling the ball at an angle.
- For the first round, P1 takes 10 shots in total. For the first 5 shots, P2 rolls the ball to the left side of the wall, giving P1 a clearer and more open shot on goal. For the next 5 shots, P2 rolls the ball to the right side of the wall, giving P1 a wider angle to curl the ball around the wall.
- For the second round, P1 takes another 10 shots, 5 from either side of the wall.
- For the third round, P1 takes another 10 shots, essentially mirroring the first round.
- Before each free-kick, P1 and P2 must discuss the pace, weight, and angle of the pass. As soon as the kick is taken, the defenders can close down the shooter so both players must be on the same page.
- Track the number of goals scored and challenge players to improve their record every time they carry out this drill.
Drill Variations
- Add more mannequins to the wall to make it more difficult for the shooter.
- Introduce a goalkeeper to simulate real game scenarios.
- If you have multiple players, create a goal-scoring competition between them.
- Adjust the distance and shooting angles to practice scoring from different positions.
Share the post "Soccer Drills for Corners, Penalty, Free Kicks, Throw-Ins (Set-Piece Drills)"
Joel is a seasoned soccer journalist and analyst with many years of experience in the field. Joel specializes in game analysis, player profiles, transfer news, and has a keen eye for the tactical nuances of the game. He played at various levels in the game and coached teams - he is happy to share his insight with you.