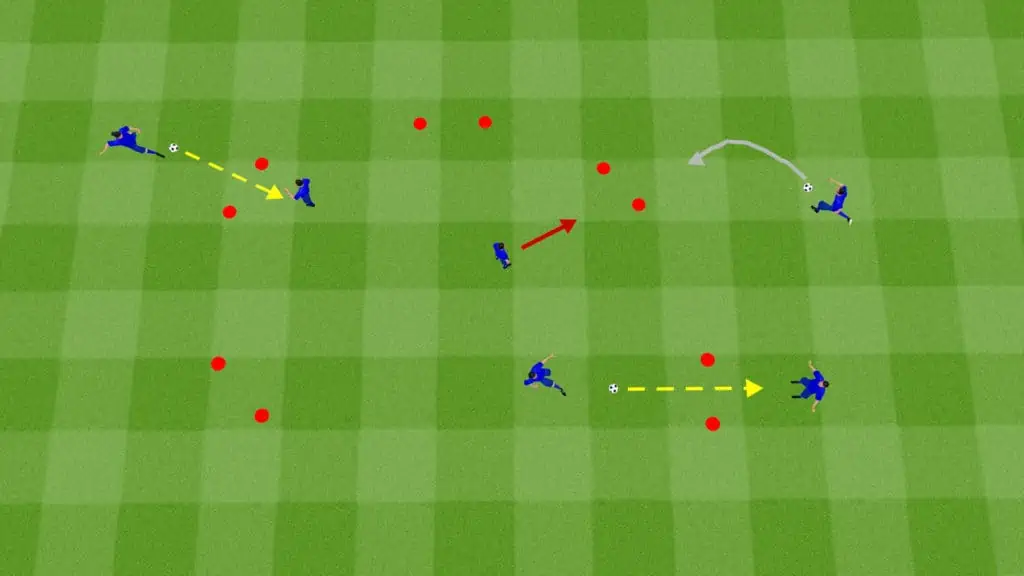
Share the post "Soccer Drills With Cones (Dribbling Exercises)"
Use cones with your team or at home to improve your dribbling, agility, and control skills. Cones are a great way of making unique circuits.
This is a list packed with a variety of cone drills and you’ll improve from the first session. You can do them on your own, with friends and teammates.
Soccer Drills With Cones
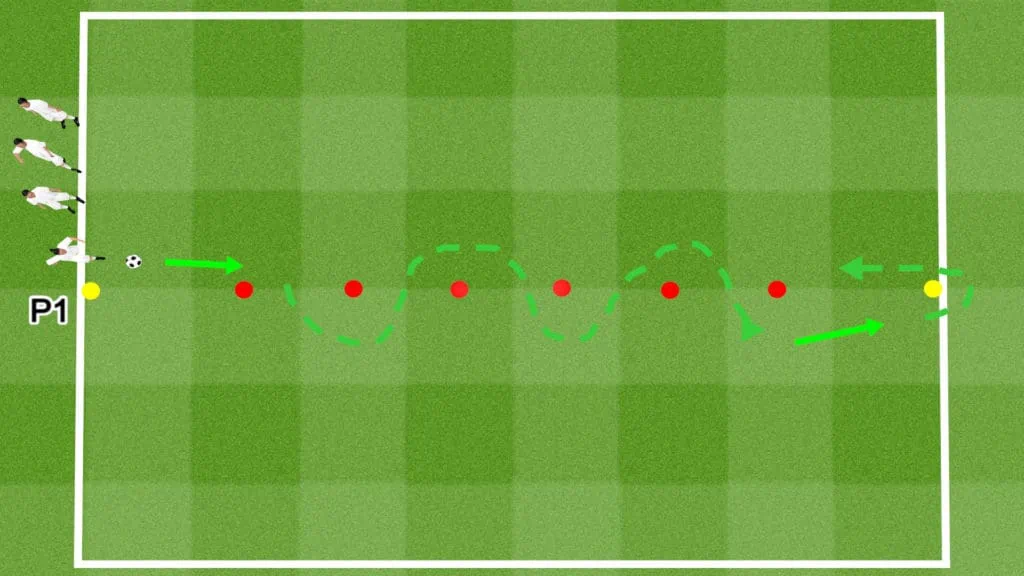
Basic Cone Weave: Soccer Drill
Drill Outline
- Drill Name: Basic cone weave
- Session Length: 5 to 10 minutes
- Age Group: all ages
- Number of players: 1 to 18
- Skills learned: Ball control, dribbling, turning with the ball
- Equipment: 1 ball (minimum), 8 cones
Drill Setup
- This drill requires a minimum 20-yard strip along the training field.
- Place 1 cone to indicate the starting point of the drill.
- Place 1 cone 5 yards from the first to indicate the starting point of the dribbling weave.
- Place a further 5 cones 1 yard apart to complete the dribbling weave section.
- Place the final cone 5 yards from the end of the dribbling weave.
- All players line up behind P1 at the starting point.
- If there are 6 or more players, consider setting up an identical cone weave, and splitting the team into 2 groups.
Drill Instructions
- P1 starts the drill by dribbling toward the cone weave.
- P1 then dribbles the ball inside and out between the cones until the weave is complete.
- P1 then dribbles around the final cone before completing the weave from the opposite side.
- After rounding the last cone in the weave, P1 passes to P2 and rejoins the end of the line.
- P2 repeats the drill.
- Players should focus on ball control, ensuring they don’t lose possession or trip over the cones.
- Round by round, increase the emphasis on speed.
Drill Variations
- Focus on the right foot dribbling only for a round.
- Focus on left foot dribbling only for a round.
- Focus on right-to-left dribbling for a round.
- Focus on left-to-right dribbling for a round.
- Once the players are comfortable dribbling through the weave, create a competition to see which team or individual completes the drill fastest. Consider introducing time penalties for losing control of the ball.
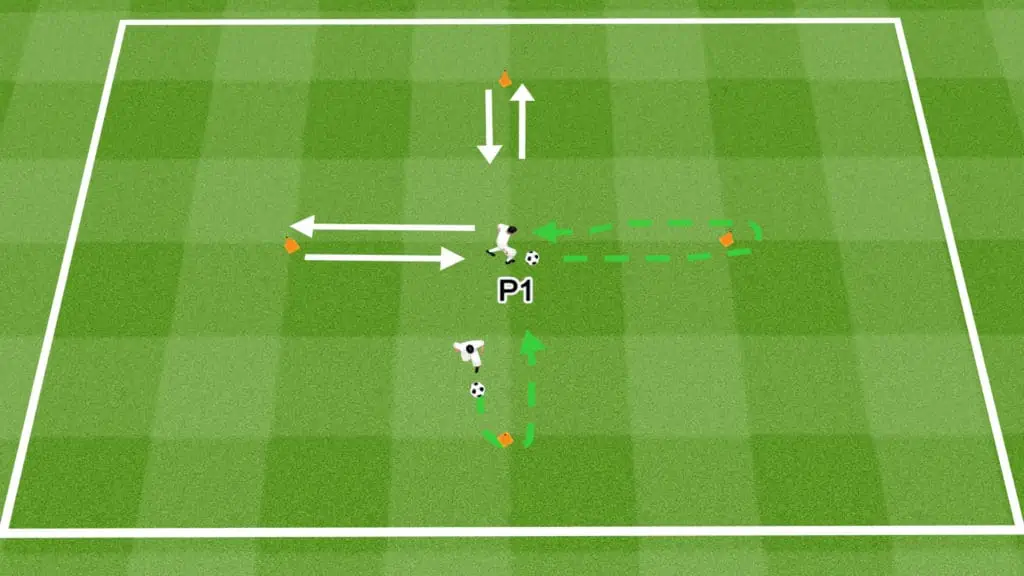
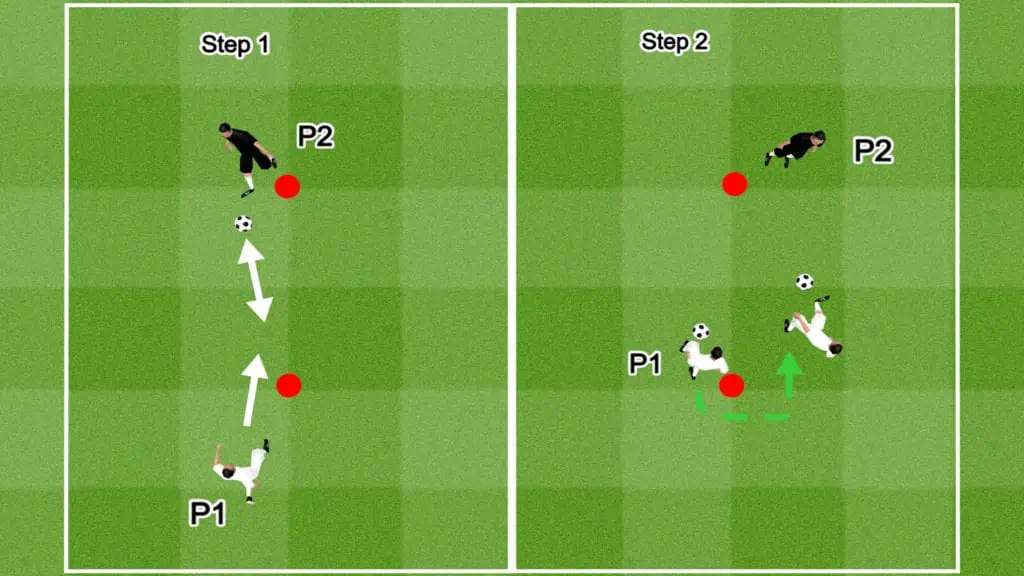
Dribble to Sprint Square: Soccer Drill
Drill Outline
- Drill Name: Dribble to Sprint Square
- Session Length: 3 to 5 minutes
- Age Group: all ages
- Number of players: 1 (set up multiple grids for more players)
- Skills learned: Sprinting, dribbling, conditioning
- Equipment: 4 cones, 1 ball
Drill Setup
- Create a 4-cone square grid with each cone placed 10 yards apart.
- Place 1 ball in the center of the grid.
- This drill works best with 1 player but 2 can participate at the same time as long as they work in opposite directions.
- Set up multiple grids for each player or grid.
- This drill works well in conjunction with another team-based drill, ensuring all players are active.
Drill Instructions
- Ensure all players undergo a thorough warmup before all conditioning drills to avoid injury.
- P1 starts with the ball at their feet in the center of the grid.
- P1 dribbles toward, then around a cone before leaving the ball back in the center of the grid.
- As soon as they stop the ball in the center, P1 sprints to the opposite cone around it and then sprint to the center grid.
- P1 collects the ball, turns to their right, then dribbles to the next cone, repeating the entire process.
- The focus of this drill is on speed, improving the players’ conditioning. However, they must also focus on technique, maintaining control of the ball at all times.
Drill Variations
- Focus on the players’ left and right feet each round, ensuring they practice with both.
- Count how many times each player completes a dribble and a sprint. Create a competition to see how many rounds players can complete.
Pass Through the Gates: Soccer Drill
- Age Range: 6-10
- Length of Session: 10 mins
- Number of Players: any
- Skills to Learn: passing, communication
- Equipment: balls and cones, optional pinnies
Description: Players must pass the ball through a gate to their teammate to earn a point.
Drill Set-up:
- Set up a large space based on the number of players you have and their ages.
- Randomly place gates using cones. Gates should be about 3 meters.
- Give each player a partner.
- Optional: use pinnies to distinguish groups.
- Each group of 2 gets 1 ball.
Drill Instructions:
- Kids must dribble around the area and pass through the gates to their partners.
- Each successful pass through the gate earns one point.
- Kids cannot go through the same gate twice in a row.
- Challenge your players to see who gets the most passes in a set time or who can complete all gates first.
- Keep each round to 60 seconds or less.
- Challenge older players to use their weaker foot or complete the drill with smaller gates.
Receive Pass Drag Back: Soccer Drill
Drill Outline
- Drill Name: Receive pass drag back
- Session Length: 10 minutes
- Age Group: 10+
- Number of players: 2 to 18
- Skills learned: First touch, drag back, dribbling, ball control
- Equipment: 2 cones (minimum), 1 ball (minimum)
Drill Setup
- This drill requires players to work in pairs.
- For each pair, set up 2 cones 5 yards apart.
- Each player stands at a cone.
- P2 starts with the ball.
- P1 starts behind their cone.
- P1 is the main focus of the drill.
- P2 plays the role of a passer.
Drill Instructions
- On the coach’s signal, P1 sprints in front of the cone and calls for the pass.
- P2 passes the ball to the feet.
- P1 takes a touch to control the ball, then drags the ball behind the cone, shuffles to the opposite side, and plays a return pass.
- Repeat the drill for 1 to 2 minutes before alternating roles.
- The focus is on moving backward, then sideways while maintaining control of the ball.
- The cone represents a defender, so this drill also helps players practice receiving the ball under pressure.
Drill Variations
- Focus on using both feet for a round.
- Focus on using the right foot for a round.
- Focus on using the left foot for a round.
Agility Assault Course: Soccer Drill
Drill Outline
- Drill Name: Agility Assault Course
- Session Length: 10 minutes
- Age Group: all ages
- Number of players: 2 to 18
- Skills learned: Quick feet, lateral movement, sprinting, deceleration, passing
- Equipment: 6 cones, 4 agility poles, 1 hurdle, 1 ball
Drill Setup
- You need a training space of approximately 30 square yards.
- Place a cone at the end of the grid to indicate the starting point.
- 5 yards from the starting point, place 4 agility poles 3 yards apart in a staggered formation.
- Place a hurdle 10 yards diagonally to the left of the final agility pole.
- Create a small square grid 10 yards diagonally to the right of the hurdle.
- Place 1 cone 5 yards from the grid.
- P2 stands at the cone at the end of the grid with a ball.
Drill Instructions
- P1 and the rest of the team line up at the starting point.
- On the coach’s signal, P1 sprints to the agility poles and quickly swerves through them, keeping their center of gravity low for fast, fluid turns.
- After rounding the final pole, P1 sprints to the hurdle and hops over it then back.
- P1 then sprints to the square grid and plays a quick give-and-go pass with P2.
- P1 shuffles to the right side of the grid, then back into it for another give-and-go.
- P1 shuffles to the left side of the grid, then back into it for another give-and-go.
- The round finishes and the next player starts.
Drill Variations
- Create competition by timing each player’s round.
- Instead of a give-and-go pass, practice headers, volleys, or chest control.
- Extend the drill by increasing the distance between stages or adding extra cones, agility poles, and hurdles.
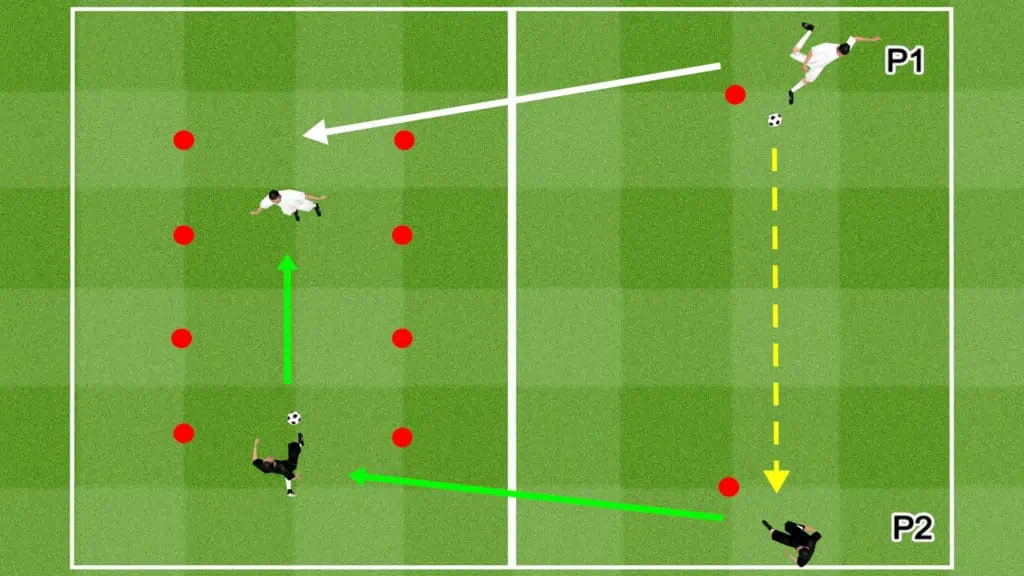
Agility Passing Weave: Soccer Drill
Drill Outline
- Drill Name: Agility Passing Weave
- Session Length: 10 minutes
- Age Group: all ages
- Number of players: 5 (minimum)
- Skills learned: Sprinting, changing direction, back peddling, 1-touch passing
- Equipment: 5 cones, 4 balls
Drill Setup
- Create a square grid using cones positioned 5 to 10 yards apart.
- Place 1 cone 5 yards perpendicular to any corner of the grid to indicate the starting point.
- 4 players stand 5 yards outside each corner of the grid. Each of these players has a ball at their feet.
- P1 and any remaining players line up behind the starting cone.
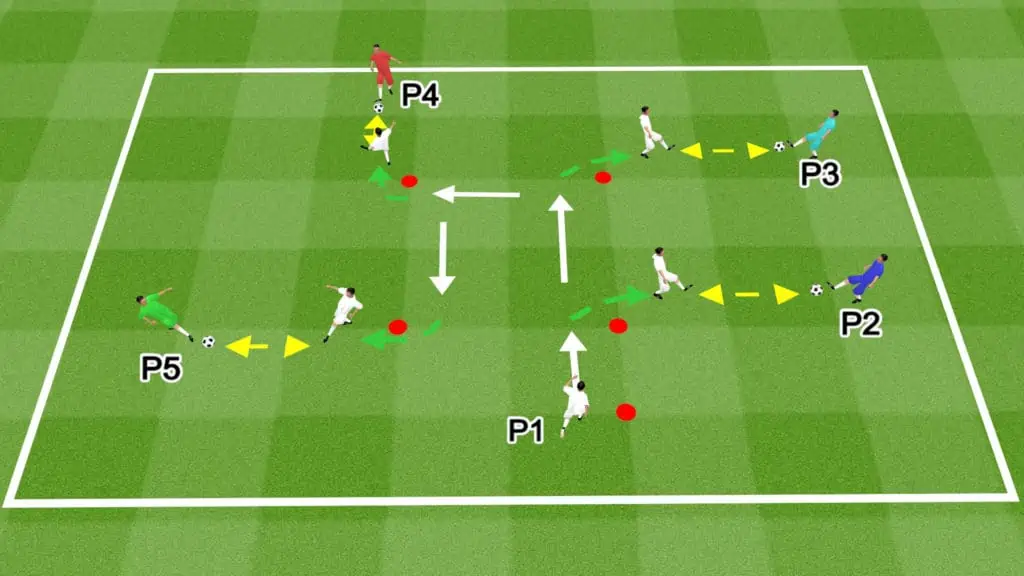
Drill Instructions
- On the coach’s signal, P1 sprints to, then around the first cone and faces P2.
- P1 calls for the ball.
- P2 plays a quick give-and-go pass with P1.
- P1 sprints, then around the next cone, repeating the process until they complete the entire square grid.
- The next player may begin when P1 reaches the second cone.
- Rotate player roles occasionally, giving all players a chance to complete the drill.
- The focus of this drill is quick movements. Sharp turns to simulate getting free from a defender to receive a pass.
- Encourage players to be vocal, calling for a pass as they would in a real game scenario.
Drill Variations
- Focus on the players’ left and right feet each round, ensuring they practice with both.
- Instead of a give-and-go pass, practice headers, volleys, or chest control.
- Increase the passing distance for higher-skilled players.
- Create competition by timing each player’s round.
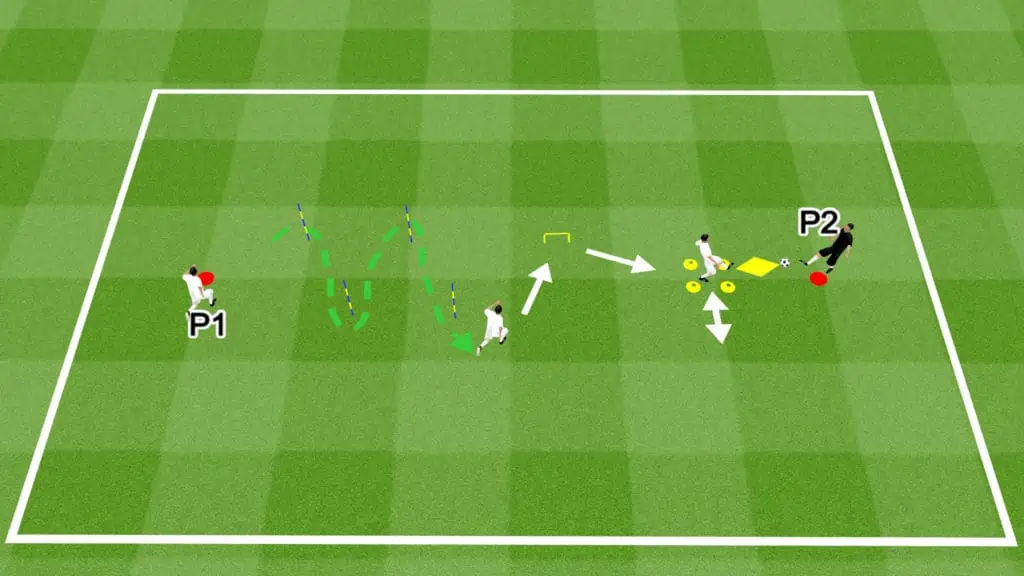
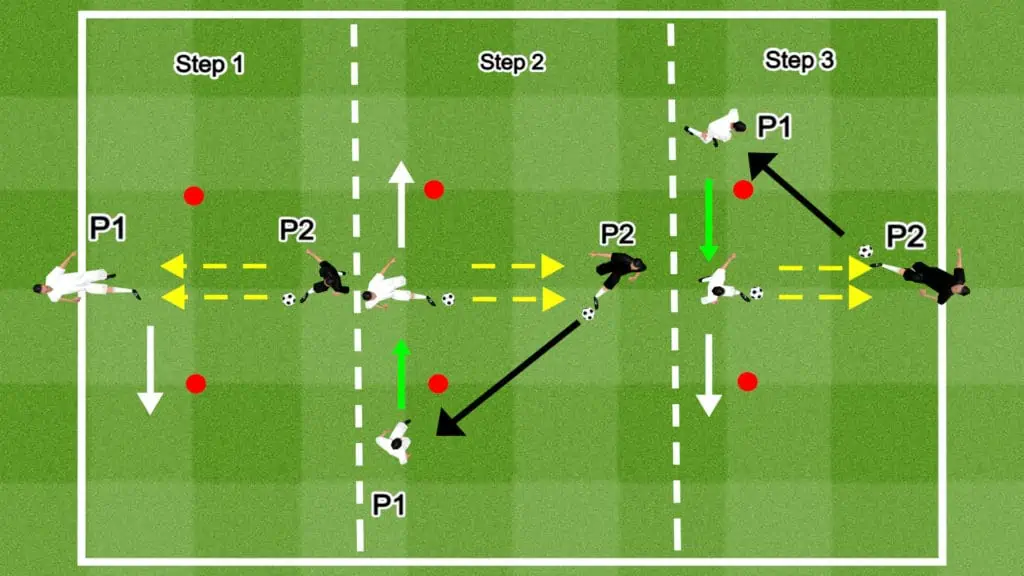
1 v 1 Pass & Move: Soccer Drill
Drill Outline
- Drill Name: 1 v 1 Pass & Move
- Session Length: 5 to 10 minutes
- Age Group: All age groups
- Number of players: 2
- Skills learned: Passing, movement, dribbling, tackling, and defensive jockeying
- Equipment: 10 cones, 1 ball
Drill Setup
- Place 2 cones 15 yards apart, marking the starting points for both players.
- 5 yards to either side of these cones, create a dribbling tunnel of the same length. The tunnel should be approximately 5 yards wide.
- Place cones 5 yards apart on both sides of the tunnel to create 3 separate, evenly sized sections within it.
- P1 begins with the ball at their feet.
Drill Instructions
- P1 starts the drill by playing a long pass to P2.
- After the pass, P1 sprints through their end of the dribbling tunnel, making their way to the center section. They cannot enter the furthest section of the tunnel.
- P2 receives the pass, then dribbles through the end of the dribbling tunnel.
- P2 then tries to dribble past P1 and through the opposite end of the tunnel.
- P1 can tackle, block, or jockey the dribbler to try and regain possession.
- The round is over when P2 loses possession or successfully passes through the tunnel.
- If the ball crosses either sideline of the tunnel, the round is over.
- After the round, players switch roles.
Drill Variations
- Create a competition to see who can complete the most successful dribbles in the allocated time frame. Or, create a competition to see which player reaches 5 successful dribbles first.
- Set a time limit for the dribblers to get through the tunnel.
- If the defenders have the edge over the attackers, prohibit them from entering the center section.
- If the attackers have the edge, allow the defenders to enter all sections of the tunnel.
Dribble Weave – Speed Ladder: Soccer Drill
Drill Outline
- Drill Name: Dribble Weave – Speed Ladder
- Session Length: 5 minutes
- Age Group: all ages
- Number of players: 1
- Skills learned: Dribbling, quick feet
- Equipment: 4 cones, 1 ball, 1 speed ladder
Drill Setup
- Place a speed ladder on the ground.
- Set up a 4-cone dribbling weave the same length as the ladder.
- P1 begins at one end of the cone weave.
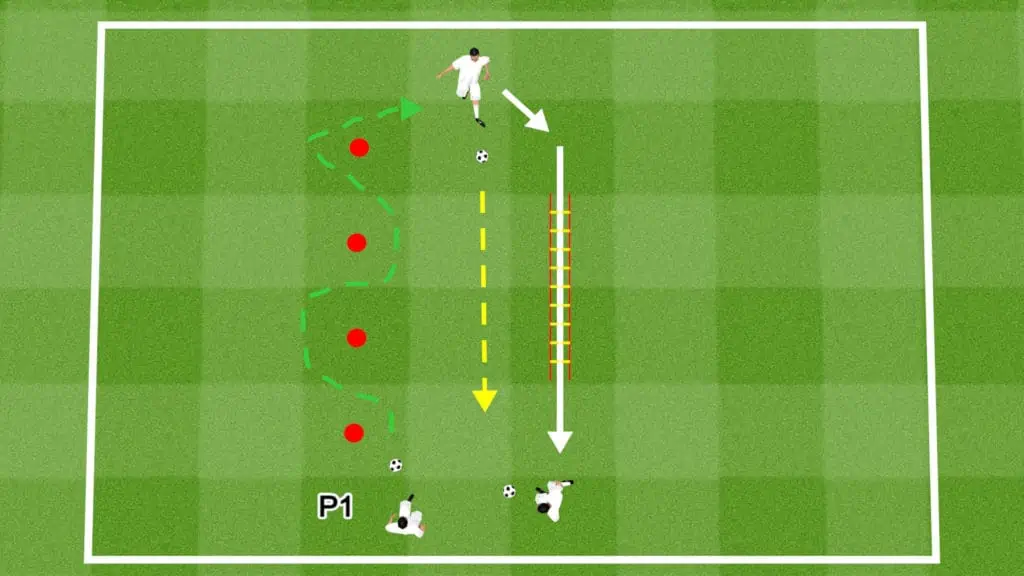
Drill Instructions
- P1 starts by dribbling through the cone weave.
- When they reach the end, P1 passes the ball lightly between the cone and the ladder from one end to the other.
- As soon as they make the pass, P1 sprints through the speed ladder.
- P1 then collects the ball and dribbles through the cone weave, repeating the drill again.
- P1 completes the drill 10 times, takes a 1-minute break, then repeats the full routine 2 more times (3 in total).
Drill Variations
- Focus on right foot dribbling only for some rotations.
- Focus on left foot dribbling only for some rotations.
- Perform different movements through the speed ladder.
Quick Fire Passing Drill: Soccer Drill
Drill Outline
- Drill Name: Quick Fire Passing Drill
- Session Length: 10 minutes
- Age Group: 10+
- Number of players: 2 (minimum)
- Skills learned: One touch passing, first touch, lateral movement, give-and-go passing
- Equipment: 1 ball (per pair), 3 cones
Drill Setup
- Divide the team into pairs.
- Each pair operates in a small grid consisting of a 3-yard, 2-cone gate, and a perpendicular cone, 3 yards from the gate.
- Each player takes turns being the focus of the drill.
- P1 begins in the center of the gate.
- P2 begins with the ball at their feet at the perpendicular cone.
Drill Instructions
- On the coach’s signal, P2 starts the drill by playing 2 return passes to P1.
- P1 then shuffles to the right side of the right-hand cone to receive the next pass.
- P2 passes the ball when P1 reaches the outside of the cone.
- P1 takes 1 touch (if possible), taking the ball back toward the center of the gate.
- P1 passes the ball to P2.
- P2 plays 2 return passes to P1.
- P1 shuffles to the left side of the left-hand cone to receive the next pass.
- After receiving the pass, P1 takes 1 touch, taking the ball back toward the center of the gate.
- P1 and P2 continue the process for 1 minute then switch roles.
- Each player performs at least 3 rounds of the drill.
Drill Variations
- To add a conditioning focus to the drill, consider increasing the working time or the number of rounds.
- Create competition by tracking the number of mistakes (extra touches, misplaced passes, performing the drill incorrectly, etc.). The team that commits the least number of mistakes wins.
1 v 1 Mini-Game: Soccer Drill
Drill Outline
- Drill Name: 1 v 1 Mini-Game
- Session Length: 5 to 10 minutes
- Age Group: All age groups
- Number of players: 2
- Skills learned: Passing, dribbling, defensive positioning, tackling, finishing
- Equipment: 10 cones, 1 ball
Drill Setup
- Create a 10 to 15-yard square playing grid, placing 1 cone on each of the 4 corners, and using 2 cones to mark the halfway point on either side.
- Create 2 x 3-yard goals using cones.
- P1 begins at 1 goal with the ball at their feet, while P2 begins at the other goal.
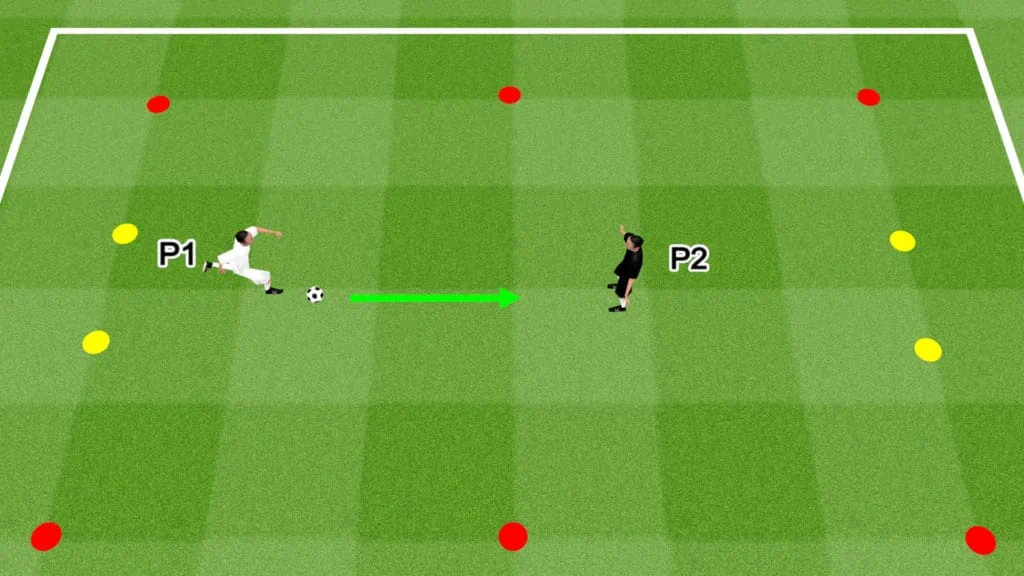
Drill Instructions
- The drill begins on the coach’s signal.
- P1 dribbles toward P2’s goal and tries to score. P2 can defend whatever way they choose, either pressing the ball aggressively or protecting their goal more conservatively.
- If the defender wins the ball, they have 3 seconds to score a goal on a counterattack.
- The round is over if either player scores, if the ball goes out of play, or if the 3-second counterattack is unsuccessful.
- The drill is then reset. After every round, the players switch roles, altering who starts with the ball.
- The first player to score 5 goals wins.
Drill Variations
- Increase the winning goal tally to improve player fitness.
- Set a time limit for the attacking player to score.
- Increase or decrease the size of the playing grid.
- Consider adjusting the points system, rewarding players for tackling, or doubling points for counterattack goals.
Share the post "Soccer Drills With Cones (Dribbling Exercises)"
Joel is a seasoned soccer journalist and analyst with many years of experience in the field. Joel specializes in game analysis, player profiles, transfer news, and has a keen eye for the tactical nuances of the game. He played at various levels in the game and coached teams - he is happy to share his insight with you.